
Progressive Profiling
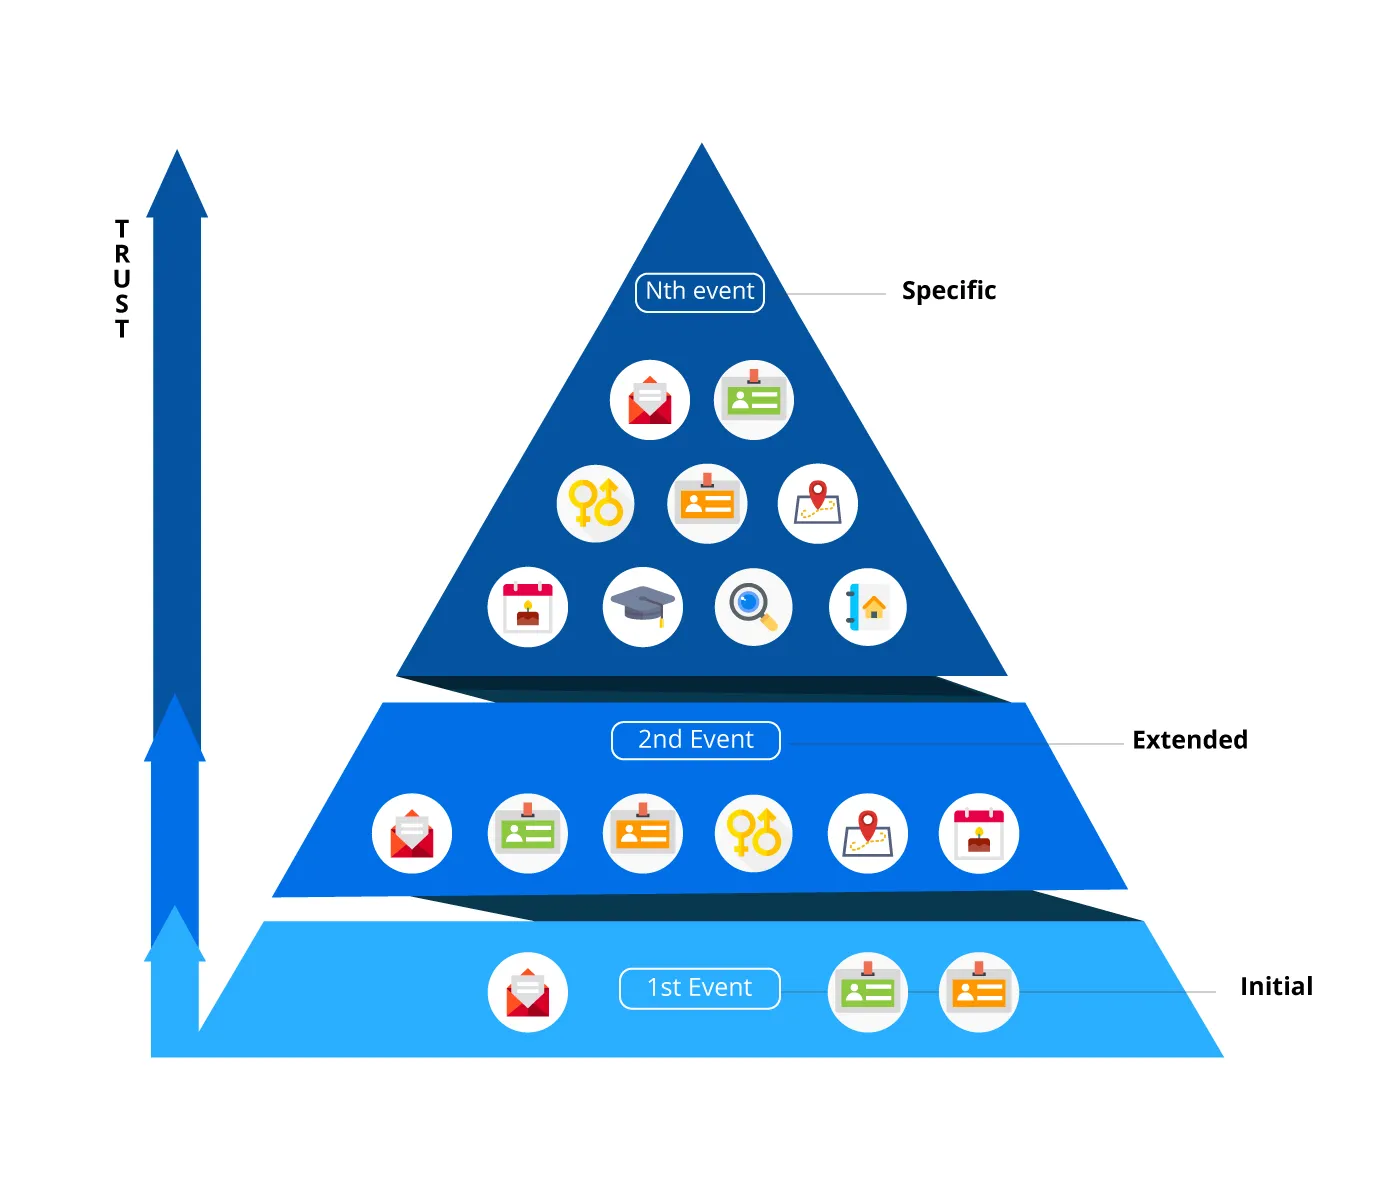
Progressive Profiling is a strategic approach that enables businesses to collect customer information incrementally, enhancing user experience and building trust over time. Instead of overwhelming users with lengthy forms during initial interactions, this method gathers data at various stages, aligning with the customer's journey and comfort level.
The following diagram explains the process of Progressive Profiling:
Common Use cases
By leveraging Progressive Profiling, businesses can enhance user experience, build richer customer profiles, and increase conversion rates without overwhelming users during initial interactions.
Let’s take an example of TechRetail - An Online Electronics Marketplace.
Challenge: TechRetail faced high drop-off rates during user registration due to lengthy sign-up forms. Customers were reluctant to provide excessive details upfront, leading to abandoned registrations and lost potential sales.
Solution: TechRetail implemented Progressive Profiling using LoginRadius to streamline customer data collection over multiple interactions. Instead of requesting all information at once, they gradually gathered details as users engaged with the platform.
Implementation:
- Initial Registration: Users provided only essential details (name, email, and password) to create an account quickly.
- Post-Login Engagement: Upon logging in, users were prompted to add optional details such as phone number, preferred product categories, and location.
- First Purchase Step: Users were asked for shipping addresses and payment preferences at checkout.
- Loyalty Program Enrollment: Frequent shoppers were encouraged to add additional profile details (e.g., birthday, purchase preferences) in exchange for loyalty points and personalized deals.
Outcome:
- Increase in Registrations: Shorter forms reduced friction in the sign-up process.
- Higher Engagement Rates: Gradual data collection made users more willing to complete their profiles over time.
- Improved Personalization: Better customer insights allowed TechRetail to offer personalized recommendations and targeted promotions.
- Boosted Sales Conversion: Streamlined checkout processes and personalized deals led to higher purchase rates.
Conclusion: By leveraging Progressive Profiling with LoginRadius, TechRetail successfully enhanced user experience, reduced registration friction, and improved customer retention, leading to higher conversion rates and increased revenue.
Configuration
You configure Progressive Profiling steps on the Branding → Forms page in the Admin Console.
The Progressive Profiling card appears only when the V2 template is deployed. The card is hidden when the V3 template is deployed.
Progressive Profiling card
The card lists your steps in a table. Click anywhere on a row to open that step in the Form Editor.
| Column | Shows |
|---|---|
| Step | The step's name. |
| Fields | Every field requested in the step, one tag each. A dash (-) means the step has no fields yet. |
| Action | Edit Step and Delete Step. |
Configure a step
The step editor has three columns: the field library on the left, the step preview in the middle, and the field settings on the right. A step strip below the toolbar shows one chip per step and highlights the step you are editing.
- On the Progressive Profiling card, click a step's row or Edit Step. The step opens in the Form Editor.
- In the step strip, click a chip to switch to another step, or click Add step to create a new one.
- Find the field in the left column. Use Search field names to narrow the list. Only DATA FIELDS are available. AUTHENTICATION FIELDS are not shown for Progressive Profiling steps.
- Click + on the field's card, or drag the card into the preview column and drop it where you want the field to appear.
- Review the preview column, which shows the step in the order end users see it. To reorder a field, hover over it to reveal the drag handle (⠿) on its left edge, drag the handle up or down, and release it at the new position. To remove a field, click the delete icon on its row.
- Click the field in the preview. Its settings open in the right column under the field's display label.
- Configure the field as described in Field settings.
- Click Save changes in the top-right toolbar. Reset discards every unsaved edit and restores the step as it was last saved.
Field settings
The settings panel lists the following settings for the selected field.
| Setting | Description |
|---|---|
| Field ID | The stored attribute name. Read-only. |
| Display label | The label shown to end users. Must be 2 to 60 characters. |
| Input type | String, Text, Option, Checkbox, Password, or Email. |
| Options | Shown only when Input type is Option. Enter one key,value pair per line. |
| Validation string | The validation rules applied to the field. Click View validation rules for the supported rules. |
| Required | Makes the field mandatory. |
| Hidden | Collects the field with the step without showing it to users. |
| Read only | Shown only for custom fields. |
Required and Hidden are mutually exclusive. Turning on Required disables Hidden, and turning on Hidden disables Required.
For an Advanced field, such as Addresses, the panel shows a Group label and a Sub-fields list. Use each sub-field's switch to include or exclude it, and expand a sub-field to configure its own settings.
Integration
The LoginRadius Identity Platform offers multiple implementation methods, allowing you to customize customer flows. This guide covers the following deployment approaches:
JavaScript Implementation
Auth Studio Implementation
The LoginRadius Identity Platform supports JS implementation of the Progressive Profiling feature. This guide walks you through all the steps to configure your LoginRadius account and implement Progressive Profiling for your web application.
-
Include LoginRadius JS Library: Directly import the LoginRadius JavaScript interfaces on your page using this link: https://auth.lrcontent.com/v2/js/LoginRadiusV2.js. If you are using HTML, you can directly paste the following script into your HTML file:
<script src="https://auth.lrcontent.com/v2/js/LoginRadiusV2.js"></script> -
Initialize the LoginRadiusV2 Object: Add the following JavaScript code to initialize the LoginRadiusV2 Object on your website.
var commonOptions = {};commonOptions.apiKey = "<your loginradius API key>";commonOptions.appName = "<LoginRadius tenant name>";var LRObject = new LoginRadiusV2(commonOptions); -
Initialize the Progressive Profiling: Initialize the method as explained in the following example:
LRObject.util.ready(function () {LRObject.progressiveProfiling.init();}); -
Implement Progressive Profiling Interface: Include the following code to implement the Progressive Profiling interface in your web application.
var poptions = {};poptions.container = "progressive-container";// If this step is for Social Data Progressive profiling, you must specify a template.// By specifying a template, a Social Login Interface will automatically be loaded in the progressive profiling container div.poptions.templateName = "loginradiuscustom_tmpl_progressive";///poptions.onSuccess = function (response) {console.log(response);};poptions.onError = function (response) {console.log(response);};LRObject.progressiveProfiling.execStep("Step Name", poptions);<div id="progressive-container"></div>; -
Use the following snippet in your code if you would like to show progressive profile fields to customers on the profile page. This will allow the user to edit the progressive profile fields.
var LRObject = new LoginRadiusV2(commonOptions);LRObject.progressiveProfiling.showInEditor = true;
📌Note: The success callback will return a JSON object {IsPosted: true}
To load the Progressive Profiling interface in your Auth Studio, you are required to perform the following:
-
Navigate to Branding > Auth Studio.
-
Add the following HTML Code to display the Progressive Profiling Interface after closing the "login-container" div of auth.aspx page.
<div id="progressive-container"></div> -
Add the following JavaScript code in Auth - Before Script to initialize the Progressive Profiling method.
LRObject.util.ready(function() {LRObject.progressiveProfiling.init();}); -
Add the following code to implement the Progressive Profiling interface, and click the Save button.
var popotions = {container: "progressive-container",templateName: "loginradiuscustom_tmpl_progressive",onSuccess: function(response) {console.log(response);window.location = 'profile.aspx';},onError: function(response) {console.log(response);}};LRObject.progressiveProfiling.execStep("Step_Name", popotions); -
Use the following JavaScript snippet to capture the access token on your page.
function getParameterByName(name) {name = name.replace(/[\[]/, '\\[').replace(/[\]]/, '\\]');var regex = new RegExp('[\\?&]' + name + '=([^&#]*)');var results = regex.exec(location.search);return results === null ? '' : decodeURIComponent(results[1].replace(/\+/g, ' '));}var access_token = getParameterByName("token");
While this guide focuses on these methods, you can achieve deployment using any supported implementation approach.
Best Practices
-
Start Simple: Begin by collecting only essential information to minimize user friction.
-
Align with User Interactions: Request additional data during natural engagement points, such as after a set number of logins or when accessing new features.
-
Maintain Transparency: Inform users why specific information is requested and how it will enhance their experience.
-
Ensure Data Privacy: Adhere to data protection regulations and communicate your privacy policies to users.
Businesses can build richer customer profiles by implementing progressive profiling, ensuring a seamless and user-friendly experience. This approach enhances data quality and fosters trust and engagement with users.