
Deploy and preview
Once a template is designed, you preview it to confirm it looks and behaves the way you expect, then deploy it to make it live. Preview and deployment both happen in Branding → Auth Studio, from the template editor.
Build a shareable link and open the template on your LoginRadius Hosted Domain, without touching a custom domain.
Publish the template as the default so it serves every unmapped domain, or map it to specific custom domains.
Open the live page on each mapped domain to confirm the deployed template is correct.
The LoginRadius Hosted Domain
Every tenant has a hosted domain that LoginRadius serves your Auth pages from, with no DNS setup:
https://<your-tenant>.hub.loginradius.com/auth
Replace <your-tenant> with your LoginRadius tenant name. This URL renders the deployed template exactly as an end user sees it, so it is the place to test a template before you point a custom domain at it. You exercise the real hosted page while keeping production domains untouched.
The base URL defaults to the Login screen. Append an action parameter to open a specific screen, for example ?action=register or ?action=forgotpassword. For the full list of screen actions, see SDK Options.
Preview a specific style
When a template holds more than one Style set, pass the s= parameter to load a specific one on the hosted domain:
https://<your-tenant>.hub.loginradius.com/auth?s=light
https://<your-tenant>.hub.loginradius.com/auth?s=dark
The value is the name of a style set in the template. This lets you check each variant on the same URL without deploying a separate template. The s= parameter also works on a Custom Domain.
The LoginRadius Hosted Domain must be enabled for your tenant. When you map a Custom Domain, it serves the same pages under your own domain in place of the LoginRadius Hosted Domain.
Preview a template
The Try button in the editor header opens the Preview popup for the template you are editing. Try is available after the template is deployed and its changes are saved, so it always previews a real deployed state. If either is pending, the button stays disabled and shows Deploy template to Try or Save changes to Try.
The Preview popup builds a shareable preview link. Set the options you want to test, then Copy the generated URL or Open preview in a new tab. Share the link so others can test the same flow.
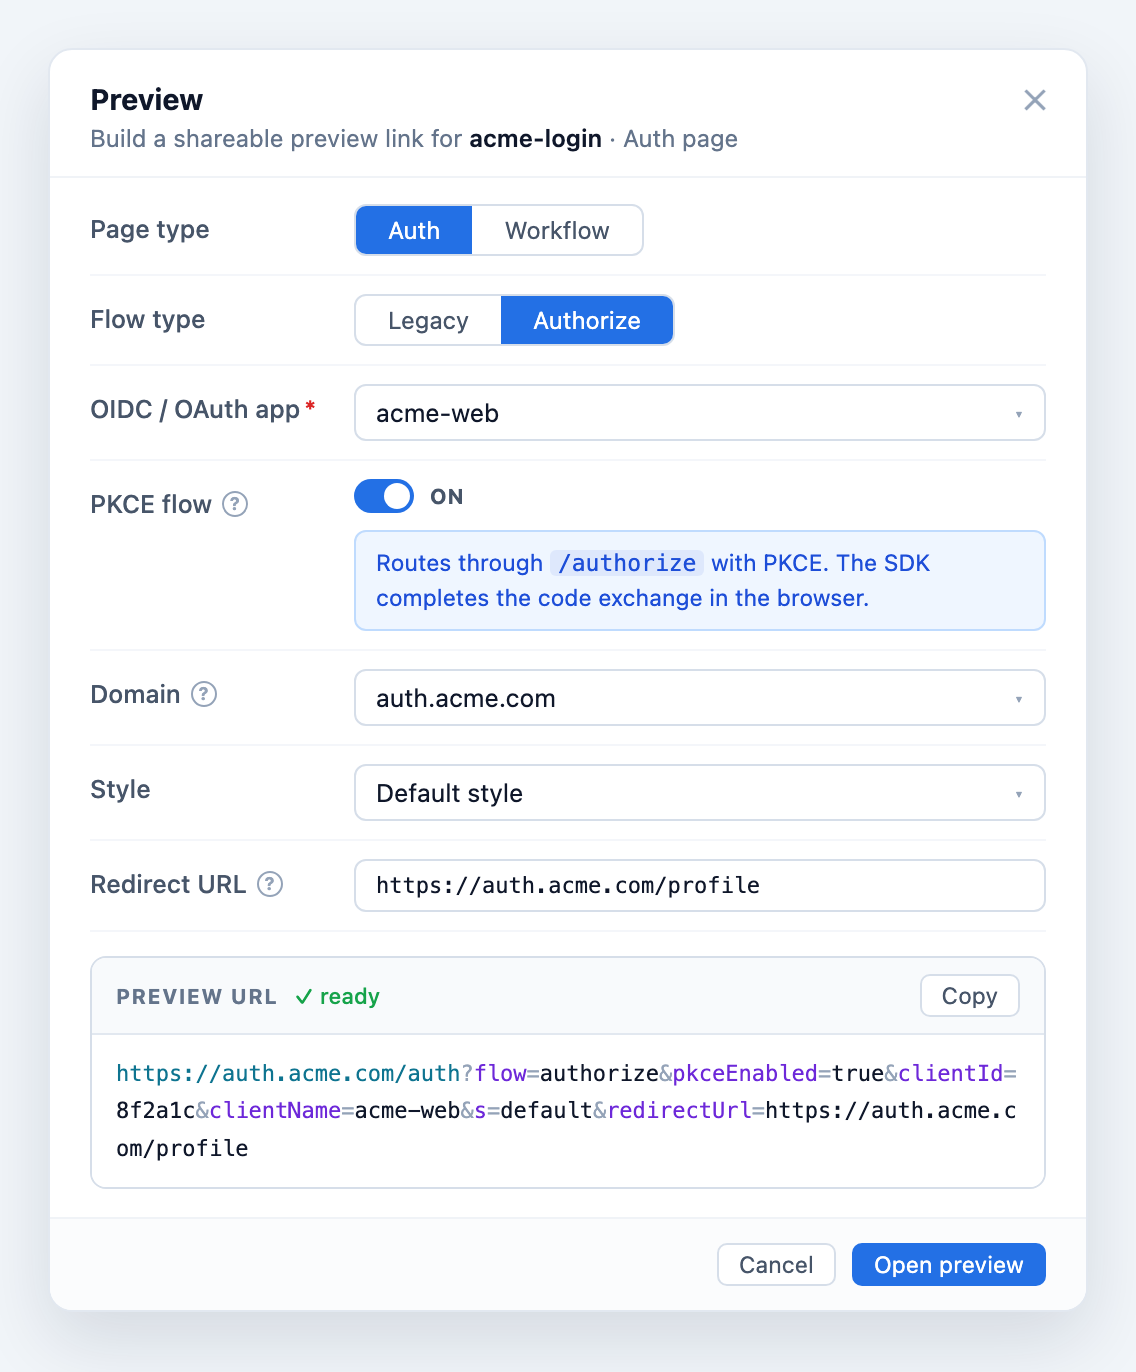
Preview options
Fields appear based on the page type, the flow, and the capabilities enabled for your tenant.
| Option | Description |
|---|---|
| Page type | Auth or Workflow. Workflow is available when Identity Orchestration is enabled and previews a specific orchestration flow. |
| Flow type | Legacy previews direct authentication on /auth. Authorize generates an OpenID Connect / OAuth URL through the /authorize endpoint with a selected app. Authorize is available on new templates. |
| PKCE flow | For the Authorize flow, run the preview with PKCE so the SDK completes the code exchange in the browser. When the selected app enforces PKCE, this stays on. |
| OIDC / OAuth app | The application the preview runs against. Required for the Authorize flow and for Workflow previews. |
| Workflow | The orchestration flow to preview. Required for a Workflow preview. |
| Debug mode | For Workflow previews, run the flow with debug output. |
| Domain | The domain to preview on, chosen from the domains mapped to this template. |
| Style | The Style set to preview, emitted as the s= parameter. Defaults to the template's default style. |
| Redirect URL | Where the page navigates after login. Pre-filled to the /profile page and editable. For the Authorize flow, it must match a Login Redirect URI registered on the selected app. |
The popup assembles these into the final Preview URL and validates it before enabling Copy and Open. If a required option is missing, it tells you what to select.
Use the Legacy flow for a quick look at the login experience. Use the Authorize flow when you need to test the full OIDC / OAuth round-trip, including the redirect back to your application.
Deploy a template
The Deploy Template button opens the deploy modal. From here you publish the template to the LoginRadius Hosted Domain as the default, map it to one or more custom domains, or both. Deploy is available after any pending changes are saved.
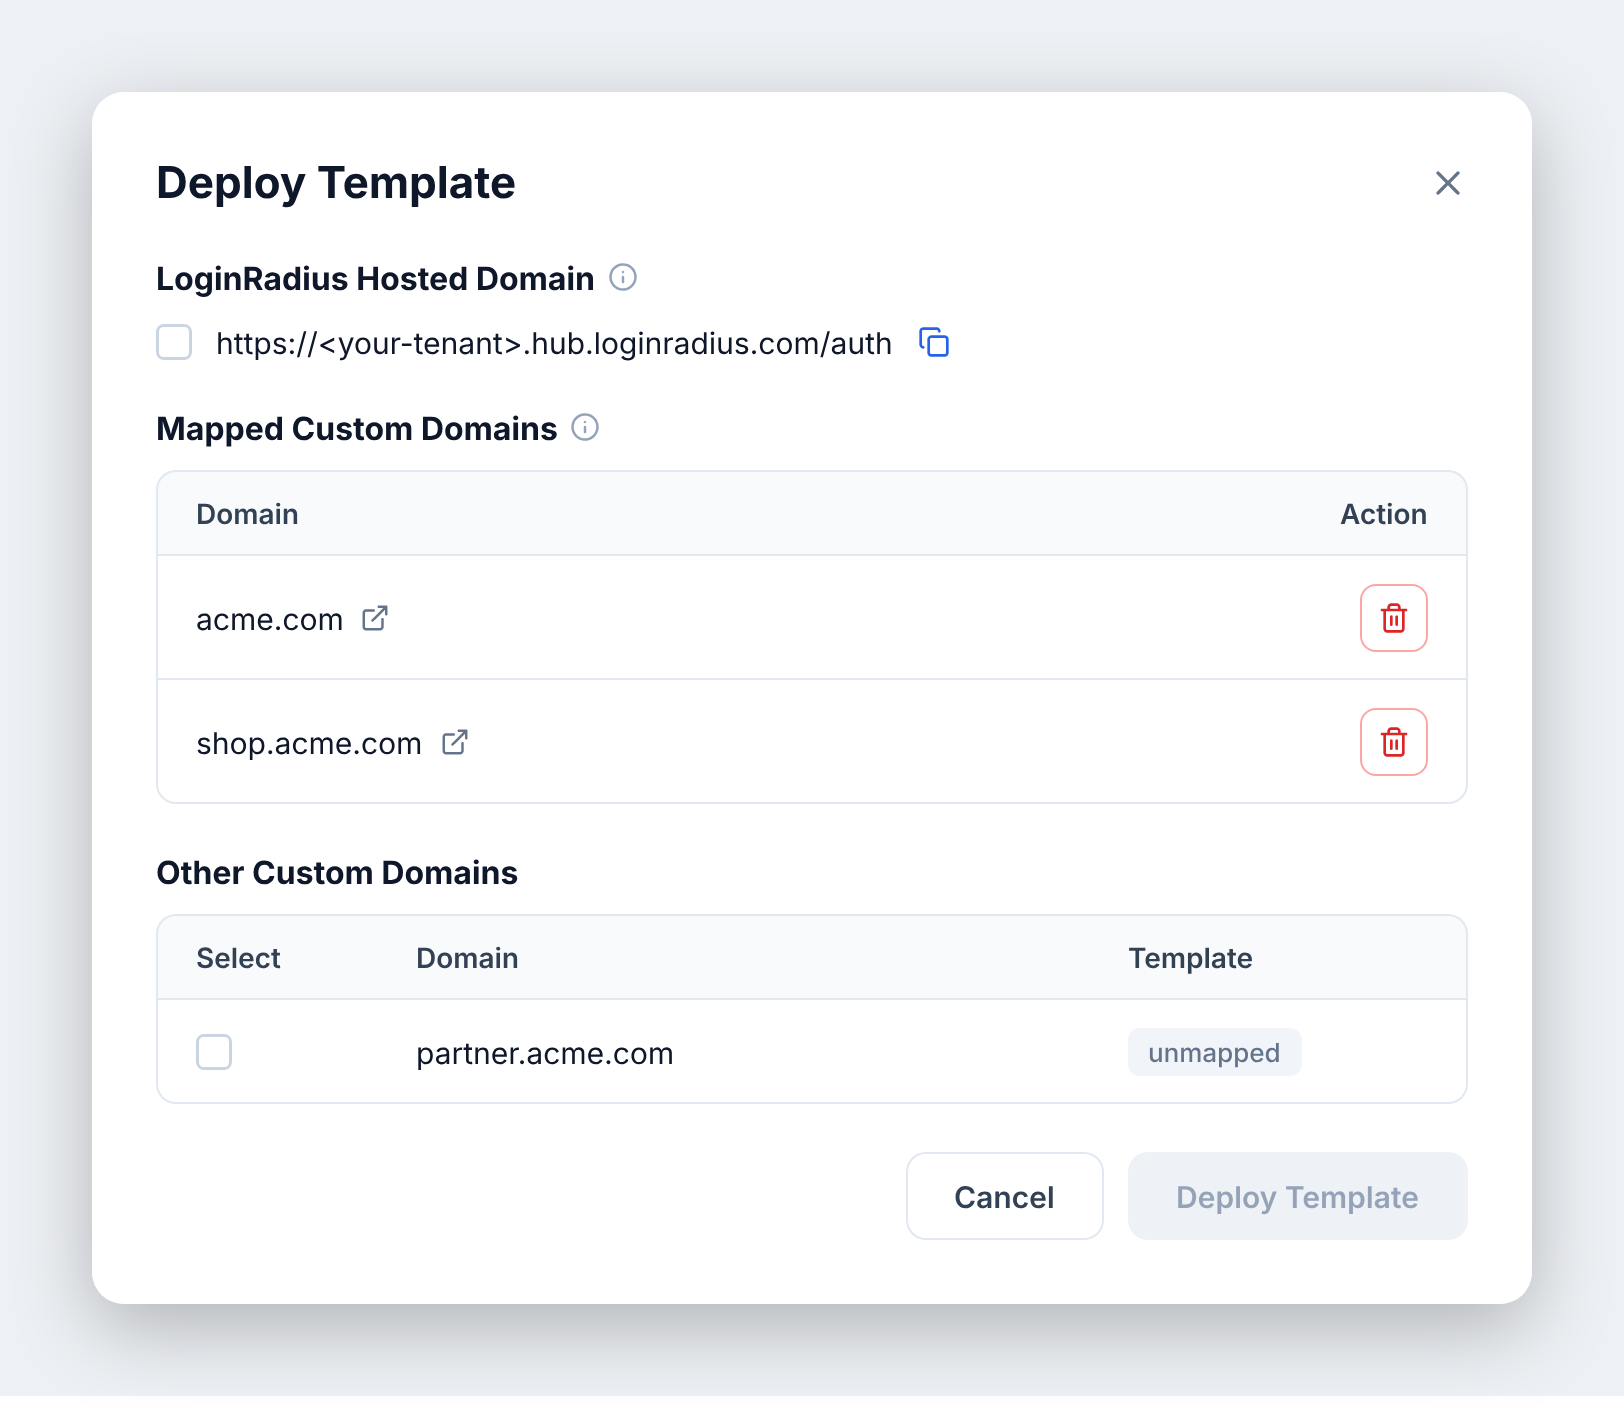
Set as the default template
The LoginRadius Hosted Domain section shows your hosted URL, which you can copy. Select its checkbox to make this template the default. The default template serves every domain that is not mapped to a specific template, so any unmapped domain switches to it. When you change the default, the modal shows which template is being replaced.
Map custom domains
The Custom Domains section lists your verified custom domains. Select the domains you want this template to serve, then deploy. Deploying to a selected domain changes the template currently deployed on it.
Mapping custom domains requires multiple custom domain branding and at least one verified custom domain. If neither is set up, the section explains what is missing. For how to add and verify domains and map branding per domain, see Multiple Custom Domains.
Mapped domains
Mapped Custom Domains lists the domains this template is currently deployed on. Open a domain's live /auth page from the table to verify it, or remove a mapping to stop serving this template there. A removed domain falls back to the default template.
Preview on the LoginRadius Hosted Domain first, confirm the template is correct, then deploy. This keeps a work-in-progress template off your production domains until it is ready.