
LoginRadius Shopify Multipass Integration
LoginRadius provides you with a Shopify Multipass Hosted Plugin to integrate LoginRadius features and functionalities into your Shopify site. This integration makes use of the LoginRadius JavaScript Interfaces along with the LoginRadius Hosted Plugin feature, refer below for instructions on setting up this integration.
Requirements
-
You must have a Shopify Plus (Enterprise ) account to leverage the LoginRadius Shopify SSO connector.
-
You must have a LoginRadius Enterprise Account.
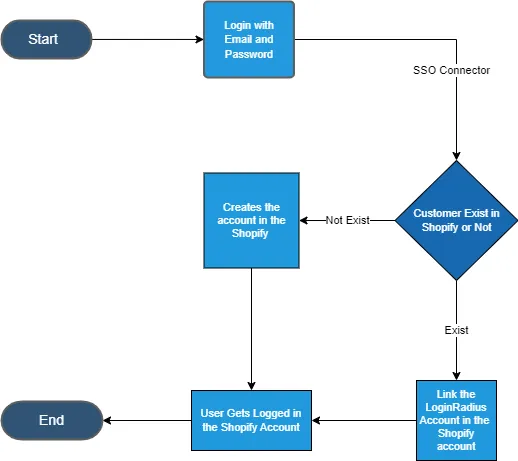
Flow Chart
Multipass Configuration
LoginRadius Console Configurations
This section covers the required configurations that you need to perform to enable Multipass in Shopify.
-
Login to your Shopify account to configure Multipass under:
Settings ➔ Checkout ➔ (scroll to Customer accounts)
-
Set the configuration to Accounts are optional or Accounts are required according to our business requirements. The Accounts are optional options that allow your customers to check out with a customer account or as a guest.
-
Under Enable Multipass login click on Enable Multipass and not down the generated secret as it will be required into LoginRadius Admin Console Configurations.
-
As you have your Shopify configured for Multipass connections, you will need to configure Multipass in your LoginRadius Admin Console as well. Refer the below section for the same.
This section covers the required configurations that you need to perform to configure Multipass in the LoginRadius Admin Console.
-
Login to your LoginRadius Console account and navigate to Integraions > SSO Integrations.
-
Now, click on Add SSO Integraion Button.
-
Click on Shopify Option
-
In the Store Name field, enter the name of your store.
Note: Below are the validation rules that should be taken care of while creating the Store Name.If any of the below validation rule is not followed the error message:
Store Name is not validwill be shown.- Only _ (underscore) and - (hyphen) are allowed as a special charater.
- App name should start with a character.
- Alpha numeric values are allowed.
- No space is allowed in between.
- Minimum length of the app name should be [1] and maximum length up to [60] is allowed.
- Now all the app names are allowed in lowercase only. If the uppercase is entered it will be automatically converted into lowercase.
-
In the Store Url field, enter the URL:
https://your_shop_name.myshopify.com. -
In the Store Login Url field, enter the URL:
https://your-shop-name.myshopify.com/account/login/. -
In the Access Token (optional) field, this field is optional.Please enter the Shopify Access Token.
-
In the Multipass Secret field, enter the Multipass Secret obtained from the above [Shopify configurations] (#multipassconfiguration0). You can find that under the Shopify Admin Panel: Settings> Checkout > (Enable Multipass login).This field is mandatory.
-
In the Data Mapping field, map the Shopify fields under Key column with corresponding the LoginRadius fields under Value column. Refer to the below table for the simple mapping examples. You can map the multiple fields by clicking on the Add Row button.
Note:
-
The Shopify SSO connector supports updating the following Shopify fields from the LoginRadius Consumer Profile:
-
Email
-
First name
-
Last name
-
Addresses
- address1
- city
- Country
- First name
- Last name
- Phone
- Province
- Zip
- Province code, e.g., "ON"
- Country code, e.g., "CA"
- default: true
-
You can map the above Shopify user profile fields with any LoginRadius Normalized field.
-
The LoginRadius array of object data type fields can be mapped by specifying the key property values or array position, e.g.,
Addresses[Type=default].Address1, Addresses[0].Address1. -
The LoginRadius object data type fields can be mapped by leveraging dot notation, e.g.,CustomFields.province_code.
-
LoginRadius does not have a province code field in the Addresses corresponding to the Shopify addresses.province_code field. You can create a Custom Field (CustomFields.province_code) and map it.
-
The email field is required to be mapped to enable the Shopify SSO workflow. The mapping for other fields are optional, e.g., if you are managing the address information in the Shopify Store and you can skip the mapping for the address information.
-
Please see the below table for your reference.
Enter The Key Enter The Value first_name FirstName last_name LastName email Other Email[0].Value addresses.first_namel First Name addresses.last_name Last Name addresses.phone Other PhoneNumbers[PhoneType=Primary].PhoneNumber addresses.province_code Other CustomFields.province_code addresses.country_code Other CustomFields.country_code addresses.address1 Other Addresses[Type=default].Address1 addresses.address2 Other Addresses[Type=default].Address2 addresses.city Other Addresses[Type=default].City addresses.country Other Addresses[Type=default].Country addresses.province Other Addresses[Type=default].State addresses.zip Other Addresses[Type=default].PostalCode -
Now, click on the Save button to save your configurations.
Shopify Theme Integration
This section covers the required configuration to integrate the Shopify theme under the Shopify admin panel. This integration requires editing .liquid files, which can be done through the Shopify theme editor. Refer to the steps below:
Step 1: Login to your Shopify admin Panel.
Step 2: Click on Online Store on the left side menu.
Step 3: Click on Theme in the left side menu.
Step 4: Select the desired theme and click on the Actions and select the Edit Code option.
Step 5: After opening the theme editor, refer to the below section to implement LoginRadius in Shopify.
Part 3: LoginRadius Shopify Plugin Integration
This section covers the LoginRadius Shopify Plugin integration under the Shopify Admin Console. In order to integrate it, you need to extract the Shopify plugin zip, file that you can get from LoginRadius Github.
-
After extracting the above file, upload the Javascript and CSS files into your theme refer the following JavaScript and CSS files. Content:
- raas-settings.js - The javascript file that handles the LoginRadius initializations and functionality. More details on how the various calls in this file work can be found here.
- lr-raas-style.css - The default Styles applied to the LoginRadius Interfaces.
- register.liquid - A sample Register .liquid file.
- login.liquid - A sample Login .liquid file.
-
Extract Shopify.Assets, inside the folder there are several files you are going to use for your LoginRadius Shopify Implementation.
-
Expand Assets option in your Shopify theme editor and click on Add a new assets in the Shopify theme editor.
-
Select both files and upload them.
-
If you are going to use the default social icon theme, you will need to upload two image files inside the same folder iconsprite.svg and iconsprite32.png.
Edit 'theme.liquid' file
In the left side theme editor menu, there is a theme file explorer, this expands the Layouts option, click on the theme.liquid file.
Add LoginRadius core JS file and theme CSS
Add the following tags just before the </head> (closing head tag) tag
{{ 'lr-raas-style.css' | asset_url | stylesheet_tag }}
{{ '//auth.lrcontent.com/v2/js/LoginRadiusV2.js' | script_tag }}
{{ '//code.jquery.com/jquery-latest.min.js' | script_tag }}
Initialize the LoginRadius User Registration options
The LoginRadius User Registration interfaces require the following options: apiKey, appName and also an SOTT token (unless you prefer to use Google ReCaptcha, add the following script just before the </body> (closing body tag).
<script type="text/javascript">
var raasoption = {};
raasoption.apiKey = <API KEY>;
raasoption.appName = <APP NAME>
raasoption.hashTemplate= true;
raasoption.sott = <SOTT>;
raasoption.verificationUrl = window.location;
raasoption.resetPasswordUrl = window.location;
var LRObject= new LoginRadiusV2(raasoption);
var lrshopifystore = <Name Of Your Shopify Store>
</script>
Add LoginRadius User Registration Shopify extension library
Add the following tag just after the 'Options initialization script'
{{ 'raas-settings.js' | asset_url | script_tag }}
Add SSO code
For best practice with LoginRadius Single-Sign-On (SSO), simply add the following two code blocks to each page where Single Sign-On is required. You need to add this to your theme.liquid file. The first code block is for the scenario when your user is not logged into Shopify but your user is logged in from other SSO family sites. The second one is used after your user is logged into Shopify, but has been logged out from other SSO family sites. Put it just after the 'raassettings. js' script tag from the above steps.
{% if customer %}
  <script type = "text/javascript">
    $(document).ready(function() {
        var check_options= {};
      check_options.onError = function(response) {
		// On Error
        // If user is not log in then this function will execute.
                window.location = 'https://{{ shop.domain }}/account/logout';
        };
      LRObject.util.ready(function() {
      	LRObject.init("ssoNotLoginThenLogout", check_options);
      });
     $("a:contains('Log out')").on('click', function() {
        lrLogout('/account/logout');
        return false;
      });
    });
 </script>
{% else %}
  <script type = "text/javascript">
   $(document).ready(function() {
      var ssologin_options= {};
      ssologin_options.onSuccess = function(data) {
      // On Success
      //Write your custom code here
        if (data.isauthenticated && document.referrer != "https://checkout.shopify.com/"){
          lrLogout('/account/logout');
        }else if (data.isauthenticated) {
           exchangeMultipassToken(data.token);
          }
      };

      LRObject.util.ready(function() {
     	 LRObject.init("ssoLogin", ssologin_options);
      });
    });
 </script>
{% endif %}
Login
Expand the templates option under directory Template, select customers/login.liquid option, select all and then delete everything on this page.
Important: In this page you need to make sure jQuery is properly imported as it varies on different themes if jQuery loads perfectly then it’s good else you can import the latest version manually by adding the following line at the top of your page.
{{ '//code.jquery.com/jquery-latest.min.js' | script_tag }}
Then copy and paste the code from the file 'login.liquid' from the zip folder. This file contains the interface and control for all the LoginRadius User Registration modules, it contains side by side social and traditional login interfaces, a message span to show the message, link for 'forgetpassword', and handles for 'forget password' and 'email verification'.
Registration
Expand the templates option and click on customers/register.liquid. To implement the registration form on Shopify Register page select everything in the file and replace it with the file 'registration.liquid' in the zip folder.
It will generate the user registration form for you with validation logic. All the fields are customizable when the form is being submitted, a verification email will be sent out to the email address that has been just filled in. The user will be officially registered after the verification link has been clicked.
Customizations
This implementation requires the LoginRadius JavaScript Interface, if you want to customize the look and feel or even make some functionality changes.