
LoginRadius as IDP with JIRA as SP
This document explains how you can establish SSO between LoginRadius Identity Provider and JIRA where JIRA is a service provider. The implementation is based on the SAML protocol.
Let’s say you are using the LoginRadius Identity Platform for your company portal and require that your employees access the JIRA account using the portal’s credentials. Reason being that you don't want the employees to remember the multiple login credentials (one for portal and one for JIRA account).
JIRA as SP Configuration Guide
This guide will take you through the setup and implementation of the LoginRadius as IDP and JIRA as SP based SSO. It covers everything you need to configure in your LoginRadius Admin Console and JIRA Application.
Pre-requisites:
- An administrator account for JIRA.
- JIRA Software Server based on your machine OS.
- SAML feature is enabled for your account in LoginRadius Admin Console.
- LoginRadius JIRA Plugin.
- A public certificate(X.509) and private key pair are required to connect applications with LoginRadius. Learn how to manage certificates and private keys.
Part 1 - Configuration in JIRA
This section covers the required configurations that you need to perform in the JIRA application to implement this flow.
NOTE: If you have enabled or added a Custom Domain for your existing application, please be aware that you should replace the URL
https://<LoginRadius tenant name>.hub.loginradius.com/withhttps://<Your Custom Domain>/in fields such as Issuer, EntityID, Login and Logout URLs, or any fields having the same format.
Step 1: Register for a JIRA account, and you should be having the Admin Access.
Step 2: Download the JIRA software server to host it on your server.
Note: Download and Install the JIRA software server based on your machine OS, you can select it from the dropdown available at the above link.
Step 3: Download the LoginRadius JIRA plugin (SAML Single Sign-On).
Step 4: Start the JIRA server and navigate to http://localhost:8080.
The following screen will appear:
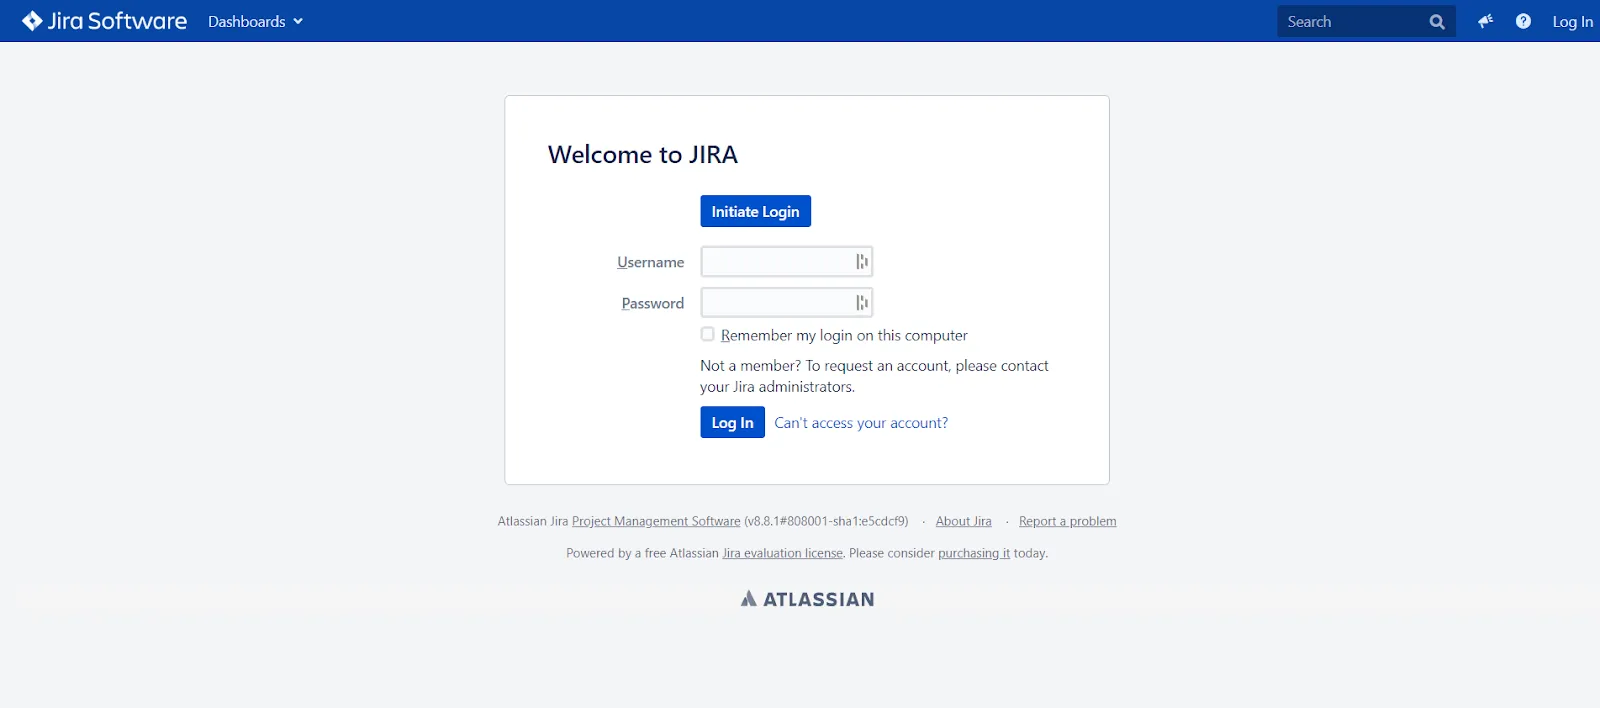
Step 5: Log in to your JIRA account.
Step 6: Click the Settings > Manage Apps as highlighted in the screen below:
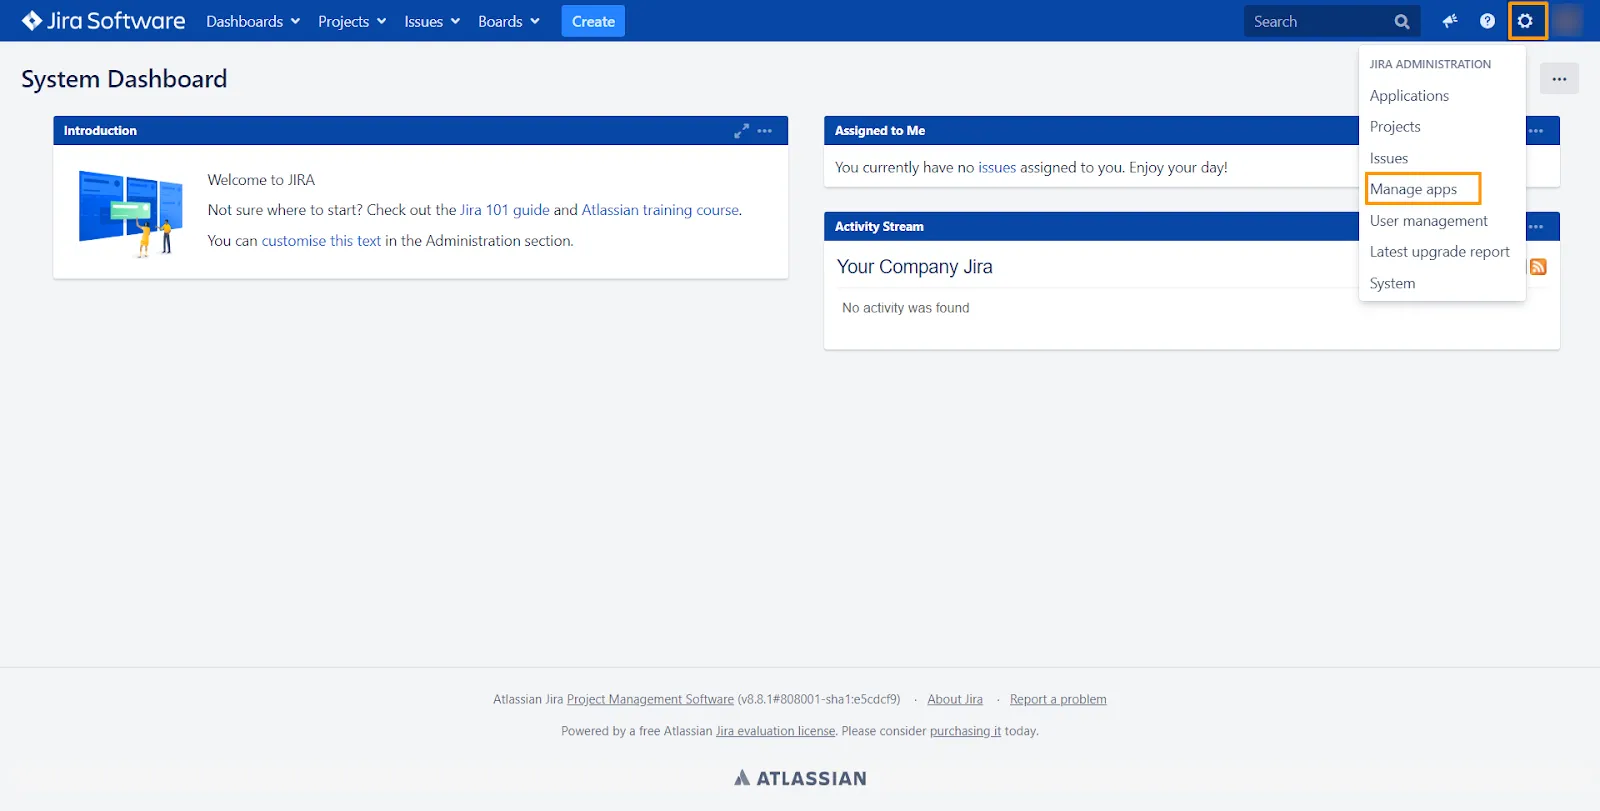
The Manage App screen will appear.
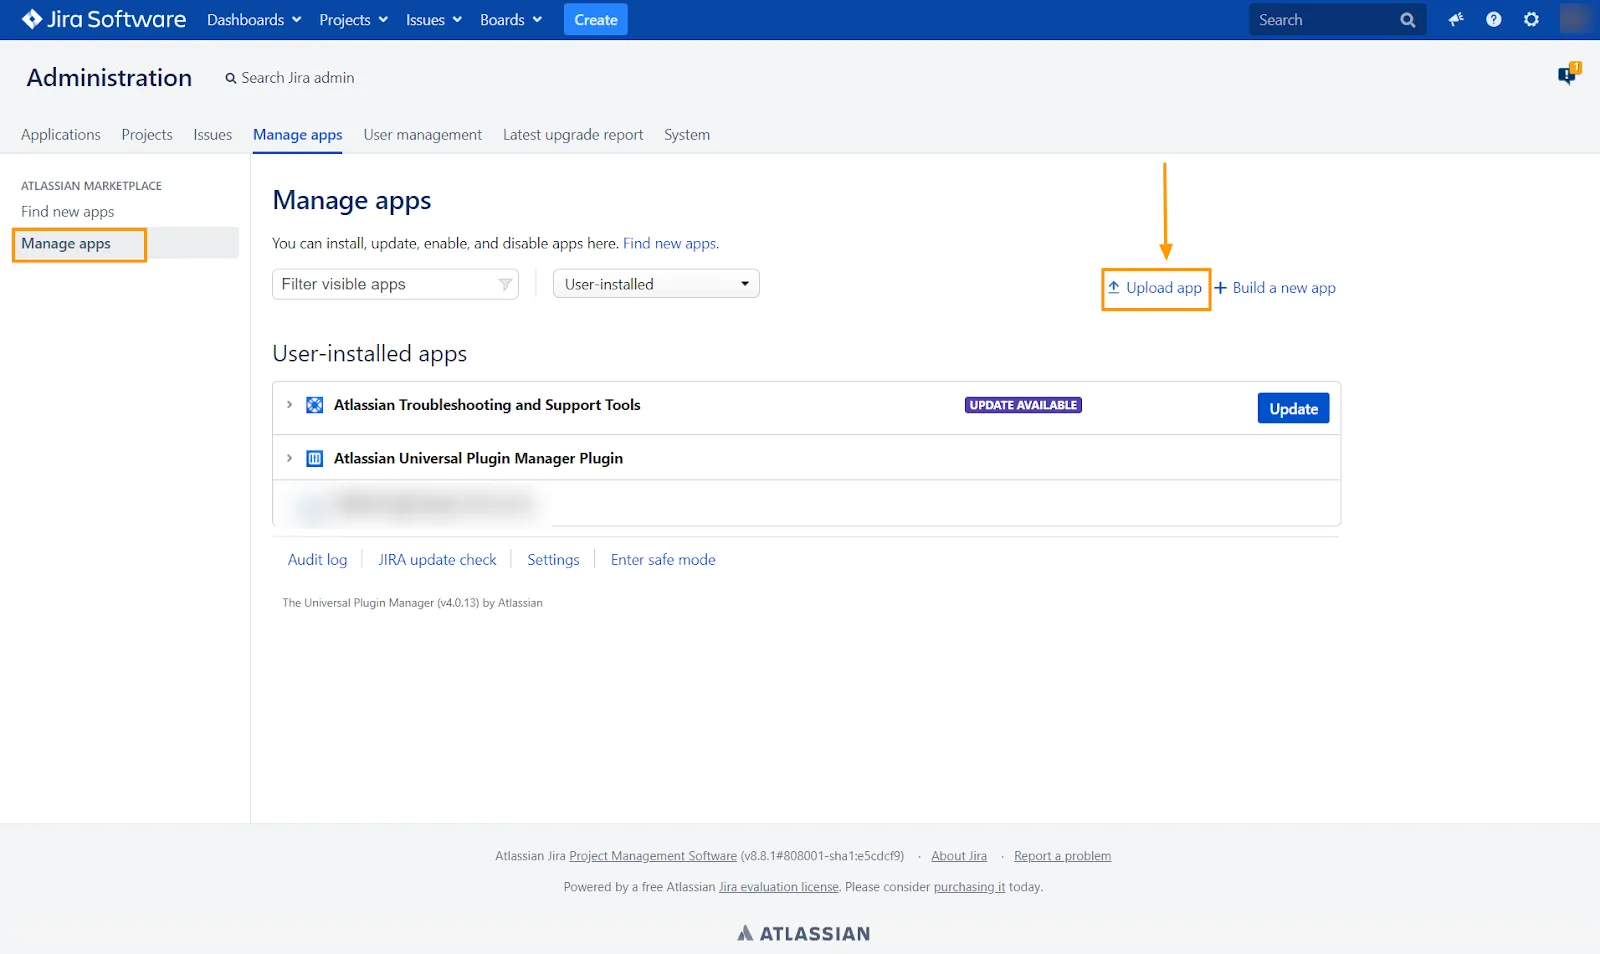
Step 7: Click the Upload App link as highlighted in the screen below:
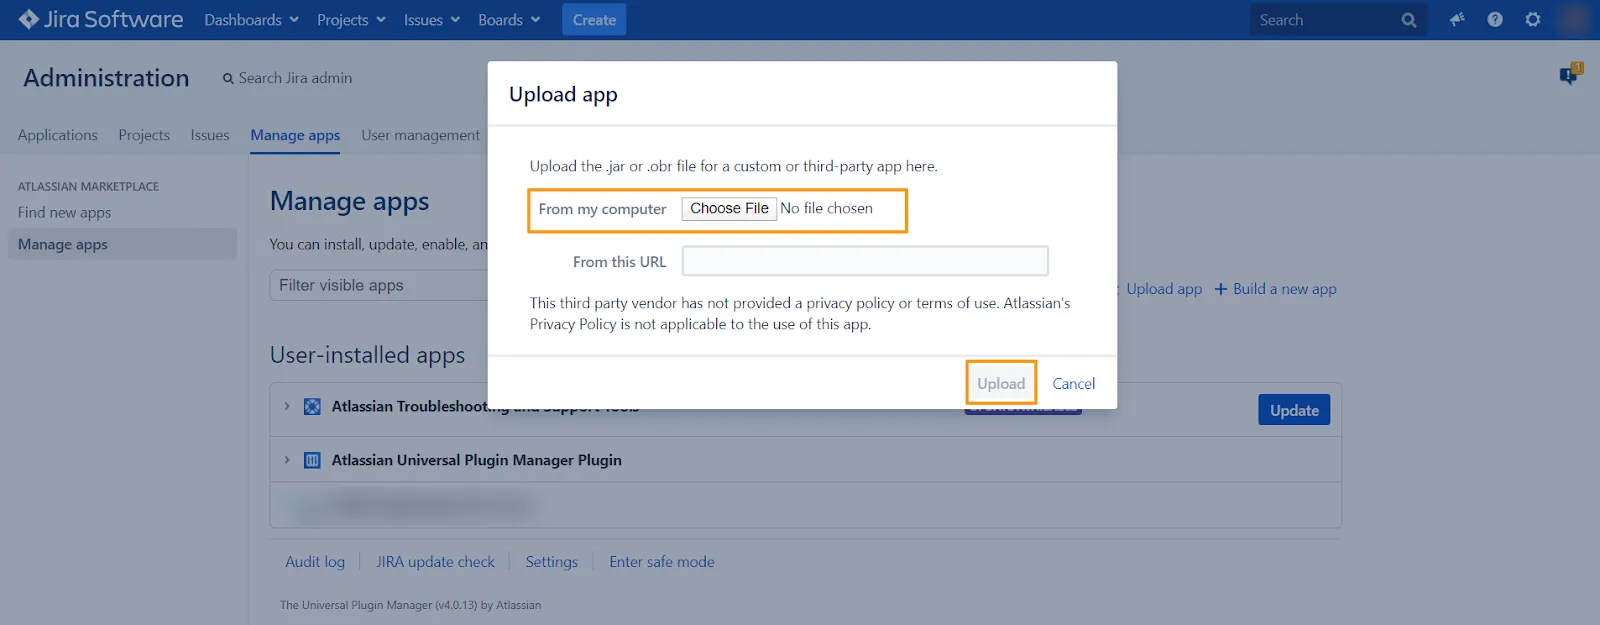
Step 8: Upload the LoginRadius JIRA(SAML Single Sign-On) Plugin by browsing the respective file as highlighted in the screen below:
The uploaded plugin will appear on the Manage Apps screen as highlighted in the screen below:

Step 9: Click the added plugin, the Configure option will appear on the screen as highlighted in the screen below:
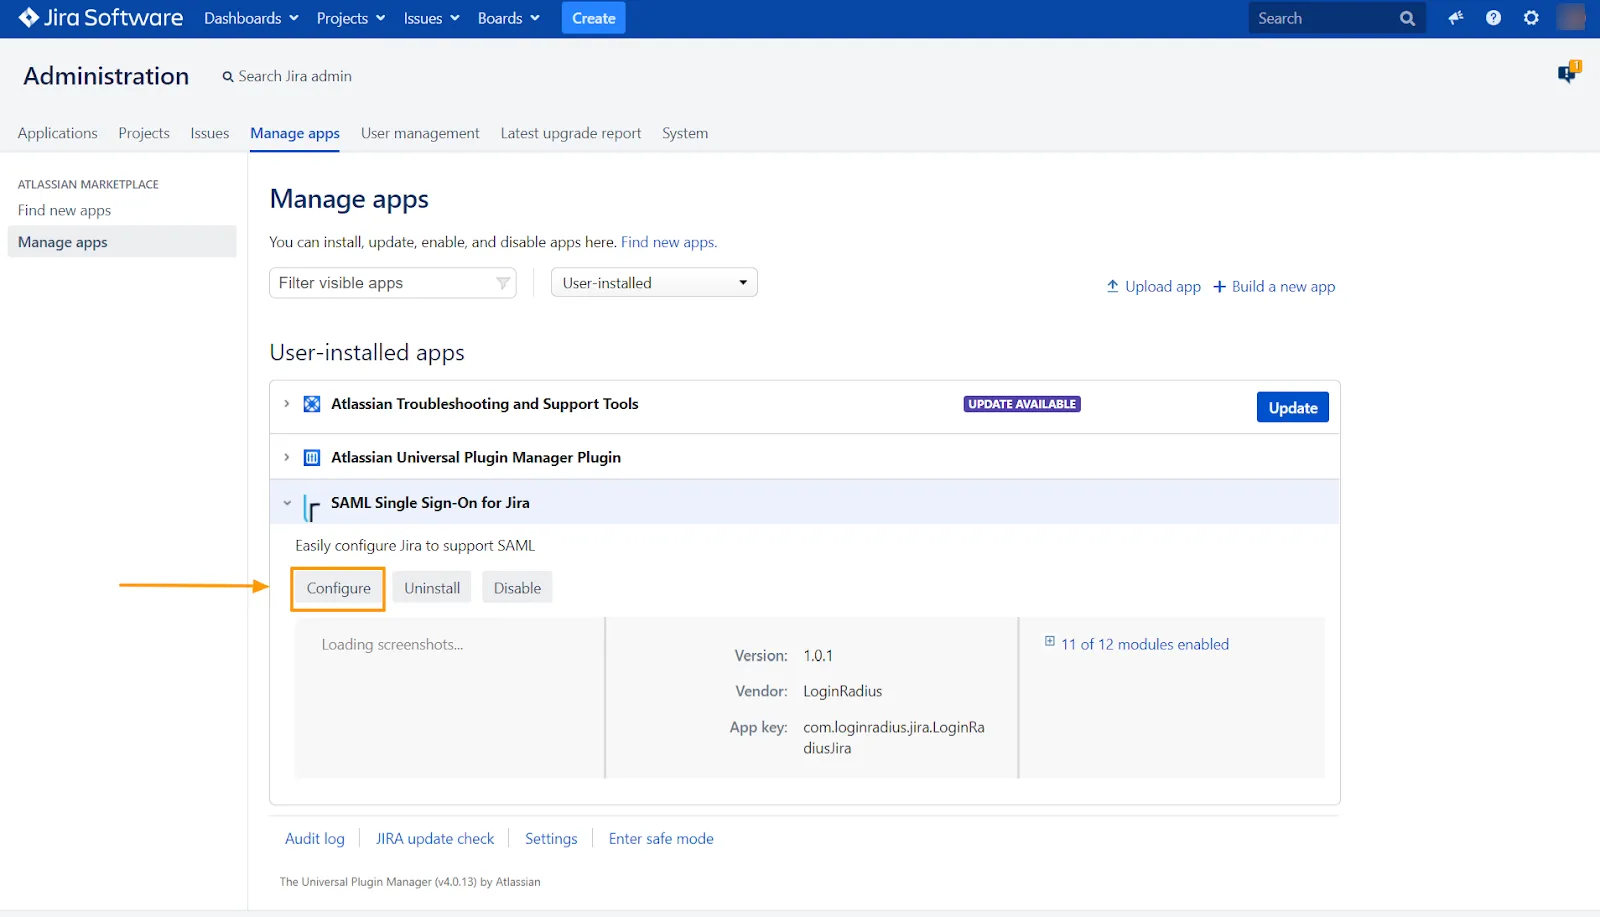
Step 10: Click the Configure button to configure the LoginRadius JIRA plugin.
The following screens will appear:
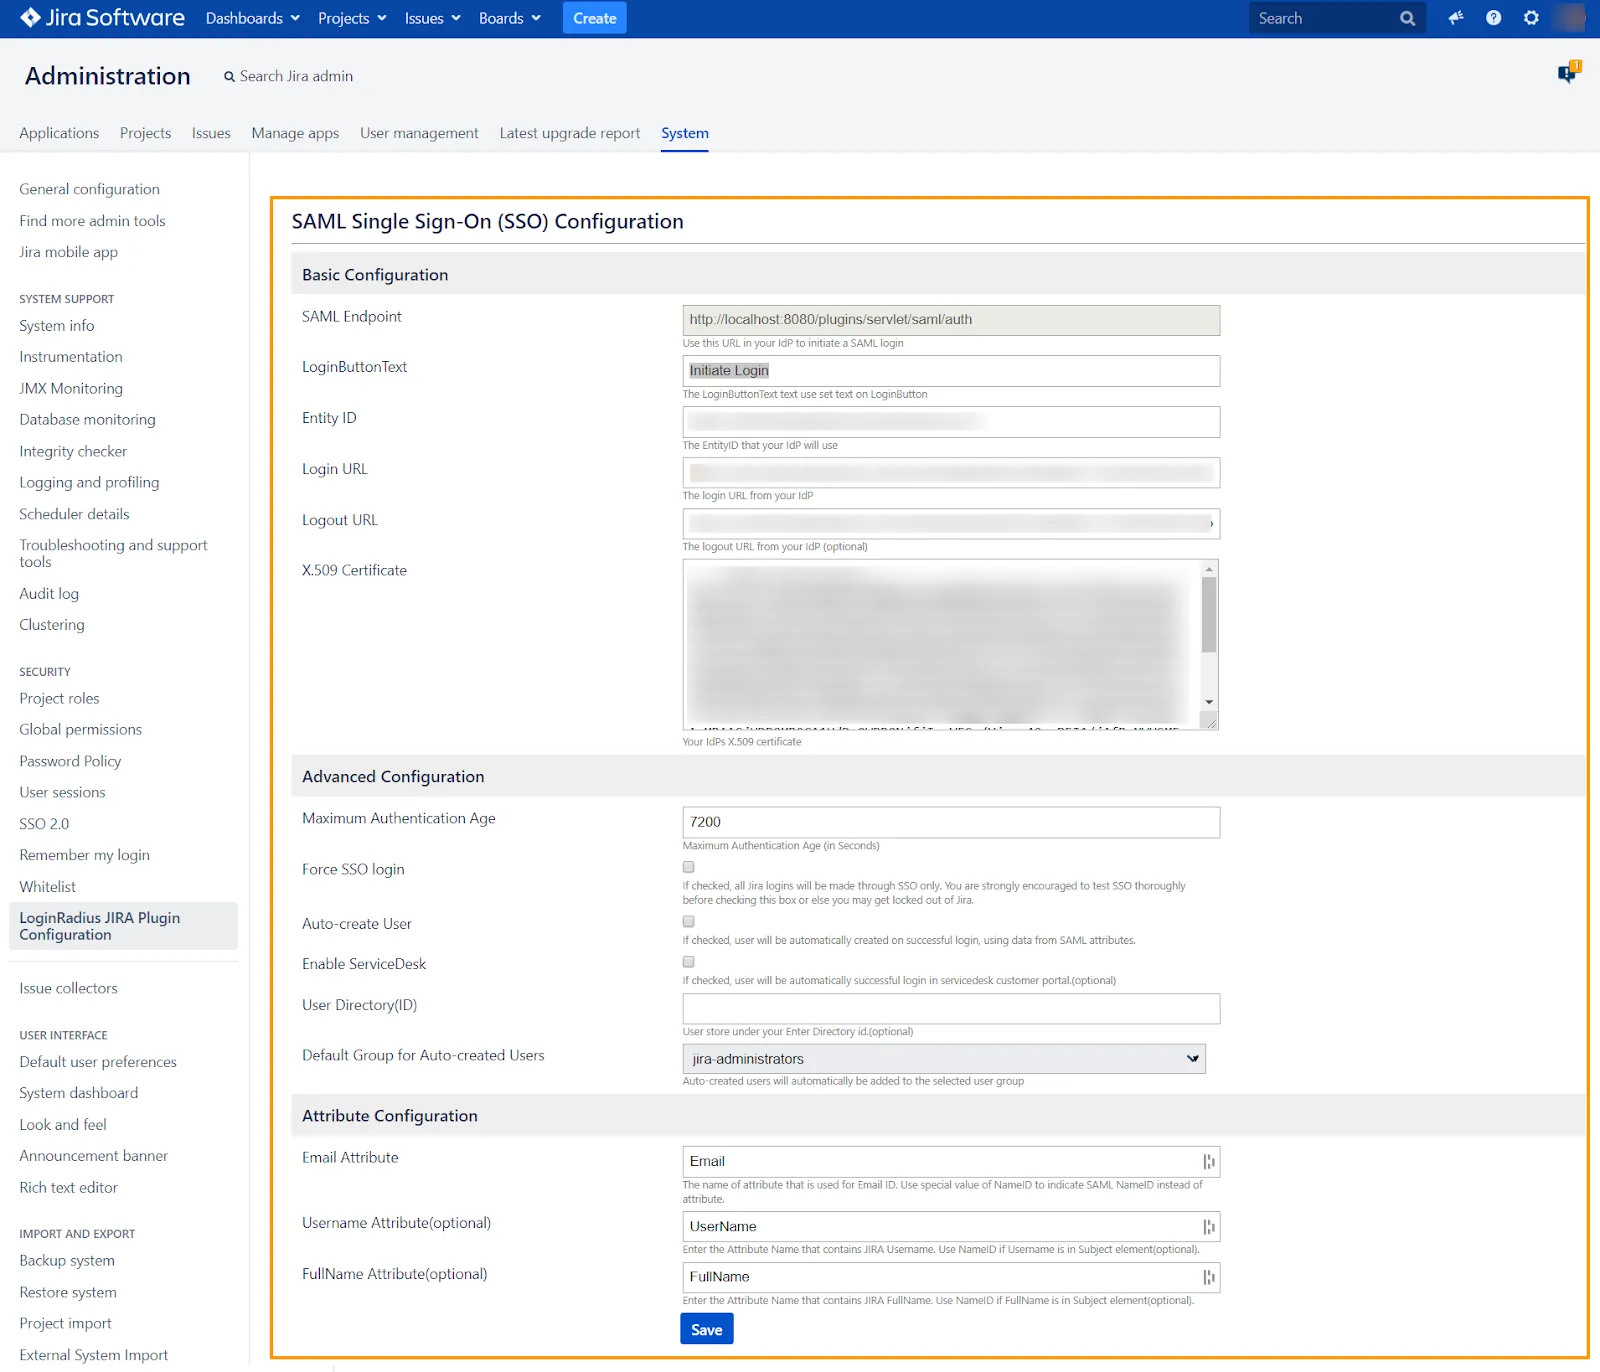
Step 11: Configure the LoginRadius Jira app, as explained below:
Basic Configurations
-
SAML Endpoint:
http://localhost:8080/plugins/servlet/saml/auth, use this URL in your IdP to initiate a SAML login -
LoginButton Text: Give a name to your login initiator button.
-
Entity ID: Your site URL. For example:
https://<your-app-name>.hub.loginradius.com/ -
Login URL:
https://<LoginRadius tenant name>/service/saml/idp/login?appname=<SAMLAppName> -
Logout URL:
https://<LoginRadius tenant name>/service/saml/idp/logout?appname=<SAMLAppName>Note: Your apiKey and SAML App name can be found under the LoginRadius Tenant Settings -> API Configuration.
-
X.509 Certificate: Add your X.509 certificate value here. For more information on how to generate a certificate and key, you can refer to this document.
Note: You need to set End Of Line Conversion for Linux Server in X.509 certificates.
Advanced Configurations
- Maximum Authentication Age: Maximum Authentication Age (in Seconds) i.e., for how long the SSO session remains active.
- Force SSO login(optional): If checked, all Jira logins will be made through SSO only. You are strongly encouraged to test SSO thoroughly before checking this box. Otherwise, you may get locked out of Jira.
- Auto-create User(optional): If checked, the user will be automatically created on successful login, using data from SAML attributes.
- Enable ServiceDesk(optional): If checked, your users will be automatically logged in the ServiceDesk customer portal.
- User Directory ID(optional): Created users are stored with entered Directory ID.
- Default Group for Auto-created Users: Auto-created users will automatically be added to the selected user group.
Attribute Configurations
- Email Attribute: Enter the attribute name that contains email values to be further mapped with the LoginRadius
Emailfield. - UserName Attribute(optional): Enter the attribute name that contains JIRA UserName. Use NameID if UserName is an object element of UsenameID through object notation like UsernameID.username(optional). For Username mapping, you can add
UserNamein the field area. - FullName Attribute(optional): Enter the attribute name that contains JIRA FullName. Use NameID if FullName is in the Subject element(optional). For FullName mapping, you can add
FullNamein the field area.
Part 2 - Configuration in LoginRadius Admin Console
This section covers the required configurations that you need to perform in the LoginRadius Admin Console to implement the SSO flow.
NOTE: If you have enabled or added a Custom Domain for your existing application, please be aware that you should replace the URL
https://<LoginRadius tenant name>.hub.loginradius.com/withhttps://<Your Custom Domain>/in fields such as Issuer, EntityID, Login and Logout URLs, or any fields having the same format.
Step 1: Log in to your LoginRadius Console account and navigate to Integrations > SSO Integrations.
The following screen will appear:
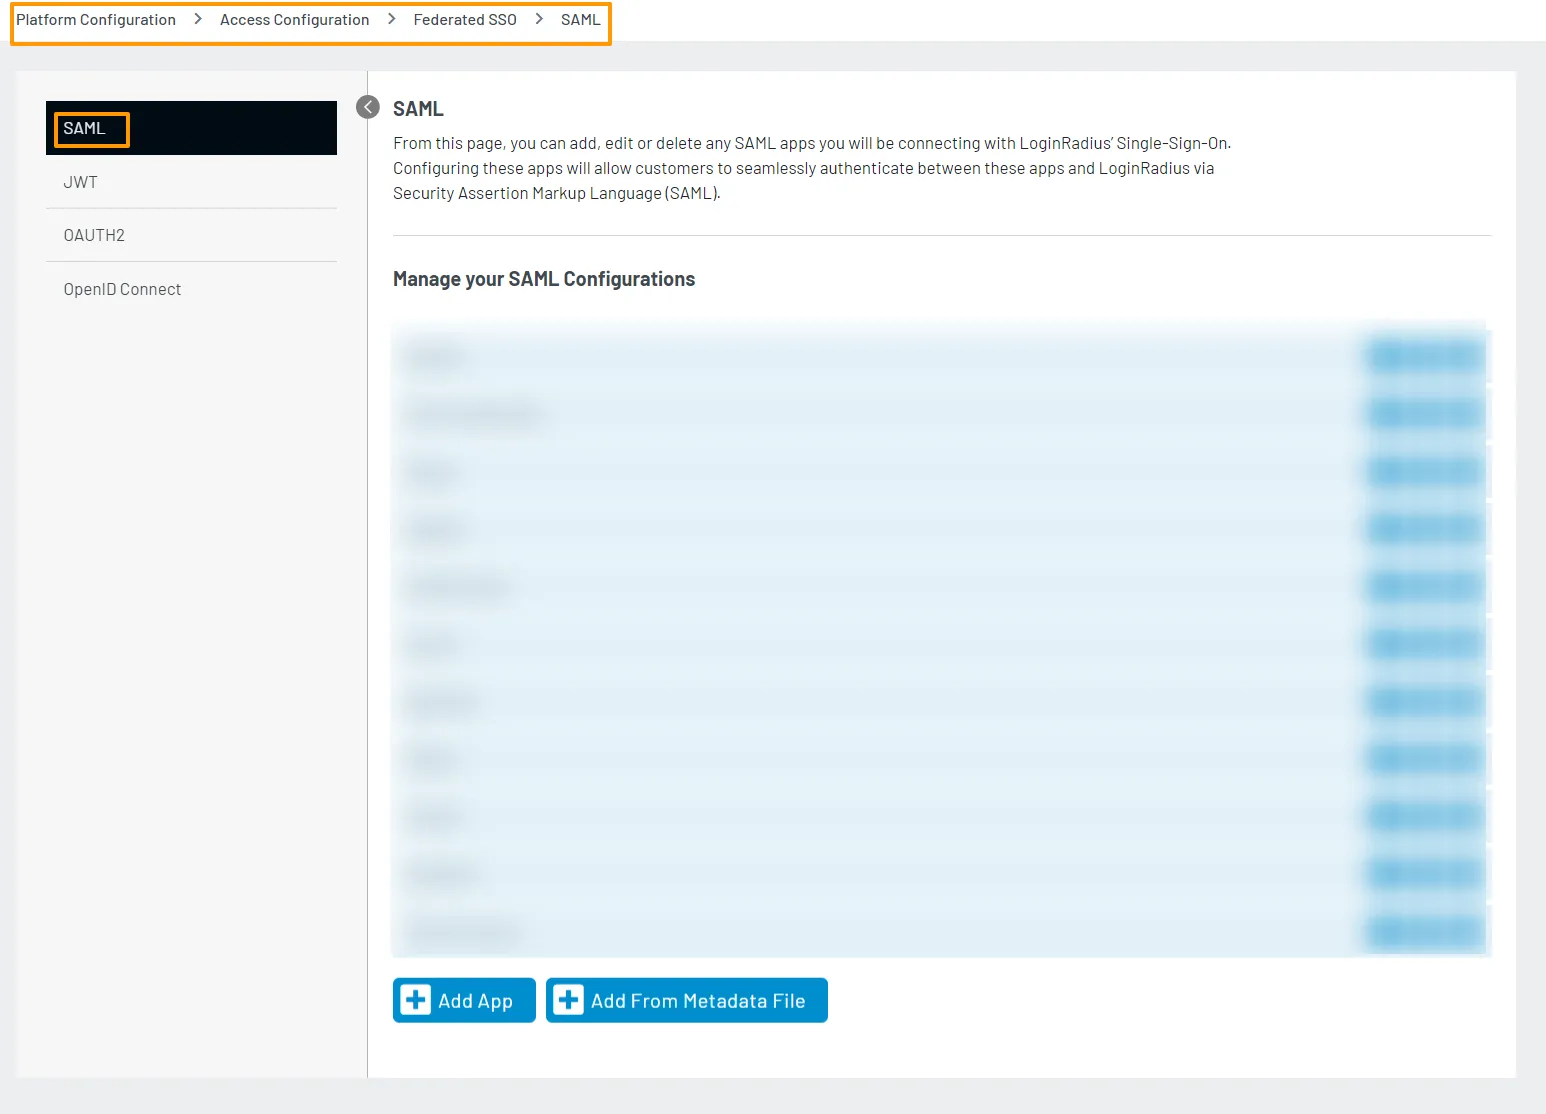
Step 2: To configure the details in the Admin Console, click the Add App button displayed in the above screen. The following screen will appear:

Step 3: Select SAML 2.0 in the SAML Version dropdown.
Step 4: Select Idp Initiated Login flow from the Login Flow.
Step 5: Enter your Id Provider Certificate Key.
Step 6: Enter your Id Provider Certificate.
Note: The same X.509 certificate and the respected key will be used here, which was created and used earlier for adding in JIRA configurations.
Step 7: In the SAML AppName field, enter a unique App name. This app name will be used by LoginRadius to identify the request originating source.
Step 8: For Attributes, you need to map the LoginRadius fields with the JIRA fields.
- In Name: Enter the fields name defined in Jira attribute
- In Format: Enter
urn:oasis:names:tc:SAML:2.0:attrname-format:unspecified. - In Value: Enter the LoginRadius mapping field name.
Step 9: Select urn:oasis:names:tc:SAML:2.0:nameid-format:unspecified form Name Id Format dropdown.
Step 10: Enter https://<LoginRadius tenant name>.hub.loginradius.com/auth.aspx in Login URL.
Step 11: For After Logout URL enter https://<LoginRadius tenant name>.hub.loginradius.com/auth.aspx?action=logout
Step 12: Enter http://localhost:8080/logout In the Service Provider Logout URL field.
Step 13: Enter http://localhost:8080/plugins/servlet/saml/auth under Assertion Consumer Service Location.
Note: You can find this URL from the basic JIRA configurations mentioned under SAML endpoint field.
Step 14: Select urn:oasis:names:tc:SAML:2.0:bindings:HTTP-POST from Default Request Binding dropdown.
Step 15: For RELAY STATE PARAMETER enter RelayState.
Step 16: Enter http://localhost:8080/jiraSAML under App Audiences.
Step 17: Select HTTP Post from SSO Method.
Step 18: Click Add a SAML App button to add the SAML app.
Part 3 - Customer Login in JIRA via LoginRadius
After completing the above configuration, your JIRA login will appear on http://localhost:8080
The following screen will appear:
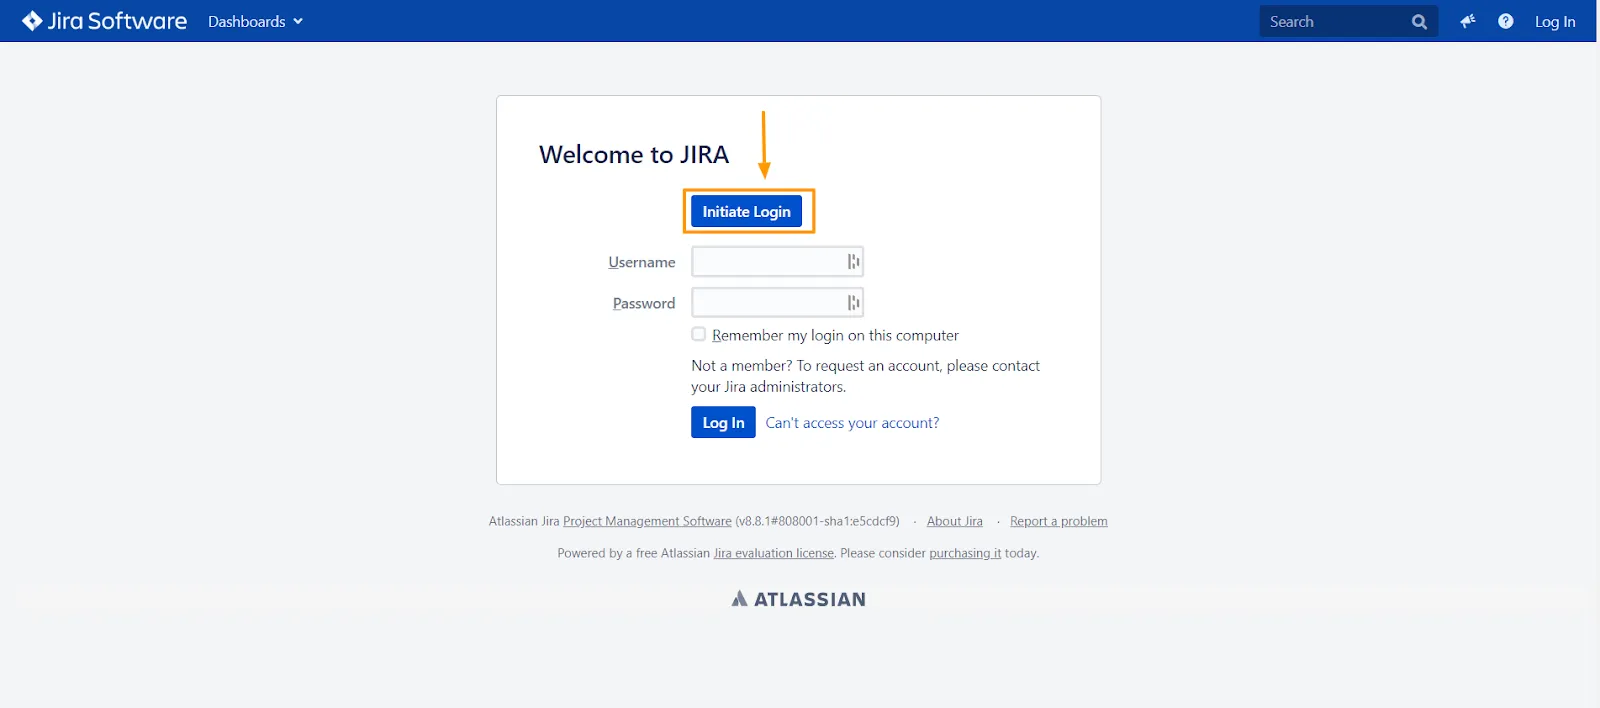
Step 1: Click the Initiate Login button, the button name will appear whatever you’ve specified in your JIRA plugin configuration under LoginButton Text.
The following screen will appear:

Step 2: Login through your LoginRadius credentials, and after successful login, you will be redirected to your JIRA application.
Note: JIRA Software Server is hosted locally in this case; you can host it on your private servers. Hence the localhost domains will be replaced by your domains, which need to be updated as per the changes.