
Roles and Permissions
A well-designed customer registration system incorporates role-based access control to regulate user permissions effectively. LoginRadius provides three distinct methods for defining and managing customer access, allowing businesses to enforce security policies and customize user experiences. These access control mechanisms ensure that customers can only access authorized sections of an application, enhancing both security and usability.
LoginRadius provides three ways to control customer access:
- Role: A role is a label that groups specific permissions.
- Permissions: It define what actions a role can perform.
- Context – Grants additional permissions on a case-by-case basis, separate from roles and permissions, allowing for more flexible access control.
Use Cases
LoginRadius Roles, Permission, and Context can be useful per your business’s requirements. A few use cases are listed below:
- Role-Based Feature Access – Restrict access to specific features based on user roles like Admin, Manager, or User.
- Granular Permission Control – Define fine-grained access levels to ensure users can only perform authorized actions.
- Multi-Tenant Role Management – This allows organizations to define custom roles and permissions within a shared system.
- Dynamic Access Adjustments – Modify user permissions dynamically based on contextual factors like subscription tier or recent activity.
Configuration
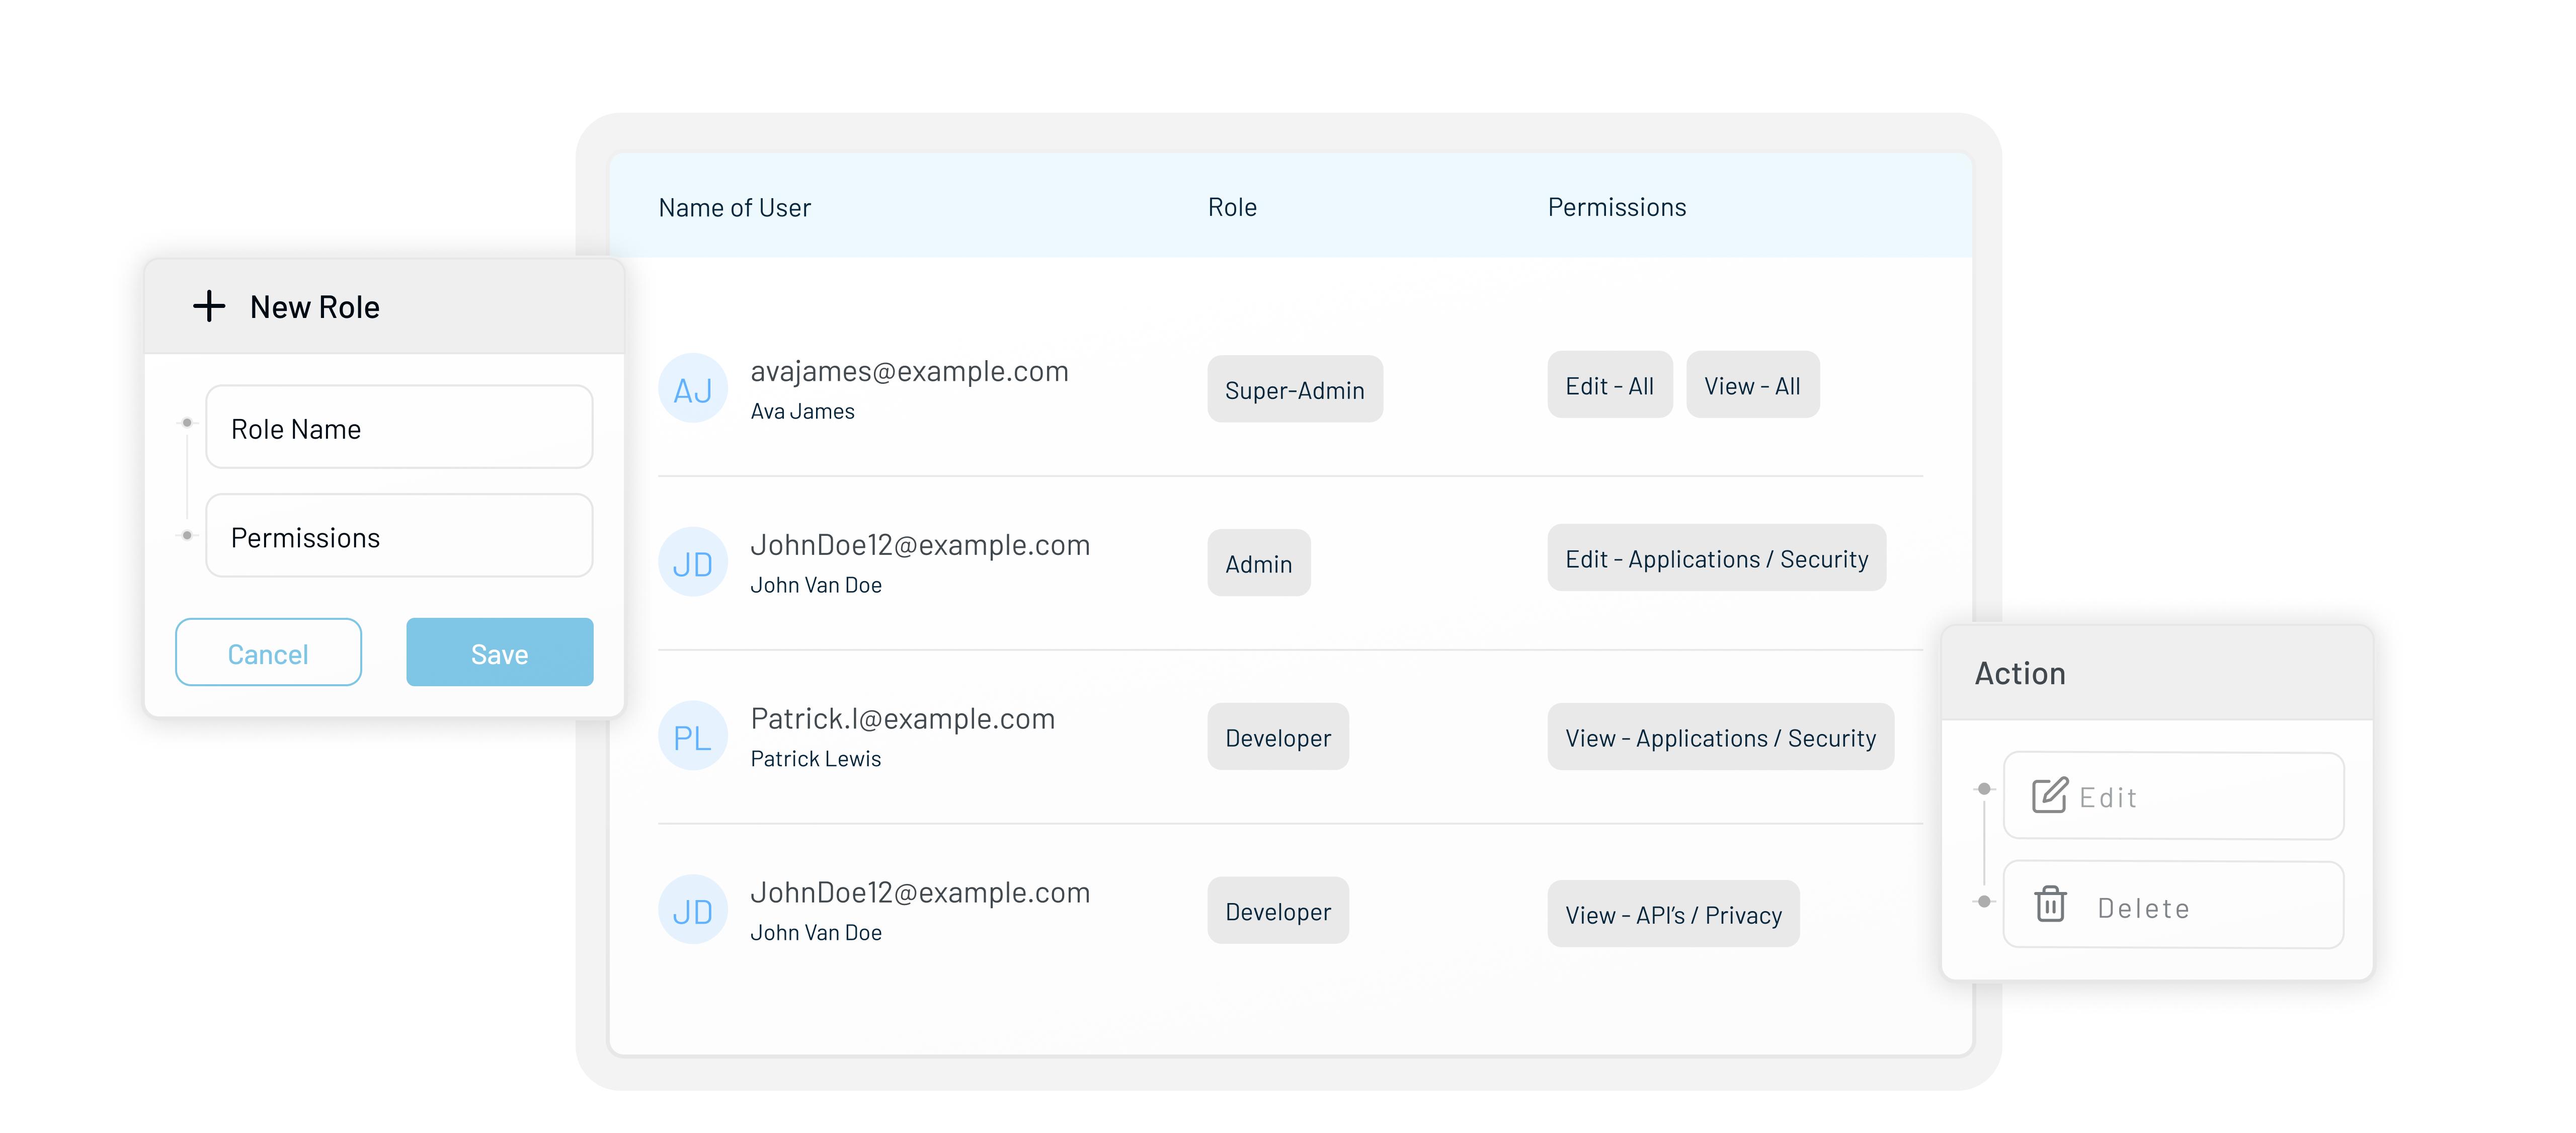
Roles & Permissions
Default Roles & Permissions
Context
Follow the below-mentioned steps to configure Roles & Permissions in your LoginRadius Admin Console.
-
Step 1: Navigate to Authorization > Roles & Permissions in the LoginRadius Admin Console.
-
Step 2: Click the Add Role button to add a new role.
-
Step 3: Now, enter the role name and associate the respective permission(s) for it. Please note that you should add at least one permission to a role.
-
Step 4: Click on the save button to save the desired rule. Similarly, add as many roles as required for your business use case.
Following the steps above, you have configured role names and their corresponding permissions. Use them as key-value pairs to define role-based access logic in your application's code.
For example, the customer profile can be retrieved using our Account API and stored in cookies or a session when needed. This profile will include role information. Your application will then manage role-based permissions, ensuring logged-in customers can access features based on their assigned roles.
After configuring your desired roles and permissions, you can also set default roles and permissions that will apply to all new customers registering on the application.
To do this, navigate to the Default Role & Permission tab. You'll see all the roles you've added following the previous steps. To assign a default role, click Save and check the Default box next to the desired role.
Context allows you to grant additional permissions to specific users, enabling better control and enhanced functionality.
Follow the steps below to add context to a specific user profile.
-
Step 1: Navigate to the admin console Users > Manage Users section. Search for the user by email, UID, or any other field and select the desired profile.
-
Step 2: Go to the Roles tab to view assigned roles and permissions, then click Add to assign context to the user.
-
Step 3: Now, you can enter all the relevant details.
- Enter the context name as required.
- The created roles are displayed in the roles dropdown. Select the role name you want to associate with this context.
- (Optional) Now, you can enter the additional permissions you wish to.
- (Optional) You can also set the expiration time for that particular context. To do so, enable the Set Expiration Time toggle and add the desired time.
-
Step 4: Click on the save button to save the context for that user.
Similarly, you can add context to all the specific user accounts.
Implementation Guide
Roles & Permissions
Context
Roles and permissions can also be managed programmatically using the LoginRadius APIs and SDK’s.
Integration via API
Integration via SDK
-
Create a Role: Use the Roles Create API to define a new role. This role will be added to your list of roles in the Admin Console.
-
Check User Role: Verify whether a user has a specific role using the Roles by UID API.
-
Assign a Role to a User: Use the Roles Assign to User API to grant a role to a user who doesn’t have one.
-
Remove a Role from a User: Use the Roles Unassign to User API to revoke a role from a specific user.
You can use any SDKs provided by LoginRadius to create a new role based on your SDK implementation requirements. LoginRadius GitHub Repositories
You can manage user context through the Admin Console or programmatically using LoginRadius APIs and SDK’s.
Integration via API
Integration via SDK
-
Create Context: Use the Upsert Context API to create a context with a predefined set of roles.
-
Delete Context: Remove an entire context using the Delete Context API.
-
Remove Role from Context: Delete a specific role from a context using the Delete Role from Context API.
-
Remove Permissions from Context: Use the Delete Permissions from Context API to revoke specific permissions from a context.
-
Retrieve Context: Get details of configured contexts, including associated roles and permissions, using the Get Context API.
You can use any SDKs provided by LoginRadius to create a new context based on your SDK implementation requirements. LoginRadius GitHub Repositories
Example Use-case
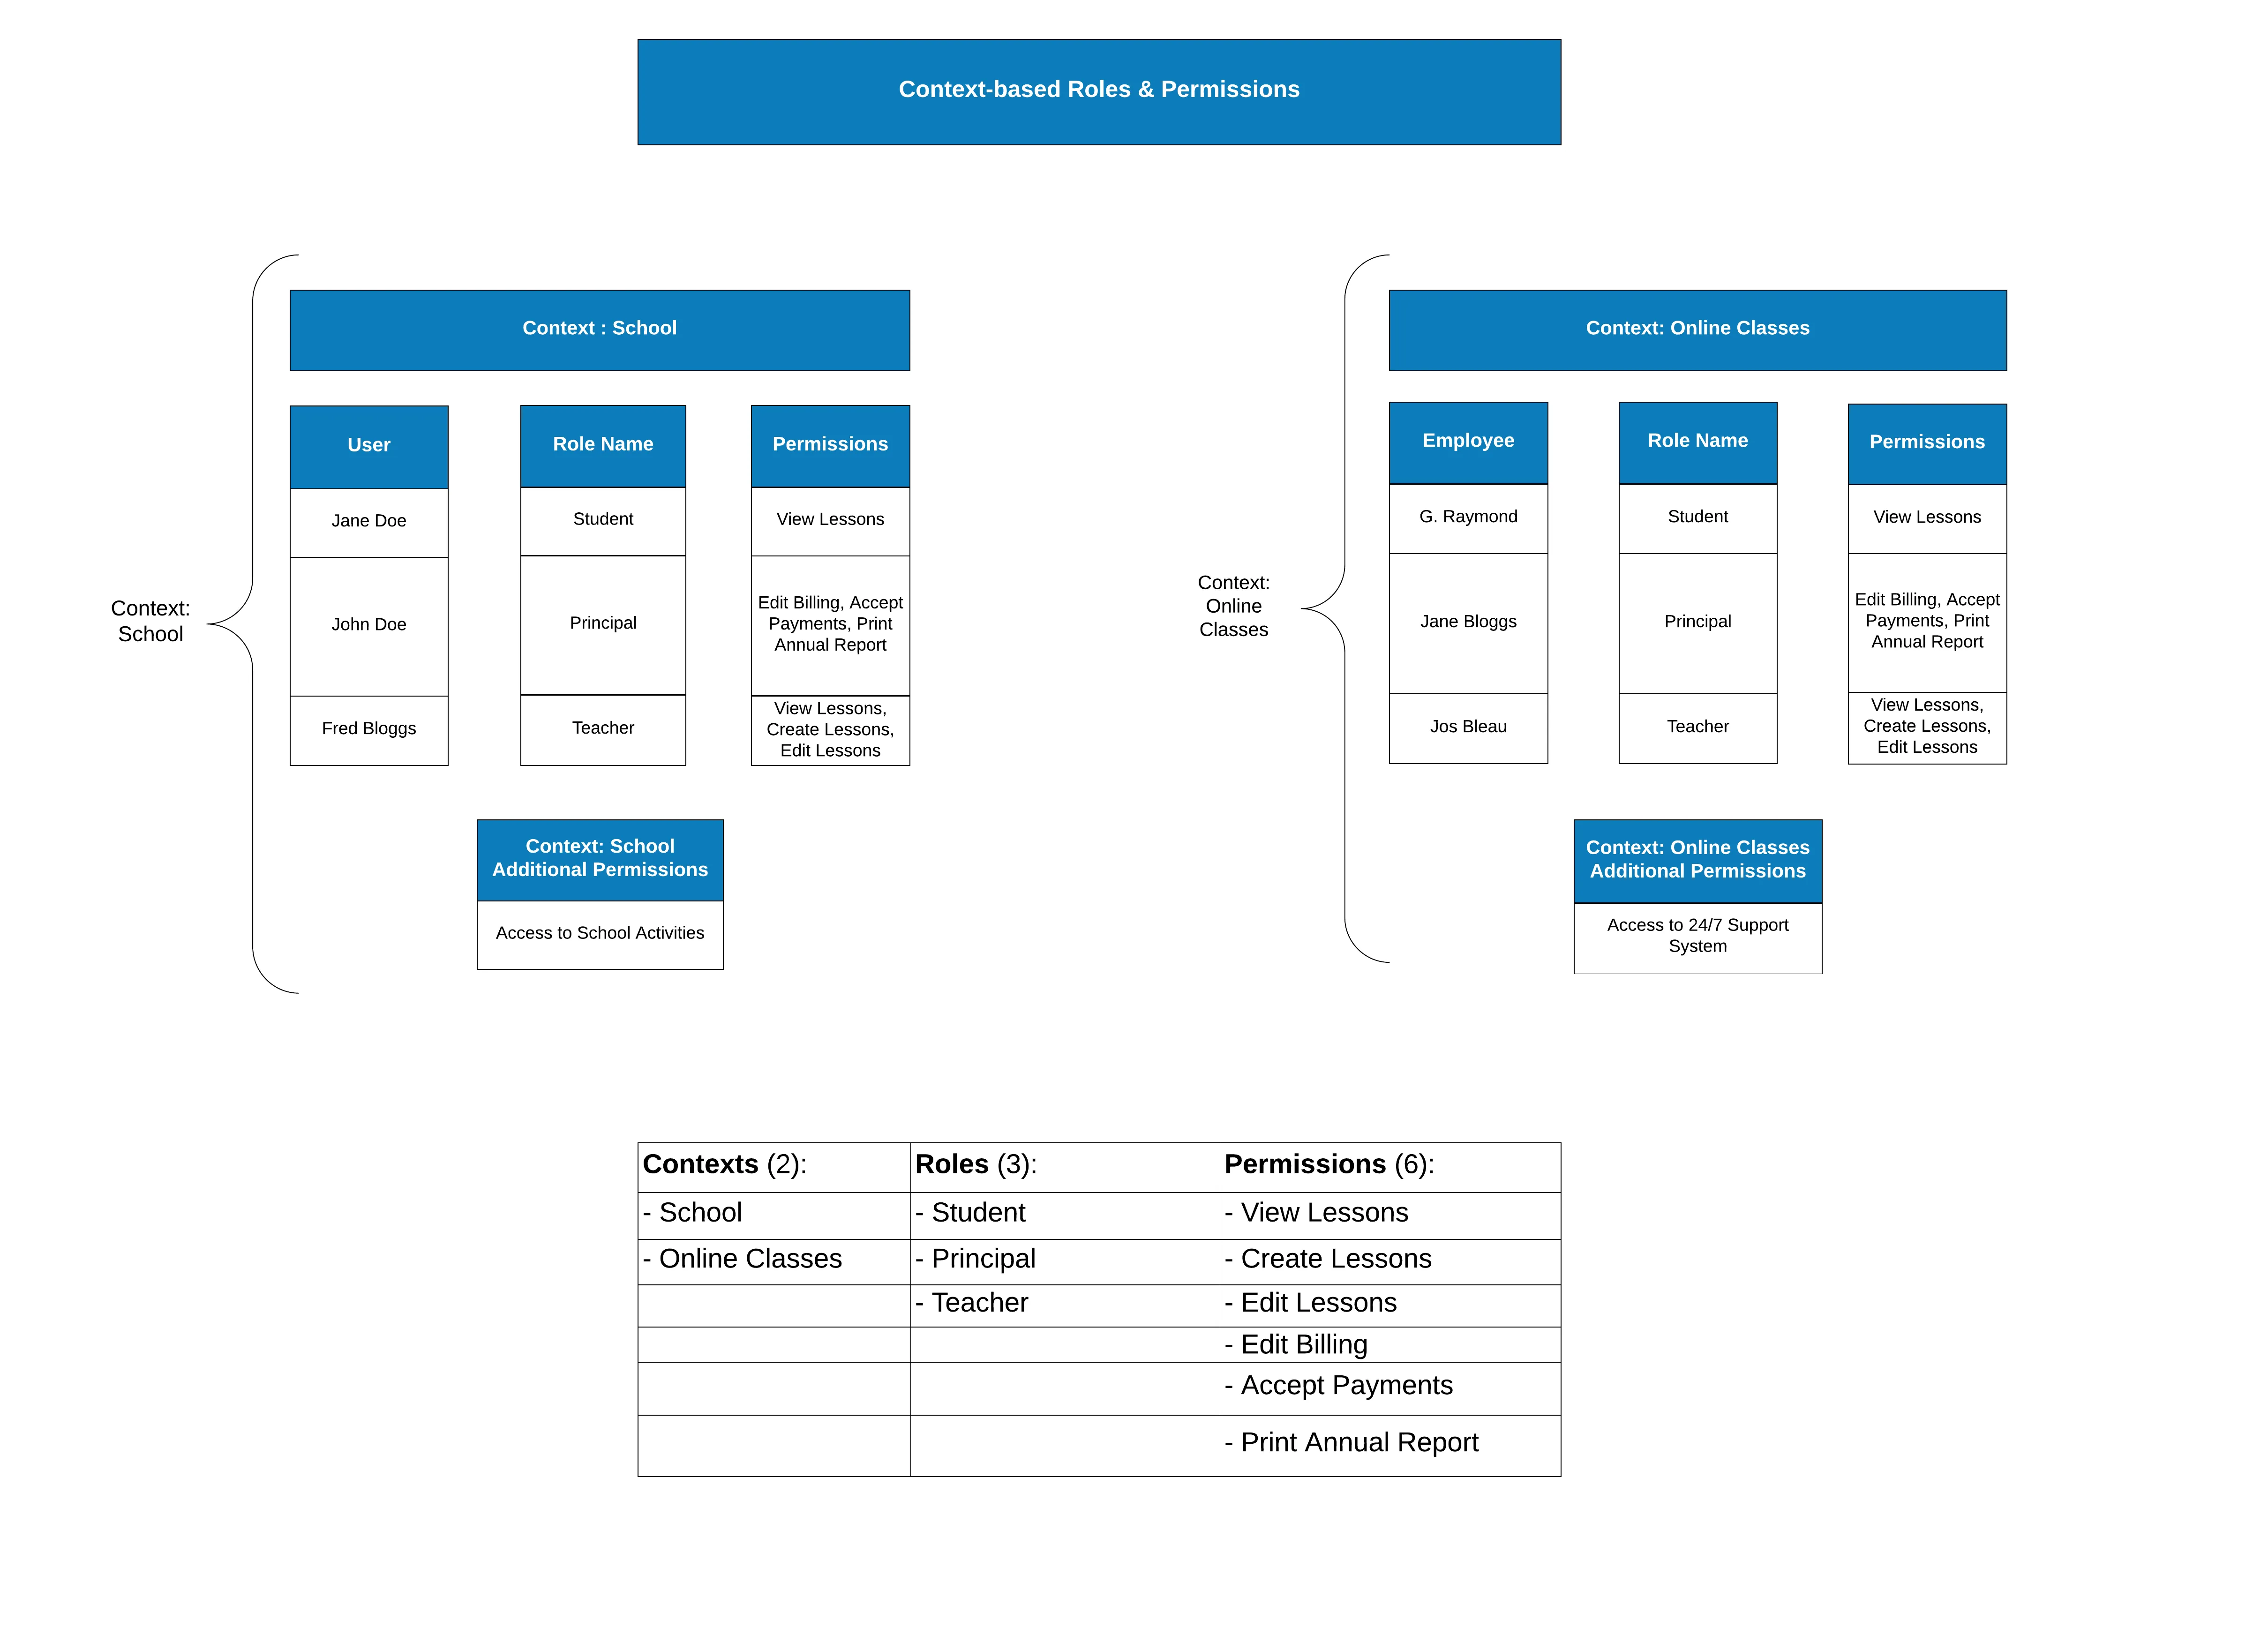
Example in JSON
{
  "Data": [
    {
      "Context": "School",
      "Roles": ["Student", "Principal", "Teacher"],
      "AdditionalPermissions": [
        "Access to School Activities"
      ],
      "Expiration": null
    },
    {
      "Context": "Online Classes",
      "Roles": ["Student", "Principal", "Teacher"],
      "AdditionalPermissions": [
        "Access to 24/7 Support System"
      ],
      "Expiration": null
    }
  ]
}
Best Practices
Effective role and permission management is crucial for maintaining security and ensuring appropriate access control within your application. Here are some best practices to consider:
-
Define Roles & Permissions: Establish clear roles with specific permissions to maintain structured access and prevent unauthorized use.
-
Apply Least Privilege: Grant users only the minimum access needed to reduce security risks.
-
Review & Update Regularly: Adjust roles and permissions to align with the application or organizational changes.
-
Use Contextual Access Control: Restrict access based on user location, device, or specific app sections for enhanced security.
-
Educate Users: Train users on access policies to ensure responsible usage and security awareness.
Adhere to these best practices to establish a robust role and permission management system that enhances security and ensures users access your application appropriately.