
Mobile SSO
Mobile SSO enables seamless authentication across multiple mobile apps, allowing users to log in once and access linked apps without re-authenticating. Like Web SSO, it stores authentication sessions using shared preferences (Android) or keychain (iOS). It helps identify an active session and automatically retrieve user data to authenticate users in connected apps. Implementing Mobile SSO with LoginRadius enhances user experience, security, and consistency across the mobile ecosystem.
This document guides implementing Mobile SSO with LoginRadius for Android and iOS, covering SSO flow and implementation for seamless authentication across mobile apps.
Common Use Cases for Mobile SSO
-
Seamless Multi-App Authentication: Businesses with multiple mobile apps (e.g., financial services, social platforms, or e-commerce brands) can enable Mobile SSO to let users switch between apps without re-entering credentials.
-
Improved User Experience and Engagement: Reducing the number of logins prevents user drop-offs, increasing engagement and retention rates for mobile-first applications.
-
Enhanced Security & Compliance: Centralized session management helps enforce security policies while reducing password fatigue.
-
Faster User Onboarding for Subscription & Membership Apps: Subscription-based services (e.g., streaming platforms, digital news, or fitness apps) can implement Mobile SSO to allow users to register once and access multiple apps without repeated logins.
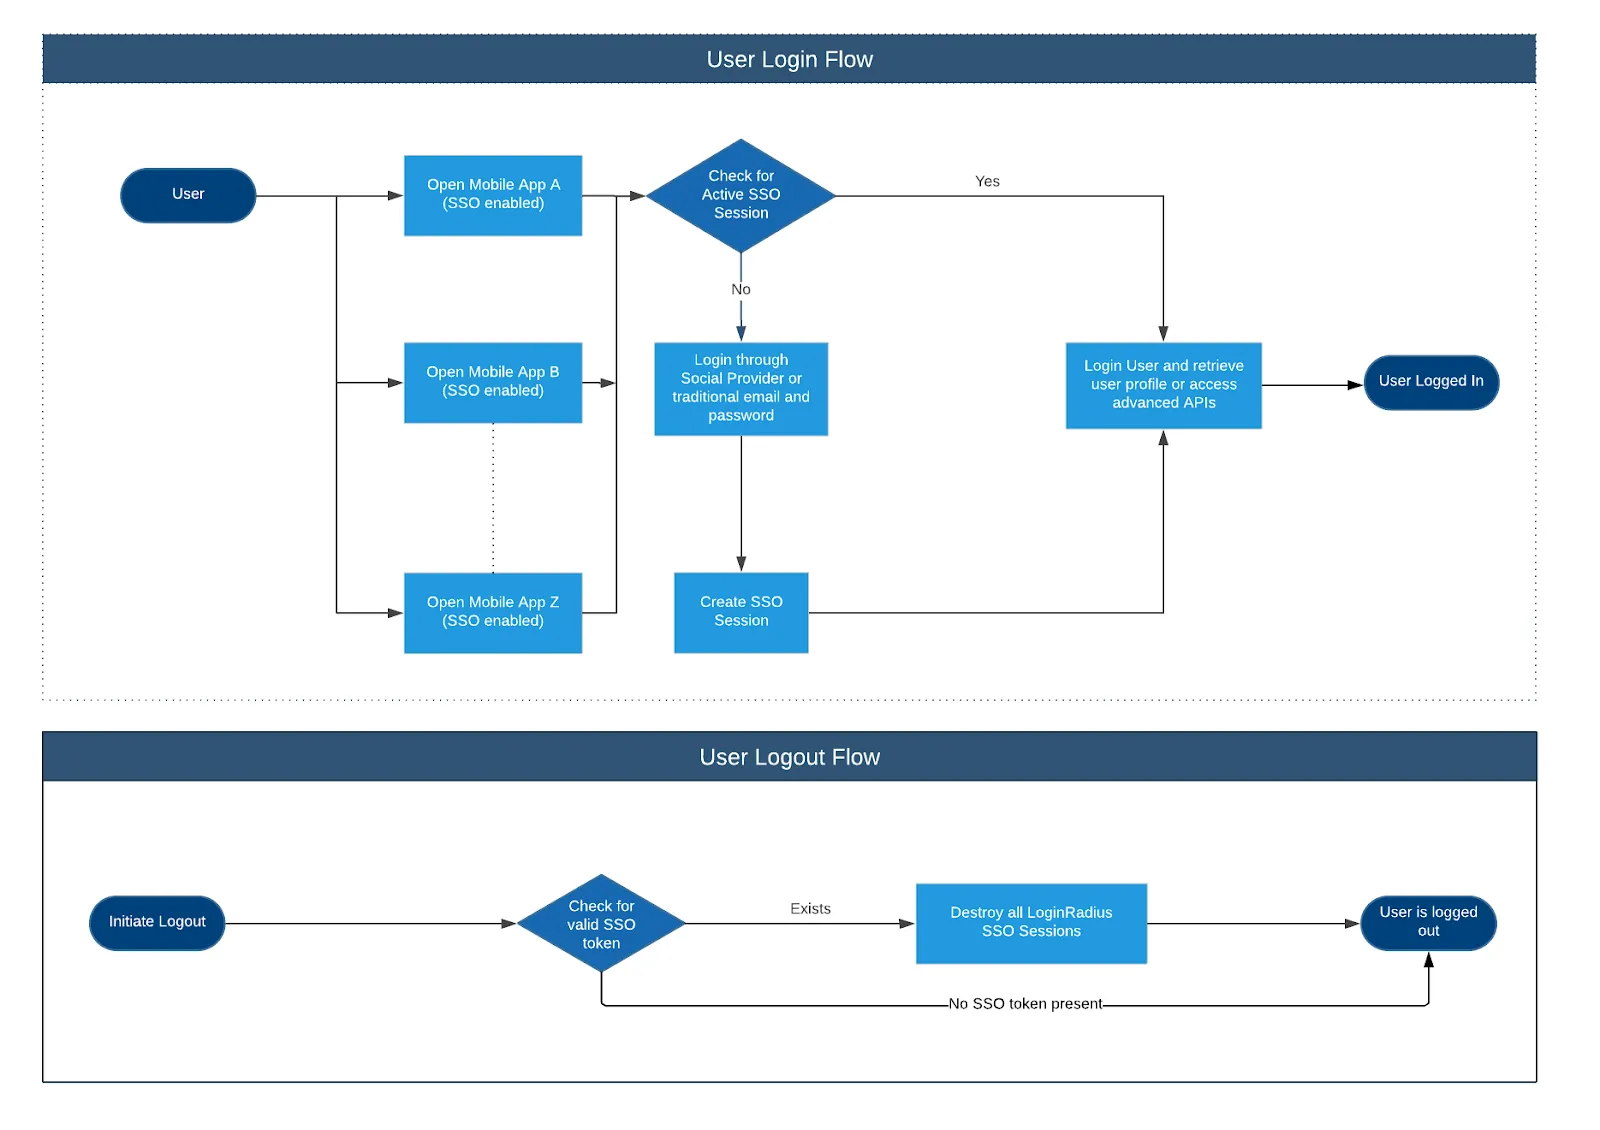
Mobile SSO Visual Flow
The image below shows the Mobile SSO login and logout flow, demonstrating how LoginRadius ensures seamless authentication across multiple mobile apps for a consistent and efficient user experience.
Integration Guide
This section provides a step-by-step guide and code snippets for integrating Mobile SSO into Android and iOS applications.
Android Implementation
iOS Implementation
With the LoginRadius Android SDK, you can enable Mobile SSO across multiple Android apps, allowing users to log in once and seamlessly switch between apps without re-authenticating.
SSO enables a single identity for each customer, allowing seamless navigation across all your Android apps with one social ID.
Follow the steps to integrate shared authentication sessions and provide a unified, secure login experience.
Android Manifest Configuration
Add Login Functionality
SSO Token Management
Add Logout Functionality
Add the sharedUserId key and its value to your Android Manifest after the package tag:
android:sharedUserId="com.example"
The following SSO code must be included in all activities where the login functionality is implemented. Use this code to enable SSO login for Android applications.
public Boolean setSSOLogin(String token) {
  if (token != "" && token != null) {
    SharedPreferences.Editor editor =
      getSharedPreferences(Endpoint.SHAREDPREFERENCEFILEKEY, MODE_PRIVATE)
      .edit();
    editor.putString("ssoaccesstoken", token);
    editor.apply();
    return true;
  } else {
    return false;
  }
}
After enabling SSO login in your app, call the method below to retrieve the LoginRadius access token. In the SSO method, pass the applicationId(Package Name) of the other app from which you want to fetch the token. Ensure the applicationId is stored in your app’s build.gradle file.
public String checkSSOLogin(String ssoSecondAppPackageName) {
  Context con = null;
  String output = "";
  try {
    con = createPackageContext(ssoSecondAppPackageName, 0);
    SharedPreferences pref = con.getSharedPreferences(Endpoint.SHAREDPREFERENCEFILEKEY, MODE_PRIVATE);
    if (pref.contains("ssoaccesstoken")) {
      String token = pref.getString("ssoaccesstoken", "");
      if (token != "") {
        SharedPreferences.Editor editor = getSharedPreferences(Endpoint.SHAREDPREFERENCEFILEKEY, MODE_PRIVATE).edit();
        editor.putString("ssoaccesstoken", token);
        editor.apply();
        output = token;
      } else {
        output = "No SSO Token Found! and the token value is null or empty";
      }
    } else {
      SharedPreferences shared = getSharedPreferences(Endpoint.SHAREDPREFERENCEFILEKEY, MODE_PRIVATE);
      if (shared.contains("ssoaccesstoken")) {
        String ssoToken = shared.getString("ssoaccesstoken", "");
        if (ssoToken != "") {
          output = ssoToken;
        } else {
          output = "No SSO Token Found! and the token value is null or empty";
        }
      } else {
        output = "No SSO Token Found!";
      }
    }
  } catch (PackageManager.NameNotFoundException e) {
    e.printStackTrace();
    output = "No SSO Token Found!";
  }
  return output;
}
After a successful login, use the following method to handle the logout functionality.
public Boolean ssoLogout(String ssoSecondAppPackageName) {
  Context con = null;
  try {
    con = createPackageContext(ssoSecondAppPackageName, 0);
    SharedPreferences pref = con.getSharedPreferences(Endpoint.SHAREDPREFERENCEFILEKEY, MODE_PRIVATE);
    if (pref.contains("ssoaccesstoken")) {
      pref.edit().remove("ssoaccesstoken").apply();
    }
    SharedPreferences shared = getSharedPreferences(Endpoint.SHAREDPREFERENCEFILEKEY, MODE_PRIVATE);
    if (shared.contains("ssoaccesstoken")) {
      shared.edit().remove("ssoaccesstoken").apply();
    }
    return true;
  } catch (PackageManager.NameNotFoundException e) {
    e.printStackTrace();
    return false;
  }
}
To implement Single Sign-On (SSO) across multiple iOS apps, use the LoginRadius iOS SDK. This approach securely manages authentication sessions by utilizing the iOS keychain.
Configuration in SDK
-
Update LoginRadius.plist:
Add the following key-value pair to enable keychain storage for authentication sessions:Key Type Value useKeychain BOOL YES -
Enable Keychain Sharing:
- Navigate to Project Folder > Capabilities in Xcode.
- Locate Keychain Sharing and add your tenant name to allow authentication data to be shared securely across multiple apps.
Implementation using SDK
Follow the steps to integrate shared authentication sessions and provide a unified, secure login experience.
Add Login Functionality
SSO Token Management
Add Logout Functionality
To ensure SSO functions smoothly, trigger the login functionality. When the app moves from the background to the foreground, add an NSNotification observer to the relevant view controllers to automatically authenticate the user.
Swift
Objective-C
override func viewWillAppear(_ animated: Bool) {
super.viewWillAppear(animated)
...
NotificationCenter.default.addObserver(self, selector: #selector(self.setupForm), name: NSNotification.Name.UIApplicationWillEnterForeground, object: nil)
...
}
override func viewWillDisappear(_ animated: Bool) {
super.viewWillDisappear(animated)
...
NotificationCenter.default.removeObserver(self, name: NSNotification.Name.UIApplicationWillEnterForeground, object: nil)
...
}
deinit
{
NotificationCenter.default.removeObserver(self)
}
- (void)viewWillAppear: (BOOL)animated {
[super viewWillAppear: animated];
...
[
[NSNotificationCenter defaultCenter] addObserver: self
selector: @selector(showProfileController)
name: UIApplicationWillEnterForegroundNotification
object: nil
];
...
}
- (void)viewWillDisappear: (BOOL)animated {
[super viewWillDisappear: animated];
...
[[NSNotificationCenter defaultCenter] removeObserver: self name: UIApplicationWillEnterForegroundNotification object: nil];
...
}
When the app receives the "UIApplicationWillEnterForegroundNotification," retrieve the accessToken and userProfile from the keychain to verify the user's authentication status.
Swift
Objective-C
func showProfileController () {
if LoginRadiusSDK.sharedInstance().session.isLoggedIn
{
//go to vc after user logged in
}else
{
//failed to logged in
}
}
- (void) showProfileController {
if ([[[LoginRadiusSDK sharedInstance] session] isLoggedIn])
{
//go to vc after user logged in
}else
{
//failed to logged in
}
}
To implement SSO logout, ensure the same observers are added to the relevant viewcontrollers that manage the user's logged-in state.
Swift
Objective-C
override func viewWillAppear(_ animated: Bool) {
super.viewWillAppear(animated)
...
NotificationCenter.default.addObserver(self, selector: #selector(self.setupForm), name: NSNotification.Name.UIApplicationWillEnterForeground, object: nil)
...
}
override func viewWillDisappear(_ animated: Bool) {
super.viewWillDisappear(animated)
...
NotificationCenter.default.removeObserver(self, name: NSNotification.Name.UIApplicationWillEnterForeground, object: nil)
...
}
func setupForm(){
let loggedIn = LoginRadiusSDK.sharedInstance().session.isLoggedIn
if(!loggedIn)
{
self.showAlert(title: "ERROR", message: "User is not logged in")
self.logoutPressed()
return
}
}
- (void)viewWillAppear: (BOOL)animated {
  [super viewWillAppear: animated];
  ...
  [
  [NSNotificationCenter defaultCenter] addObserver: self
  selector: @selector(checkForLogin)
  name: UIApplicationWillEnterForegroundNotification
  object: nil
  ];
  ...
  }
- (void)viewWillDisappear: (BOOL)animated {
  [super viewWillDisappear: animated];
  ...
  [[NSNotificationCenter defaultCenter] removeObserver: self name: UIApplicationWillEnterForegroundNotification object: nil];
  ...
  }
- (void)setupForm{
  BOOL loggedIn = [[[LoginRadiusSDK sharedInstance] session] isLoggedIn];
  if (!loggedIn)
  {
  [self showAlert: @"ERROR" message: @"User is not logged in"];
  [self logoutPressed];
  return;
  }
  //do normal logged in view controller behavior
  }
Best Practices
- Secure Token Storage: Use Shared Preferences (Android) and Keychain (iOS) for safe authentication token storage.
- Manage Sessions Properly: Refresh and validate tokens to maintain seamless and secure login.
- Ensure Cross-App Consistency: Implement a unified SSO approach across all linked apps.
- Clear Sessions on Logout: Remove tokens from all apps when users log out.
- Optimize Security & Performance: Enforce token encryption, expiration policies, and fast authentication.