ADFS Setup in Admin Console
Follow the below Instructions to setup ADFS for your team members in the LoginRadius Admin Console:
Adding a new relying party trust
The connection between ADFS and LoginRadius is defined using a relying party trust.
-
Sign in to the server where ADFS is installed.
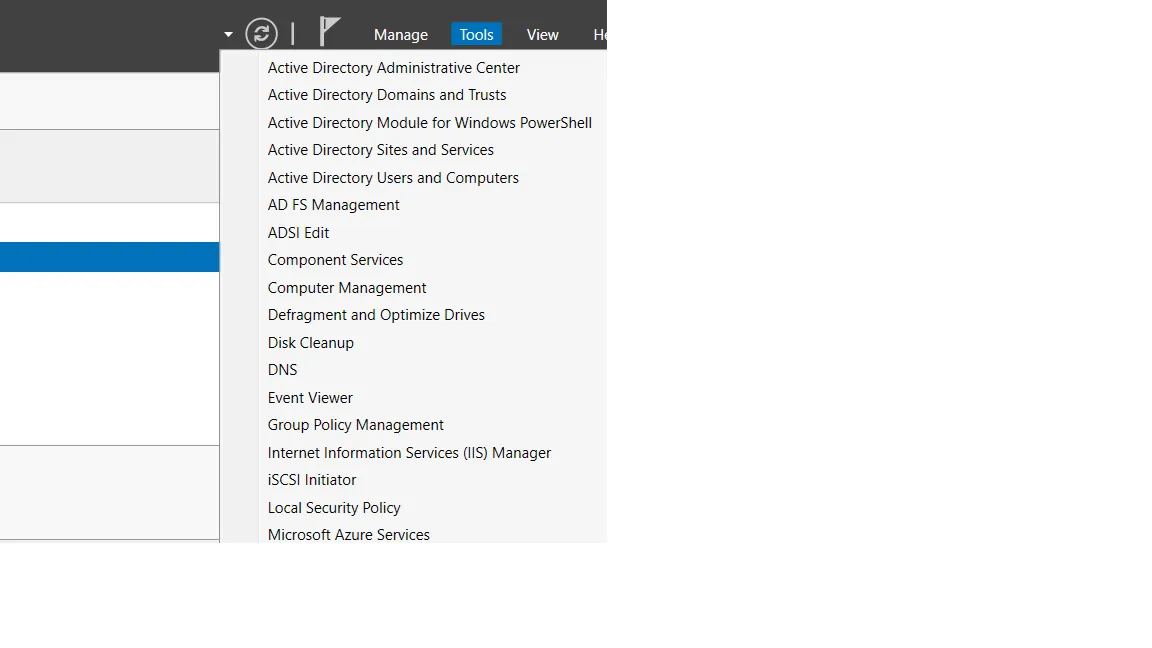
-
Click on Tools -> ADFS Management and then select Relying Party Trusts.
- Click Add Relying Party Trust from the Actions sidebar.

- Click Start on the Add Relying Party Trust wizard.

- On the Select Data Source screen, click Enter data about the relying party manually and click Next.

-
Provide information on each screen
a) On the next screen, enter a Display name that you'll recognize in the future.
b) Skip the Configure Certificate screen by clicking Next.
c) On the Configure URL, select the box labeled Enable Support for the SAML 2.0 WebSSO protocol. The URL will be
https://lr.hub.loginradius.com/saml/serviceprovider/AdfsACS.aspx

d) On the Configure Identifiers screen, enter the Relying party trust identifier. The URL will be
https://lr.hub.loginradius.com/

e) Skip the Configure Multi-factor Authentication screen (unless you want to configure this) by clicking Next.
f) Skip the Choose Issuance Authorization Rules screen by clicking Next.
-
On the Ready to Add Trust screen, review your settings and then click Next.
-
On the final screen, make sure the “Configure Claim issuance policy for this application” checkbox is selected and click Finish. This opens the claim rule editor.
Creating claim rules
After you create the relying party trust, you can create the claim rules.
- If the claim rules editor appears, click the Add Rule. Otherwise, in the Relying Party Trusts list, right-click the relying party object that you created, click Edit Claims Rules, and then click the Add Rule.

-
In the Claim rule template list, select the Send LDAP Attributes as Claims template, and then click Next.
-
Create the following rule:
a) LDAP Attribute: E-Mail-Addresses
b) Outgoing Claim Type: E-Mail Address
c) Enter a descriptive rule name
d) Attribute Store: Active Directory
e) Add the following mapping
-
Click OK.
-
Create another new rule by clicking Add Rule, this time selecting Transform an Incoming Claim as the template.
-
On the next screen, create the following rule:
a) Enter a descriptive rule name
b) Incoming Claim Type: E-Mail Address
c) Outgoing Claim Type: Name ID
d) Outgoing Name ID Format: Email
e) Pass through all claim values (the default)
-
Finally, click OK to create the claim rule, and then OK again to finish creating rules.
Configuring LoginRadius
-
Log in to your LoginRadius Console
-
Navigate to your Team SSO section in LoginRadius Console from here.
-
Click on Add Team SSO under Manage Team SSO.
-
Here, you can.
-
Configure App manually by entering the required details.
-
Configure from Metadata
-
Configure App
Step-1: For configuring through app section, fill the details mentioned in form.
a) Toggle the Is ADFS option to ON
b) Under the Login Flow section, select the type of SSO flow appropriate for your setup. You can choose one of the following options:
- Service Provider-Initiated Login
- Identity Provider-Initiated Login.
c) Under the ID Provider Binding section select the binding method supported by your Identity Provider. You can choose one of the following options:
- urn:oasis:names:tc:SAML:2.0:bindings:HTTP-POST
- urn:oasis:names:tc:SAML:2.0:bindings:HTTP-Redirect.
d) In ID Provider Location, Enter the correct URL. This is typically ADFS Public URL with /adfs/ls.
To find this URL :
- In the ADFS Management application, select Service > Endpoints.
- Scroll down to the endpoint that has SAML 2.0/WS-Federation as the type and note the URL path.
e) In ID Provider Logout URL, enter the correct ADFS logout URL. This is typically the ADFS public URL with /adfs/ls/ and a query string parameter for sign-out.
To find this URL:
- In the ADFS Management application, go to Service > Endpoints.
- Scroll down to find the endpoint related to WS-Federation sign-out.
- The logout URL usually looks like:
https://<your-adfs-domain>/adfs/ls/?wa=wsignout1.0
f) Enter the Relay State Parameter if your application requires passing additional state information or a specific redirect path after authentication.
g) In ID Provider Certificate, Export the token-signing certificate with the ADFS Microsoft Management Console. When using the certificate exporting wizard, ensure you select Base-64 encoded X.509 (.CER) for the encoding format. Open the exported file in a text editor to get the certificate value.
d) Enter the LoginRadius Key under Service Provider Certificate Key. You can get the Certificate by running the following command:
openssl req -new -x509 -key lr.hub.loginradius.com.key -out lr.hub.loginradius.com.cert -days 3650 -subj /CN=lr.hub.loginradius.com
e) For DATA MAPPING select the LoginRadius' fields (SP fields) and enter the corresponding ADFS fields (IdP fields).
Field : Email
Profile Key : Please check this link for more details - Link.
Note:
- To renew the Service Provider Certificate, click the designated "Renew Certificate" button. Once the renewal is completed, the updated expiry date and time will be promptly shown.
- If you select the Switch off Email/Password Login instead of Enable only SSO option, then login with Email/Password will not work, and only SSO Login will work to access LoginRadius Admin Console.
Configure From Metadata
If you are looking to configure this by uploading a Metadata file, click on the "Configure from Metadata" option. You are required to upload the XML file, which consists of metadata for the SSO setup, and after a successful upload, click the Add button.