Time Required: 20 minutes.
Technologies: Express, Node.js, JavaScript.
Prerequisites:
- Basic knowledge of Express, Node.js, and JavaScript.
- Node.js and npm are installed.
This tutorial will go over how to build a bot that will respond to pings (i.e. @), and send messages to a chat room. On a high level, the bot will run on an express server, and receive pings via an HTTP endpoint. Responses to pings will be sent synchronously through a payload in the HTTP response, while bot-initiated messages will be sent asynchronously using the Google Hangout Chat API.
Outline
- Environment setup.
- Get bot to respond to pings.
- Send bot-initiated messages.
- Deploy.
Environment Setup
Create a new project with the file ‘app.js’.
Open command line/terminal, and navigate to your project directory. Run ‘npm init’, and press enter until package.json is created. Next, install the following dependencies:
- express:
npm install express --save - body-parser:
npm install body-parser --save - googleapis:
npm install googleapis --save - unirest:
npm install unirest --save
In ‘app.js’, let’s setup our server:
1const express = require('express');
2const bodyParser = require('body-parser');
3const { google } = require('googleapis');
4const app = express();
5app.use(bodyParser.urlencoded({
6extended: false
7}));
8app.use(bodyParser.json());
9app.listen(8100, function() {
10console.log('App listening on port 8100.');
11});
Running ‘node app.js’ will now create a local server on port 8100.
Responding to Pings
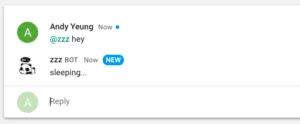
The bot will respond to pings through a HTTP POST endpoint. Create one with express:
1app.post('/', function(req, res) {
2  console.log('someone pinged @');
3if (req.body.type === 'MESSAGE') {
4return res.json({
5text: 'sleeping...'
6});
7}
8});
The bot will respond with the text: ‘sleeping…’.
Synchronously responding to messages simply requires us to return a response to Google. The downside to this is the 30 second time limit before Google no longer accepts responses to the request. For instance, this would be a problem if you were building some kind of reminder app; the bot wouldn't be able to synchronously respond after 30 seconds. This is where async responses come in.
Bot-initiated Messages
To show this, we will have our bot post to a chat room every 1 minute.
Sending async messages to Google API requires a Service Account for authentication. Once authenticated, we can make a POST request to a Google API URL that will create a message.
So first, create a Google Service Account following these steps. Take the downloaded JSON file and put it in the root directory of your project. Here, we renamed it to googlekeys.json:
1const gkeys = require('./googlekeys.json');We will be making POST requests using Unirest:
1const unirest = require('unirest');Now generate a JWT that will be used in our POST request:
1function getJWT() {
2  return new Promise(function(resolve, reject) {
3    let jwtClient = new google.auth.JWT(
4      gkeys.client_email,
5      null,
6      gkeys.private_key, ['https://www.googleapis.com/auth/chat.bot']
7    );
8jwtClient.authorize(function(err, tokens) {
9  if (err) {
10    console.log('Error create JWT hangoutchat');
11    reject(err);
12  } else {
13    resolve(tokens.access_token);
14  }
15});
16
17});
18}
Here is our function for posting messages. ROOM-ID can be found in the URL of the hangout chat room page i.e.: https://chat.google.com/u/0/room/{ROOM-ID}
1function postMessage(count) {
2  return new Promise(function(resolve, reject) {
3      getJWT().then(function(token) {
4          unirest.post('https://chat.googleapis.com/v1/spaces/' + {ROOM-ID} + '/messages')
5              .headers({
6                  "Content-Type": "application/json",
7                  "Authorization": "Bearer " + token
8              })
9              .send(JSON.stringify({
10                  'text': 'Hello! This is message number ' + count,
11              }))
12              .end(function(res) {
13                  resolve();
14              });
15      }).catch(function(err) {
16          reject(err);
17      });
18  });
19}
Finally, add the code that will repeat our post every minute.
1const timer = require('timers');
2app.listen(8100, function() {
3console.log('App listening on port 8100.');
4let count = 0;
5timer.setInterval(function() {
6postMessage(count += 1);
7}, 60000);
8});
Deploy
Expose your local server to public (we used ngrok).
Login to developer console. Create a new project, and enable Hangout Chat API. Under configuration, set:
- status: live
- bot name (this is how you will add and ping the bot)
- avatar
- description
- functionality: rooms
- connection settings - bot URL:
- permission: everyone in your domain
Restart your local server, and that’s it! Make sure you have your bot added to the chat room, and you can ping it by sending @. The bot will also post to the chat room every minute.
There are a lot of different ways to further extend this bot, such as setting reminders/notifications, making to-do lists, displaying server logs, and interacting with API’s.