Web design and CSS have come a long way. And today, modern websites have everything you could wish for alongside stunning designs. Then why should your website's login and signup forms look boring?
The web ecosystem has tons of reliable third-party libraries and frameworks to help you build intuitive designs even if you're not a design wizard. Amidst the plethora of libraries comes a utility first CSS framework called Tailwind CSS.
So in this post, you'll learn:
- what Tailwind CSS is;
- why it's awesome; and,
- how you can use it in a React app.
I'll then walk you through step by step how to use it to create a modern login and signup form with routing in React.
Finally, you'll see how to make these forms functional using LoginRadius Authentication APIs docs/references/api/authentication).
What is Tailwind CSS?
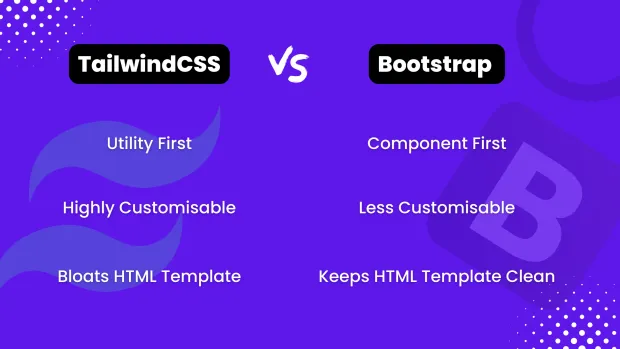
If you've heard of Materialize and Bootstrap, Tailwind CSS is much similar in what it offers. It's a CSS framework that helps developers build layouts, components, themes, and whatnot, without writing all the CSS themselves.
However, unlike Bootstrap and Materialize, it doesn't give you built-in components out of the box. Instead, it gives you a wide range of fully customizable utility classes that you can use to style your pages.
Why Tailwind CSS Better or Worse Than the Others?
The community loves Tailwind. For most developers, the key takeaway is that it gives you more freedom on how you want your components or elements to look. So in many cases, when developers use component-based CSS frameworks like Bootstrap, they have a hard time changing the way they want their website to look.
Being utility first, it's the most customization-friendly CSS framework!
Also, it's pretty easy to integrate with modern frontend frameworks like React, NextJS, VueJS, Angular, Svelte, etc. I'll also explore that shortly when we add Tailwind to our React app.

On the downside, Tailwind might make your HTML bloated with loads of CSS classes for small and specific rules. However, you can control it with a framework like React by building smaller reusable components and using JSX bindings for long class names for more maintainability and readability.
In fact, we'll take this optimal approach in building our Login form, so you'll understand some best practices you can use to avoid bloated HTML templates in your React app.
What You’ll Build: Modern Login Form Tailwind React + Signup Page
We'll create a simple yet modern looking login and signup form that looks like this:
It will be interactive using React state, can route to different pages, and we'll also, in the end, talk about how we can make it functional from a backend standpoint.
Sounds good? Let's start by understanding how we can add TailwindCSS to our React app.
Project Setup: Scaffold a Login Page React Tailwind Project
Inside a directory of your choice, create a new React project by running:
1npx create-react-app react-tailwind-appNext, move inside the project and install react-router-dom by running:
1cd create-react-app react-tailwind-app && npm i react-router-domInstall Tailwind CSS for a React Login Page Template
Now, add Tailwind to your React project by following the steps given here.
First, install Tailwind CSS and its related dependencies by running the following command in the root directory:
1npm install -D tailwindcss postcss autoprefixerNext, generate some configurational files by running the following command in the root directory:
1npx tailwindcss init -pThat should generate a tailwind.config.js file and postcss.config.js file for you as shown:
Awesome!
Configuring Tailwind CSS for a React Tailwind Login Page
Now, go ahead and update the tailwind.config.js file to support templates for your React component files as shown:
1module.exports = {
2  content: [
3    "./src/**/*.{js,jsx,ts,tsx}",
4  ],
5  theme: {
6    extend: {},
7  },
8  plugins: [],
9}
Almost there! We'll now add some necessary Tailwind directives to your index.css file present in the root directory:
1@tailwind base;
2@tailwind components;
3@tailwind utilities;
4...
Each of the above directives represents a layer of Tailwind's utility classes that you can use in your project. Their declaration allows using these utility classes anywhere in your project.
Finally, we'll kickstart your React project by spinning a local development server:
1npm startYou're now ready to start using Tailwind CSS to create some awesome-looking UI for your React app!
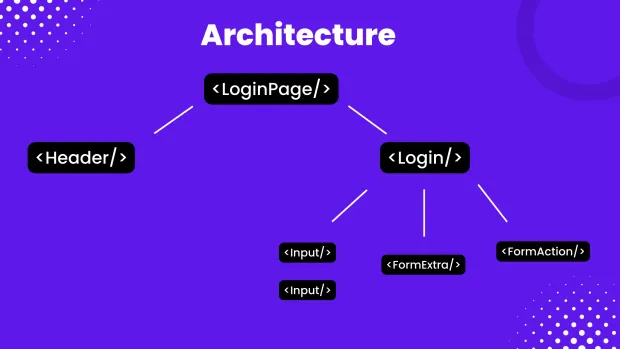
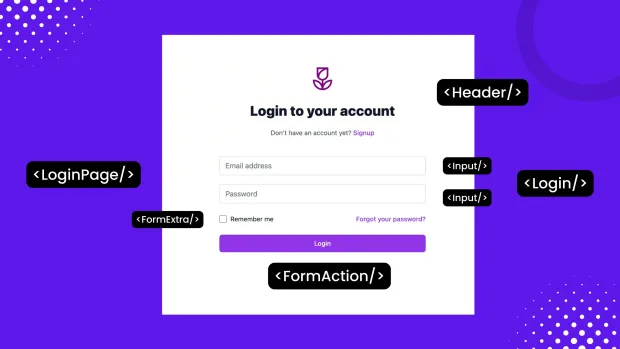
Frontend Architecture for a React Login Page Template Tailwind
We'll break down the entire page into small, reusable components to ensure that your code is readable and maintainable and doesn't have bloated HTML templates.
Component Architecture
For instance, you can have a <Header/> component that takes care of the page's heading and displays a link to navigate to another page.
Similarly, you can have a reusable custom <Input/> component that can be used inside the form. All in all, here's what your frontend architecture would look like:
Directory Structure
So first, let's go ahead and create these files and folders. You'll develop corresponding files for the Signup page as well. Create the following files and folders inside your root directory:
1.
2├── components/
3│   ├── FormAction.js
4│   ├── FormExtra.js
5│   ├── Header.js
6│   ├── Input.js
7│   ├── Login.js
8│   └── Signup.js
9├── constants/
10│   └── formFields.js
11└── pages/
12    ├── Login.js
13    └── Signup.js
For perspective, here's how we'll use those components to build your entire Login Page:
Makes sense? Great!
Components Boilerplate Code
While we're at it, let's also create some component boilerplate for all these files except the /src/constants/formFields.js.
For the Login.js files (/src/pages/Login.js), you can put down the following code:
1export default function LoginPage(){
2 return(
3 <>
4 </>
5)
6
7}Similarly, you can create such boilerplates for the rest of the files.
Form Fields Constants
You've created a formFields.js file earlier. This file will hold all the input fields related constants like placeholder, value, name, field type, etc. Inside this file, add the following code:
1const loginFields=[
2    {
3        labelText:"Email address",
4        labelFor:"email-address",
5        id:"email-address",
6        name:"email",
7        type:"email",
8        autoComplete:"email",
9        isRequired:true,
10        placeholder:"Email address"
11    },
12    {
13        labelText:"Password",
14        labelFor:"password",
15        id:"password",
16        name:"password",
17        type:"password",
18        autoComplete:"current-password",
19        isRequired:true,
20        placeholder:"Password"
21    }
22]
23const signupFields=[
24{
25labelText:"Username",
26labelFor:"username",
27id:"username",
28name:"username",
29type:"text",
30autoComplete:"username",
31isRequired:true,
32placeholder:"Username"
33},
34{
35labelText:"Email address",
36labelFor:"email-address",
37id:"email-address",
38name:"email",
39type:"email",
40autoComplete:"email",
41isRequired:true,
42placeholder:"Email address"
43},
44{
45labelText:"Password",
46labelFor:"password",
47id:"password",
48name:"password",
49type:"password",
50autoComplete:"current-password",
51isRequired:true,
52placeholder:"Password"
53},
54{
55labelText:"Confirm Password",
56labelFor:"confirm-password",
57id:"confirm-password",
58name:"confirm-password",
59type:"password",
60autoComplete:"confirm-password",
61isRequired:true,
62placeholder:"Confirm Password"
63}
64]
65export {loginFields,signupFields}
The above file has two arrays: one each for your login form fields and signup form fields. Each array contains an object that contains attributes for the input fields.
The field names should be self-explanatory as to what they represent. Here's a quick summary of that:
labelText: The label for an input fieldlabelFor: The value that associates a label to the input field via an id attribute on the input fieldid,name,type, andplaceholder: Respective attributes on the input fieldisRequired: If you want to make an input field mandatory, in this case, all our input fields for form submission will be mandatory
Later, we'll use this array to cycle through each input field and render a custom <Input/> component that you'll create shortly.
Set Up Routing
As you already have your components boilerplates in place, let's first set up routing for your app.
By default, when a user opens the app, we'll direct them to a Login page. Then, if the route changes to /signup, we'll direct them to a Signup page.
Head over to your /src/App.js file and add the following code:
1import './App.css';
2import {
3  BrowserRouter,
4  Routes,
5  Route,
6} from "react-router-dom";
7import SignupPage from './pages/Signup';
8import LoginPage from './pages/Login';
9function App() {
10return (
11<div className="min-h-full h-screen flex items-center justify-center py-12 px-4 sm:px-6 lg:px-8">
12<div className="max-w-md w-full space-y-8">
13<BrowserRouter>
14<Routes>
15<Route path="/" element={<LoginPage/>} />
16<Route path="/signup" element={<SignupPage/>} />
17</Routes>
18</BrowserRouter>
19</div>
20</div>
21);
22}
23export default App;
Notice that you have two containers wrapped around your <BrowserRouter/> with some long classnames.
The first container gives a minimum height of 100% and sets a fixed height of the container to 100vh via the min-h-full and h-screen classes. Then, it centers everything via flex, items-center to vertically center all the flex child elements, and justifty-center to center them horizontally.
Finally, we have some padding classes prefixed with p. For top and bottom padding, we use the prefix py- followed by some value. We also have some responsive padding on small and large screen devices prefixed with sm: and lg: respectively. You can learn more about these padding and margin properties to see other similar classes you can use.
Similarly, the second container sets some width for its child elements and provides some spacing via the respective Tailwind classes.
Build the Header for Your React Tailwind Login Page
Now, let's create the <Header/> component that you can render on both the login and signup pages for quick information and navigation.
Head over to /src/components/Header.js, and add the following code:
1import {Link} from 'react-router-dom';
2export default function Header({
3heading,
4paragraph,
5linkName,
6linkUrl="#"
7}){
8return(
9<div className="mb-10">
10<div className="flex justify-center">
11<img
12alt=""
13className="h-14 w-14"
14src="https://ik.imagekit.io/pibjyepn7p9/Lilac_Navy_Simple_Line_Business_Logo_CGktk8RHK.png?ik-sdk-version=javascript-1.4.3&updatedAt=1649962071315"/>
15</div>
16<h2 className="mt-6 text-center text-3xl font-extrabold text-gray-900">
17{heading}
18</h2>
19<p className="mt-2 text-center text-sm text-gray-600 mt-5">
20{paragraph} {' '}
21<Link to={linkUrl} className="font-medium text-purple-600 hover:text-purple-500">
22{linkName}
23</Link>
24</p>
25</div>
26)
27}Your <Header/> component takes four props:
- a dynamic
headingthat it displays on the top; - then some additional text as
paragraph; - a
linkNameto display which page it will redirect the user to; and, - its corresponding path as
linkUrl.
Using the ' justify-center ' class, we place all these elements inside a flexbox container and horizontally center them. There is also an outer container that simply gives the header some bottom margin using the mb-10 class.
Then, we give our header image some fixed height and width using the h-14 and w-14 classes, respectively.
Finally, our text and links have some typography classes for font-size, font-colour, hover effect, and font-weight.
Let's now go ahead and render the <Header/> component with all the props inside the Login page (/src/pages/Login.js):
1import Header from "../components/Header"
2export default function LoginPage(){
3return(
4<>
5<Header
6heading="Login to your account"
7paragraph="Don't have an account yet? "
8linkName="Signup"
9linkUrl="/signup"
10/>
11 </>
12)
13
14}Here's what the login page should now look like:

Let's now start building the rest of the Login page form.
The Input Component
We'll now create our reusable and great looking <Input/> component that you'll use to build your Login form.
Head over to the /src/components/Input.js file, and add the following code:
1const fixedInputClass="rounded-md appearance-none relative block w-full px-3 py-2 border border-gray-300 placeholder-gray-500 text-gray-900 focus:outline-none focus:ring-purple-500 focus:border-purple-500 focus:z-10 sm:text-sm"
2export default function Input({
3handleChange,
4value,
5labelText,
6labelFor,
7id,
8name,
9type,
10isRequired=false,
11placeholder,
12customClass
13}){
14return(
15<div className="my-5">
16<label htmlFor={labelFor} className="sr-only">
17{labelText}
18</label>
19<input
20onChange={handleChange}
21value={value}
22id={id}
23name={name}
24type={type}
25required={isRequired}
26className={fixedInputClass+customClass}
27placeholder={placeholder}
28/>
29</div>
30)
31}
Remember all those fields' key-value pairs you set earlier in your formFields.js constants file?
Those are all the props your <Input/> component will take. It will also take a value and a handleChange prop since we want this to be a controlled component linked to some state.
Notice how the HTML markup of this component looks very clean. How is that possible? Are you not using any Tailwind classes here?
As there are a lot of Tailwind classes for styling this input field, we have created a constant for it — called fixedInputClass. It contains all the essential styling classes for the input field.
We also take a customClass prop that will append any custom Tailwind class you want to pass to the input field for customizations. How cool is that?!
Build the Login Form React Tailwind Component
Next, create the <Login/> component inside /src/components/Login.js, where the entire Login form will be rendered. This component will also be responsible for owning any state or event handlers passed down as props to other child components.
Based on your loginFields from your formFields constants, we programmatically generate an initial value for your loginState.
Then we have a handleChange event handler to update the state whenever an onChange event is fired from the nested <Input/> component.
Then we simply loop through the fields array and render an <Input/> component that you've created in the previous section.
1import { useState } from 'react';
2import { loginFields } from "../constants/formFields";
3import Input from "./Input";
4const fields=loginFields;
5let fieldsState = {};
6fields.forEach(field=>fieldsState[field.id]='');
7export default function Login(){
8const [loginState,setLoginState]=useState(fieldsState);
9const handleChange=(e)=>{
10    setLoginState({...loginState,[e.target.id]:e.target.value})
11}
12
13
14return(
15    <form className="mt-8 space-y-6">
16    <div className="-space-y-px">
17        {
18            fields.map(field=>
19                    <Input
20                        key={field.id}
21                        handleChange={handleChange}
22                        value={loginState[field.id]}
23                        labelText={field.labelText}
24                        labelFor={field.labelFor}
25                        id={field.id}
26                        name={field.name}
27                        type={field.type}
28                        isRequired={field.isRequired}
29                        placeholder={field.placeholder}
30                />
31
32            )
33        }
34    </div>
35
36
37
38  </form>
39)
40
41}
Before seeing how the login form looks, you need to render it inside your Login page.
So render the above <Login/> component inside /src/pages/Login.js file as shown:
1import Header from "../components/Header"
2import Login from "../components/Login"
3export default function LoginPage(){
4return(
5<>
6<Header
7heading="Login to your account"
8paragraph="Don't have an account yet? "
9linkName="Signup"
10linkUrl="/signup"
11/>
12<Login/>
13</>
14)
15}
Now, if you go back to your React app, you should see your Login page input fields appear as follows:

Excellent, it looks like you're almost there!
Now add the final pieces to the Login page by writing the <FormExtra> and <FormAction/> components.
Free React Authentication API for Your Login Form Tailwind React
If you want to make your login and signup forms functional without building an entire backend, a free React authentication API is the fastest solution. Instead of handling password storage, token management, and security policies yourself, you can offload these to a reliable identity platform.
With LoginRadius, you get a developer-friendly authentication API that works seamlessly with React. You can quickly add features like email/password login, passwordless login, OTP authentication, and even social logins—all without managing infrastructure. This helps you move faster while ensuring enterprise-grade security.
👉 Get started free with the LoginRadius Authentication APIs and connect your React forms to a secure backend instantly.
Wrapping Up the Login Page React Tailwind UI
The <FormExtra/> component holds the template and styles for a simple "Remember me" functionality.
Inside /src/components/FormExtra.js file, add the following code:
1export default function FormExtra(){
2 return(
3 <div className="flex items-center justify-between ">
4 <div className="flex items-center">
5 <input
6 id="remember-me"
7 name="remember-me"
8 type="checkbox"
9 className="h-4 w-4 text-purple-600 focus:ring-purple-500 border-gray-300 rounded"
10 />
11 <label htmlFor="remember-me" className="ml-2 block text-sm text-gray-900">
12 Remember me
13 </label>
14 </div>
15 <div className="text-sm">
16 <a href="#" className="font-medium text-purple-600 hover:text-purple-500">
17 Forgot your password?
18 </a>
19 </div>
20 </div>
21
22)
23
24}Again here we're using some Tailwind typography and flexbox classes to style and structure the layout of the UI.
Let's go to the /src/components/FormAction.js file and create a submit button for the Login form.
Add the following code inside this file:
1export default function FormAction({
2 handleSubmit,
3 type='Button',
4 action='submit',
5 text
6}){
7 return(
8 <>
9 {
10 type==='Button' ?
11 <button
12 type={action}
13 className="group relative w-full flex justify-center py-2 px-4 border border-transparent text-sm font-medium rounded-md text-white bg-purple-600 hover:bg-purple-700 focus:outline-none focus:ring-2 focus:ring-offset-2 focus:ring-purple-500 mt-10"
14 onSubmit={handleSubmit}
15 >
16 {text}
17 </button>
18 :
19 <></>
20 }
21 </>
22)
23
24}Notice that you also have loads of CSS classes inside our <button/> element to style it. It makes our HTML appear bloated and difficult to read. We can follow the same approach of using a constant and a prop against the className for the <button/> as we previously did to combat this.
At last, we'll put everything together inside /src/components/Login.js file as follows:
1import { useState } from 'react';
2import { loginFields } from "../constants/formFields";
3import FormAction from "./FormAction";
4import FormExtra from "./FormExtra";
5import Input from "./Input";
6const fields=loginFields;
7let fieldsState = {};
8fields.forEach(field=>fieldsState[field.id]='');
9export default function Login(){
10const [loginState,setLoginState]=useState(fieldsState);
11const handleChange=(e)=>{
12    setLoginState({...loginState,[e.target.id]:e.target.value})
13}
14
15const handleSubmit=(e)=>{
16    e.preventDefault();
17    authenticateUser();
18}
19
20//Handle Login API Integration here
21const authenticateUser = () =>{
22
23}
24
25return(
26    <form className="mt-8 space-y-6" onSubmit={handleSubmit}>
27    <div className="-space-y-px">
28        {
29            fields.map(field=>
30                    <Input
31                        key={field.id}
32                        handleChange={handleChange}
33                        value={loginState[field.id]}
34                        labelText={field.labelText}
35                        labelFor={field.labelFor}
36                        id={field.id}
37                        name={field.name}
38                        type={field.type}
39                        isRequired={field.isRequired}
40                        placeholder={field.placeholder}
41                />
42
43            )
44        }
45    </div>
46
47    <FormExtra/>
48    <FormAction handleSubmit={handleSubmit} text="Login"/>
49
50  </form>
51)
52
53}
And once we do that, we should have a stunning, modern looking login page appear right in front of us:
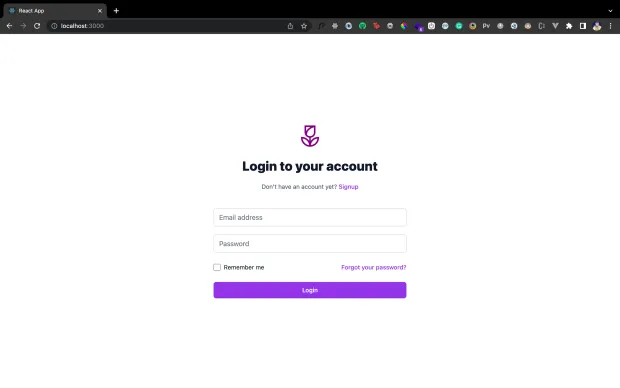
Login Page Tailwind CSS React
Building a login page with Tailwind CSS and React gives you full control over the look and feel of your authentication experience. Tailwind ensures your forms are responsive and modern, while React’s component-driven approach keeps them reusable and maintainable.
But beyond design, businesses often need to customize login pages across different brands or regions. For example, a company managing multiple products may want consistent login functionality but with unique branding (colors, logos, themes) per brand.
This is where LoginRadius helps. With hosted pages and multi-branding configuration, you can build a Tailwind + React login UI while still leveraging LoginRadius’ secure hosted pages for authentication. This lets you deliver a tailored brand experience without compromising on scalability or security.
👉 Explore how to set up Multi-Branding Configuration in LoginRadius Hosted Pages to extend your Tailwind + React login page across different products and audiences.
The Signup Page
You've created so many reusable components. Now, it's straightforward to use them to build the Signup page further.
Feel free to take this as a challenge and build it yourself based on what you've learned.
Here's a quick walkthrough of the steps and how you can use the same approach to build the Signup page in minutes.
First, create a main <Singup/> component inside /src/components/Signup.js file similar to the <Login/> component you've completed in the previous section. It will render the signup form fields and attach state and event handlers to it.
Here's how the entire code looks like:
1import { useState } from 'react';
2import { signupFields } from "../constants/formFields"
3import FormAction from "./FormAction";
4import Input from "./Input";
5const fields=signupFields;
6let fieldsState={};
7fields.forEach(field => fieldsState[field.id]='');
8export default function Signup(){
9const [signupState,setSignupState]=useState(fieldsState);
10const handleChange=(e)=>setSignupState({...signupState,[e.target.id]:e.target.value});
11const handleSubmit=(e)=>{
12e.preventDefault();
13console.log(signupState)
14createAccount()
15}
16//handle Signup API Integration here
17const createAccount=()=>{
18}
19return(
20    <form className="mt-8 space-y-6" onSubmit={handleSubmit}>
21    <div className="">
22    {
23            fields.map(field=>
24                    <Input
25                        key={field.id}
26                        handleChange={handleChange}
27                        value={signupState[field.id]}
28                        labelText={field.labelText}
29                        labelFor={field.labelFor}
30                        id={field.id}
31                        name={field.name}
32                        type={field.type}
33                        isRequired={field.isRequired}
34                        placeholder={field.placeholder}
35                />
36
37            )
38        }
39      <FormAction handleSubmit={handleSubmit} text="Signup" />
40    </div>
41
42
43
44  </form>
45)
46
47}
Then, render this component inside /src/pages/Signup.js alongside the <Header/> components with some modified props for the signup page.
1import Header from "../components/Header";
2import Signup from "../components/Signup";
3export default function SignupPage(){
4return(
5<>
6<Header
7heading="Signup to create an account"
8paragraph="Already have an account? "
9linkName="Login"
10linkUrl="/"
11/>
12<Signup/>
13</>
14)
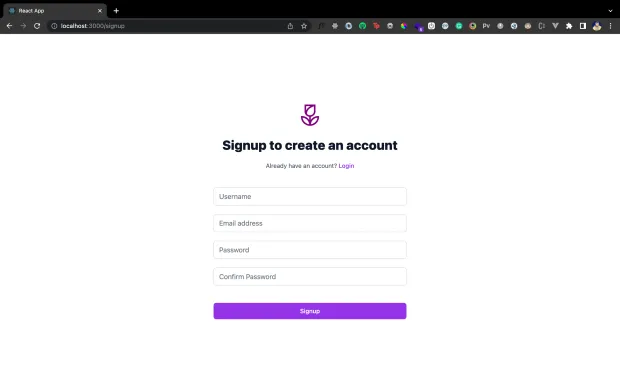
15}And that's it! That's all there is to build a great looking signup page that looks as follows:
Don't worry; if you got stuck somewhere, feel free to refer to the entire codebase for this tutorial here.
Use LoginRadius Authentication APIs
You can use LoginRadius to quickly set up an authentication backend for your frontend application.
First, set up an account, and get your API key from your Account Dashboard.
Then, you can use their login endpoint to authenticate users.
The endpoint takes an email and password as parameters and validates them against the correct credentials. If we were to integrate this endpoint in our previously built <Login/> component (/scr/components/Login.js), here's what the authenticateUser method would look like:
1//Handle Login API Integration here
2    const authenticateUser = () =>{
3    const endpoint=`https://api.loginradius.com/identity/v2/auth/login?apikey=${apiKey}`;
4     fetch(endpoint,
5         {
6         method:'POST',
7         headers: {
8         'Content-Type': 'application/json'
9         },
10         body:JSON.stringify(loginFields)
11         }).then(response=>response.json())
12         .then(data=>{
13            //API Success from LoginRadius Login API
14         })
15         .catch(error=>console.log(error))
16
17}
Similarly, you can use the Signup endpoint to create users without managing a complete backend database yourself.
Curious to learn more?
I did a full-fledged guide on authenticating Svelte apps with LoginRadius here.
Conclusion
In this tutorial, you have learned to create beautiful registration and authentication forms for your web app with Tailwind CSS. You also learned the advantages and disadvantages of Tailwind CSS and understood how Tailwind CSS works better with React.


