In this tutorial, you'll learn how to easily convert an OpenCV project into a web app that you can showcase. You'll use a library called Streamlit, which helps you easily build a web user interface in Python. Yes, you heard it right — no HTML, CSS, or JavaScript required. Just Python!
Prerequisites
- You should be comfortable using basic OpenCV functions.
- You should be comfortable coding in Python.
Let's get started.
Install Dependencies
Install OpenCV and Streamlit using pip. You would also need Pillow — another image library.
1pip install opencv-python streamlit PillowIf you use Python 2.7, note that OpenCV doesn't directly support Python 2.7 in their latest versions. Accordingly, you have to specify an older version like this
pip install opencv-python==4.2.0.32
Create a Small OpenCV Project
1import cv2
2def brighten_image(image, amount):
3img_bright = cv2.convertScaleAbs(image, beta=amount)
4return img_bright
5def blur_image(image, amount):
6img = cv2.cvtColor(image, 1)
7blur_img = cv2.GaussianBlur(img, (11, 11), amount)
8return blur_img
9def enhance_details(img):
10hdr = cv2.detailEnhance(img, sigma_s=12, sigma_r=0.15)
11return hdr
12img = cv2.imread(filename='tony_stark.webp')
13do some cool image processing stuff
14img = enhance_details(img)
15img = brighten_image(img, amount=25)
16img = blur_image(img, amount=0.2)
17cv2.imshow('Tony Stark', img)
18cv2.waitKey(0)
19cv2.destroyAllWindows()
Here are three image processing functions that accept an image, do some processing, and return the processed image.
brighten_image— increases the brightness of the image.blur_image— applies a blur effect on the image.enhance_details— applies an effect to enhance the details of the image.
These functions make use of the OpenCV functions to do the actual processing — for e.g.: cv2.GaussianBlur, etc. I'm not explaining in-depth about them and the various parameters they accept since this tutorial is more focused on integrating OpenCV with Streamlit. However, feel free to jump to the OpenCV documentation to know more details about them.
This program reads the image from the filepath using cv2.imread(); then, it passes the image to these functions that do the processing. Finally, the image is displayed using cv2.imshow(). cv2.waitKey(0) is to wait till the user presses any key, after which the program is exited.
Streamlit Basics
Streamlit offers some common UI components out of the box that you can place on your webpage. This makes it super easy to code up something real quick. The way Streamlit works is that it reruns the Python script every time a user interacts with the components. They have some caching and optimizations, but this simple design makes it easy to build interactive webpages using Streamlit.
Someone said, “Talk is cheap. Show me the code.” So, let's see some code.
Open an editor and copy-paste this to demo-app.py
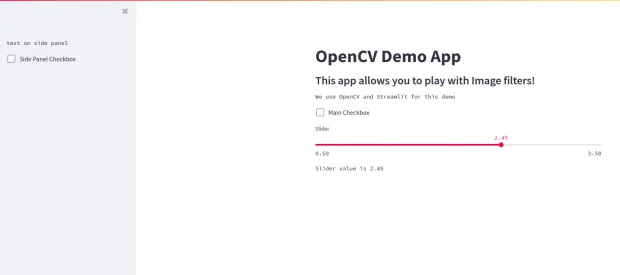
1import streamlit as st
2st.title("OpenCV Demo App")
3st.subheader("This app allows you to play with Image filters!")
4st.text("We use OpenCV and Streamlit for this demo")
5if st.checkbox("Main Checkbox"):
6st.text("Check Box Active")
7slider_value = st.slider("Slider", min_value=0.5, max_value=3.5)
8st.text(f"Slider value is {slider_value}")
9st.sidebar.text("text on side panel")
10st.sidebar.checkbox("Side Panel Checkbox")
To start a streamlit app, simply run the command streamlit run with the filename — for example:
1streamlit run demo-app.pyYou should get a similar output as follows.
1You can now view your Streamlit app in your browser.
2Local URL: http://localhost:8501
3Network URL: http://192.168.1.8:8501
Click on the links in the output to open the Streamlit app in your browser. You'll see something as follows.
If you see the code, it's very straightforward. It imports streamlit as st. The default is a simple linear layout where you can place components on the webpage in a sequential manner.
For example, st.title() , st.checkbox(), st.slider() places the components on the main page in the order they're called..
Streamlit also offers a side panel. In order to place components in the sidepanel, you can do as follows:
st.sidebar.title() , st.sidebar.checkbox(), st.sidebar.slider()
There are other components also apart from these. You can explore more in the docs.
Integrate Streamlit into Your OpenCV Project
Let's integrate your OpenCV program into Streamlit. Here is the complete code:
1import cv2
2import streamlit as st
3import numpy as np
4from PIL import Image
5def brighten_image(image, amount):
6img_bright = cv2.convertScaleAbs(image, beta=amount)
7return img_bright
8def blur_image(image, amount):
9blur_img = cv2.GaussianBlur(image, (11, 11), amount)
10return blur_img
11def enhance_details(img):
12hdr = cv2.detailEnhance(img, sigma_s=12, sigma_r=0.15)
13return hdr
14def main_loop():
15st.title("OpenCV Demo App")
16st.subheader("This app allows you to play with Image filters!")
17st.text("We use OpenCV and Streamlit for this demo")
18blur_rate = st.sidebar.slider("Blurring", min_value=0.5, max_value=3.5)
19brightness_amount = st.sidebar.slider("Brightness", min_value=-50, max_value=50, value=0)
20apply_enhancement_filter = st.sidebar.checkbox('Enhance Details')
21
22image_file = st.file_uploader("Upload Your Image", type=['jpg', 'png', 'jpeg'])
23if not image_file:
24    return None
25
26original_image = Image.open(image_file)
27original_image = np.array(original_image)
28
29processed_image = blur_image(original_image, blur_rate)
30processed_image = brighten_image(processed_image, brightness_amount)
31
32if apply_enhancement_filter:
33    processed_image = enhance_details(processed_image)
34
35st.text("Original Image vs Processed Image")
36st.image([original_image, processed_image])
37
38if name == 'main':
39main_loop()
Let's understand what's happening here.
Apart from the image processing functions, you have a 'main_loop' function to add the logic for the webpage.
Nothing fancy about st.title(), st.subheader(), st.text() — they just print some text in different sizes.
Next, there are two sliders to get the amount by which you need to apply the blur and brightness filters.
Note that st.sidebar places these components in the sidebar.
slider() takes in some arguments: name of the slider, min value, max value, and the default value of the slider. This function returns the current value of the slider.
Next, there's a checkbox component.
checkbox() returns True if the checkbox is checked; else, it would return False.
Next, there's a file_uploader component, through which users can upload files of different types specified by the type parameter. Here, it's restricted to the image file types needed for the demo usecase.
When the program starts, there are no files selected by the user. At this time, this component returns None. When a file is uploaded from the UI, this component returns the path of the file.
This is why there's an if-check on the return value of this component. If no files are selected, you can skip the rest of the program by returning from the main_loop() function.
Remember that the entire program is rerun whenever there's user interaction on any components of the page. When a user uploads a file, the whole program is executed again — and the if-check fails so that the program executes the image processing logic.
Pillow.Image() is used to open this file, then it's converted to a numpy array using np.array() so that OpenCV can process it.
Now, it's passed to the different processing functions along with the amount parameter.
Finally, the program displays the original and processed images using the st.image() component.
The web app is ready!
To start the app, simply run:
1streamlit run demo-app.pyNow you can play with the filters. Of course, these are some basic filters, but you can extend it to more interesting filters — like cartoonify filters, etc. — using the rich features of OpenCV.

How to Publish Your App?
To publish your app, you need to host this program somewhere. There are different hosting providers for complex projects. But for this hobby project, is there a simple and quick solution?
Yes, there's one!
You can host the Streamlit application in Streamlit Cloud for free. You can host up to 3 apps in an account for free with up to 1GB of memory.
Check out this tutorial from the community to host your app in Streamlit Cloud.
Conclusion
You can find the source code for this tutorial. The web app discussed above is hosted here if you want to try it out.
Want to add user authentication and registration in your app quickly? Check out the LoginRadius Python integration.


