
Introduction
Building an API in Deno is straightforward. Authentication is where the decisions start to matter.
Once an application has user-specific endpoints, the API needs a reliable way to identify the caller on each request. JWT authentication in Deno is one approach: after a user successfully signs in, the server issues a signed JSON Web Token (JWT). The client sends that token with subsequent API requests, and the server verifies it before allowing access to protected resources.
But creating a JWT is the easy part.
A secure implementation also needs to verify the token's signature, enforce expiration, validate relevant claims such as issuer and audience, protect the signing key, and make authorization decisions after the caller has been authenticated. Simply decoding a JWT or checking that a token exists is not enough.
The complete authentication path looks more like this:
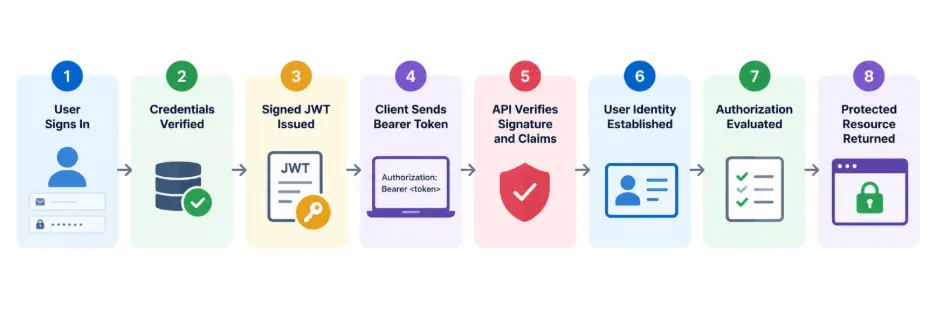
This distinction matters because a JWT is a token format, not an authentication system by itself. Its payload is also encoded rather than encrypted by default, so sensitive information should not be placed inside a token simply because it is signed.
With modern Deno and established JWT libraries such as jose, developers can build this flow without relying on outdated JWT packages or custom token-signing logic. The real goal is not just to generate a token. It is to make every token the API accepts verifiable, short-lived, appropriately scoped, and useful for enforcing access to the right resources.
What Is JWT Authentication and How Does It Work in Deno?
JWT authentication in Deno uses a signed JSON Web Token to carry claims that an API can verify before allowing a request to access protected resources. The token is typically issued after the application has authenticated the user through credentials or another trusted authentication method.
The client then sends the JWT with later API requests, commonly as a bearer token in the HTTP Authorization header. The Deno API verifies the token before trusting the identity or claims it contains.
A JWT has three dot-separated parts: Header.Payload.Signature
Each part serves a different purpose. Understanding that distinction prevents a common mistake: treating everything inside a JWT as inherently secure simply because the token has been signed.
The JWT Header Identifies How the Token Is Signed
The header contains metadata about the token. For a signed JWT, this commonly includes the signing algorithm and token type.
A decoded header might conceptually look like this:
{
"alg": "HS256",
"typ": "JWT"
}
The algorithm tells the verifier which cryptographic method is associated with the signature. The API should not blindly trust whatever algorithm appears in an incoming token. Verification should be restricted to the algorithm or algorithms the application explicitly expects.
The JWT Payload Carries Claims About the Token and Subject
The payload contains claims. These are pieces of information the API may use when processing the token. Standard claims commonly relevant to authentication include:
| Claim | Purpose | Security Benefit |
|---|---|---|
| sub | Subject | User identity |
| iss | Issuer | Prevent foreign token acceptance |
| aud | Audience | Restrict API usage |
| exp | Expiration | Limit replay window |
| iat | Issued At | Auditing |
| nbf | Not Before | Delayed activation |
An application can also include its own claims when there is a legitimate reason to do so. Keep the payload small. More importantly, do not treat it as secret storage.
A standard signed JWT is encoded so that its header and payload can be read by anyone who obtains the token. Signing protects the token against undetected modification; it does not encrypt the claims.
Passwords, signing secrets, API keys, and unnecessary sensitive customer data do not belong in the payload.
The JWT Signature Protects Token Integrity
The signature allows the API to determine whether the signed token data has been changed and whether it was signed using the expected cryptographic key.
For example, if an attacker modifies a sub claim in a properly signed JWT without possessing the required signing key, the existing signature will no longer validate.
This is why decoding and verifying a JWT are different operations.
Decoding can reveal the header and payload. It does not establish that the token came from a trusted issuer or that its contents are authentic. Verification is what matters.
JWT Verification Should Include Claims, Not Just the Signature
A valid signature is necessary, but production authentication normally requires additional checks.
Suppose a token was legitimately signed six months ago but expired five months ago. Its cryptographic signature can still be mathematically valid. The application should reject it because its exp claim says the token is no longer acceptable.
The same principle applies to issuer and audience validation. A correctly signed token intended for a different API should not automatically be accepted by yours.
A stronger verification decision therefore looks like this:
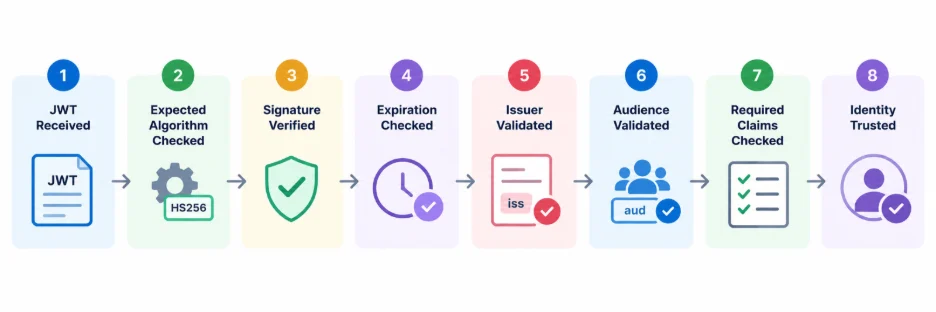
The exact claims required depend on the application's token architecture, but the rule is consistent: never trust claims before verification succeeds.
Authentication Still Comes Before JWT Issuance
JWTs do not authenticate a username and password on their own.
During sign-in, the application first needs to verify the user's credentials. Only after authentication succeeds should it issue a signed access token representing that authenticated identity.
The lifecycle is: Credentials Submitted → Credentials Verified → JWT Issued → JWT Used on Later Requests → JWT Verified → Protected Request Evaluated
And there is one more distinction worth keeping clear. Authentication establishes who the caller is. Authorization determines what that authenticated caller is permitted to do.
A valid JWT belonging to User A should not automatically allow User A to read or modify User B's resources. That distinction will become important once we use JWT verification to protect the Deno API routes.
Set Up a Modern Deno Project for JWT Authentication
Before adding JWT authentication, create a small Deno project with just enough structure to keep authentication, routes, and application logic separate.
You will need a current supported version of Deno, basic TypeScript knowledge, and an API client such as Postman, Insomnia, or curl for testing requests. We will also use the jose library for JWT operations rather than building token signing and verification ourselves.
Modern Deno can work directly with npm packages, so libraries from the npm ecosystem can be imported using Deno's npm compatibility rather than relying on the older URL-based dependency patterns common in earlier Deno tutorials.
Create the Deno Project
Create a new directory and initialize the project:
mkdir deno-jwt-api
cd deno-jwt-api
deno init
Deno creates the basic project files. From there, we can organize the authentication code without introducing a large application structure too early.
A practical starting structure is:
deno-jwt-api/
├── deno.json
├── main.ts
├── .env
└── src/
├── auth/
│ ├── jwt.ts
│ └── middleware.ts
├── routes/
├── services/
└── db/
The responsibilities stay fairly clear. JWT creation and verification belong under auth, route handlers under routes, application logic under services, and persistence-related code under db.
As the API grows, this structure can expand without putting authentication logic directly inside every route.
Add the JWT Dependency
For JWT creation and verification, use the established jose library: deno add npm:jose
Deno supports npm packages directly, which makes it unnecessary to depend on an older JWT package simply because the application runs on Deno.
Later, we will use jose to sign access tokens and verify incoming JWTs before protected routes are allowed to continue.
Keep Configuration and Signing Material Out of Source Code
Create a .env file for local development configuration:
JWT_SECRET=replace-with-a-strong-development-secret
JWT_ISSUER=deno-jwt-api
JWT_AUDIENCE=deno-jwt-api-client
Do not commit real production signing secrets to the repository.
For production environments, signing keys or secrets should come from an appropriately protected configuration or secrets-management system. Environment variables can be useful for local development and some deployment environments, but the important requirement is that signing material is not hardcoded into application source.
Also add .env to .gitignore: .env
One problem in older JWT examples is generating a completely new signing key every time the server starts. That makes previously issued tokens unverifiable after a restart. For an authentication system, signing-key persistence and rotation need to be deliberate.
Use Deno Permissions Deliberately
Deno does not automatically give an application unrestricted access to system resources. If the API needs network access, environment variables, or a database connection, those permissions need to be granted when the application runs.
For example, a local API that reads environment configuration and listens for HTTP requests might eventually be started with permissions appropriate to those operations.
Avoid reaching immediately for: deno run -A main.ts
-A grants all permissions. It is convenient during experimentation, but a production-oriented example should grant only the capabilities the application actually requires.
As database and environment access are added, we will make those requirements explicit rather than hiding them behind unrestricted permissions.
Start With a Minimal Application Entry Point
Keep main.ts small. Its job should be to start the server and connect the major application pieces rather than contain password verification, JWT signing, database queries, and route authorization in one file.
That separation will matter once authentication is introduced: HTTP Request → Route → Authentication Middleware → Application Logic → Response
For public endpoints such as signup and sign-in, authentication middleware will not be required. Protected routes will pass through JWT verification before their handlers run.
With the project structure in place, the next step is to create those API routes and establish which endpoints are public and which require an authenticated request.
Create the Deno API and Separate Public From Protected Routes
Before implementing JWTs, define which parts of the API anyone can reach and which require an authenticated identity. That boundary should be visible in the route design rather than scattered through individual handlers.
For this tutorial, we will use a small task API with two public authentication endpoints and several routes that require a valid access token:
POST /api/signup
POST /api/signin
GET /api/profile
GET /api/tasks
POST /api/tasks
GET /api/tasks/:id
PUT /api/tasks/:id
DELETE /api/tasks/:id
/api/signup and /api/signin must be reachable before a JWT exists. The remaining endpoints will eventually pass through authentication middleware before their handlers execute.
Start the API With Deno.serve()
Modern Deno includes a built-in HTTP server API, so a small REST API does not require a framework simply to listen for requests.
Start with a minimal main.ts: const PORT = 8000;
Deno.serve({ port: PORT }, async (request) => {
const url = new URL(request.url);
if (request.method === "GET" && url.pathname === "/health") {
return Response.json({ status: "ok" });
}
return Response.json(
{ message: "Not found" },
{ status: 404 },
);
});
console.log(API running on http://localhost:${PORT});
Run the application with the permissions it currently needs: deno run --allow-net main.ts
Then request: GET http://localhost:8000/health
The expected response is:
{
"status": "ok"
}
At this stage, there is no authentication. That is intentional. First establish that requests reach the API correctly.
Create Public Signup and Sign-In Routes
Now add the two routes responsible for entering the authentication lifecycle.
A signup request might eventually accept:
{
"email": "user@example.com",
"password": "customer-password"
}
The signup handler will validate the input, check whether the account already exists, hash the password, and store the resulting password verifier rather than the plaintext password.
Sign-in accepts the credentials required to authenticate the customer:
{
"email": "user@example.com",
"password": "customer-password"
}
Its responsibility is different: Credentials Received → Account Located → Password Verified → Authentication Succeeds → JWT Issued
Do not generate a JWT simply because an email address exists. Token issuance belongs after credential verification succeeds.
Keep Authentication Logic Out of Route Handlers
It is tempting to put everything directly inside /api/signin: database lookup, password comparison, JWT signing, error handling, and token configuration.
That works for a tiny demo. It becomes difficult to maintain almost immediately.
Instead, keep the responsibilities separate:
Route
↓
Authentication Service
↓
User/Data Service
↓
JWT Service
The route should deal mainly with the HTTP request and response. Password verification belongs in authentication logic, and token creation belongs in the JWT module we created earlier.
This separation also makes authentication easier to test without starting an HTTP server for every test case.
Mark Protected Routes Clearly
The task and profile endpoints should not trust requests until JWT verification succeeds.
Their eventual request path will look like this: Request → Extract Bearer Token → Verify JWT → Establish Authenticated User → Route Handler → Authorization Check → Resource
Notice that JWT verification does not remove the authorization step.
Suppose the request is: GET /api/tasks/123
A valid token can establish that the caller is User A. The route still needs to determine whether task 123 belongs to User A or whether that user otherwise has permission to access it.
Without that check, JWT authentication can be implemented correctly while the API still exposes another customer's data.
Return Appropriate HTTP Status Codes
Authentication APIs are easier to debug when status codes have consistent meanings.
For this tutorial, use the following general distinction:
| Status Code | Meaning |
|---|---|
| 200 | Request succeeded |
| 201 | Resource created |
| 400 | Invalid request |
| 401 | Authentication missing or invalid |
| 403 | Authenticated but not permitted |
| 404 | Resource not found |
| 409 | Resource already exists |
In HTTP terminology, 401 Unauthorized is normally used when valid authentication credentials are missing or cannot be accepted, despite the slightly confusing name. 403 Forbidden is useful when the caller has been authenticated but is not allowed to perform the requested operation.
That difference becomes particularly important once JWT middleware and resource-level authorization are added.
For now, the API has its boundary: signup and sign-in establish identity, while profile and task routes require it. The next step is making sure the credentials used at signup are stored safely before we issue any JWT at all.
Authenticate the User and Issue a Signed JWT in Deno
Once the submitted password has been verified, the API can issue an access token representing the authenticated user. This is where JWT enters the sign-in flow.
The token should contain only the claims the API needs, have a defined lifetime, and be signed with a key the server protects. Avoid putting the entire user record into the payload simply because it is available at sign-in.
Create a JWT Signing Module With jose
Keep token creation in src/auth/jwt.ts rather than embedding signing logic inside the sign-in route.
For an HMAC-based example using HS256, the module can load the signing secret from application configuration and convert it into key material for jose:
import { SignJWT } from "jose";
const secret = Deno.env.get("JWT_SECRET");
if (!secret) {
throw new Error("JWT_SECRET is not configured");
}
const key = new TextEncoder().encode(secret);
const issuer = Deno.env.get("JWT_ISSUER") ?? "deno-jwt-api";
const audience = Deno.env.get("JWT_AUDIENCE") ?? "deno-jwt-api-client";
export async function createAccessToken(userId: string) {
return await new SignJWT({})
.setProtectedHeader({ alg: "HS256", typ: "JWT" })
.setSubject(userId)
.setIssuer(issuer)
.setAudience(audience)
.setIssuedAt()
.setExpirationTime("15m")
.sign(key);
}
This creates a short-lived signed JWT with the user identifier in sub rather than exposing unnecessary account information.
The 15-minute lifetime here is an example, not a universal requirement. Token lifetime should reflect the application's risk model and refresh/session architecture.
Use Claims Deliberately
A useful access token might contain claims such as:
{
"sub": "user_123",
"iss": "deno-jwt-api",
"aud": "deno-jwt-api-client",
"iat": 1780000000,
"exp": 1780000900
}
Each claim has a reason to exist.
sub identifies the subject represented by the token. iss identifies who issued it. aud identifies the intended recipient or API context. iat records when it was issued, while exp defines when the token must stop being accepted.
Application-specific claims can be added when the API genuinely needs them, but avoid turning the JWT into a copy of the user database.
Roles and permissions need particular care. If authorization data is placed inside a JWT, that information can remain valid until the token expires even if permissions change in the underlying system. Whether authorization claims belong in the token depends on how quickly the application needs those changes to take effect.
Issue the Token Only After Credential Verification Succeeds
The sign-in service can now connect password verification with JWT creation:
import { createAccessToken } from "../auth/jwt.ts";
export async function signIn(email: string, password: string) {
const user = await findUserByEmail(email);
if (!user) {
throw new Error("INVALID_CREDENTIALS");
}
const passwordIsValid = await verifyPassword(
password,
user.passwordHash,
);
if (!passwordIsValid) {
throw new Error("INVALID_CREDENTIALS");
}
const accessToken = await createAccessToken(user.id);
return {
accessToken,
tokenType: "Bearer",
expiresIn: 900,
};
}
The exact password verification and database functions will depend on the libraries selected for the application. The security boundary stays the same: Credentials Submitted → User Located → Password Verified → JWT Created → Access Token Returned
If password verification fails, no token should be issued.
Return Only the Information the Client Needs
A successful sign-in response might look like this:
{
"accessToken": "",
"tokenType": "Bearer",
"expiresIn": 900
}
Returning the token lifetime separately can help the client understand when it will need a new access token without decoding the JWT and treating unverified payload data as authoritative.
The client can then use the token for subsequent protected API requests.
Do Not Generate a New Signing Secret Every Time Deno Starts
This deserves explicit attention because it is an easy mistake in JWT tutorials.
If the application creates a random signing key at startup, tokens issued before the next restart will no longer verify once a new key is generated. In a multi-instance deployment, different application instances could also end up unable to verify each other's tokens. Signing keys need a deliberate lifecycle.
For local development, a stable secret loaded from environment configuration can keep the example understandable. Production systems should use appropriately protected signing material and establish procedures for storage, access, rotation, and—where the architecture requires it—supporting multiple active keys during rotation.
Choose Symmetric or Asymmetric Signing Based on the Architecture
HS256 is useful for demonstrating JWT authentication because the same secret signs and verifies the token. That also means every service capable of verification needs access to the shared signing secret.
For architectures where one identity service issues tokens and multiple independent APIs only need to verify them, asymmetric algorithms can provide a cleaner trust model. The issuer protects the private signing key while APIs verify tokens using the corresponding public key.
The choice should come from the architecture rather than a blanket rule that one JWT algorithm is always best.
At this point, the API can authenticate a user and issue a signed, expiring access token. The next question is practical: how should the client send that JWT back to the Deno API without turning it into another exposed credential?
Send JWT Access Tokens Securely With the Authorization Header
After sign-in, the client has a signed access token. That token now acts as a bearer credential: any party that obtains a valid token may be able to use it until it expires or is otherwise rejected.
So where and how the JWT is sent matters.
For API requests, a common approach is to send the access token in the HTTP Authorization header using the Bearer authentication scheme: Authorization: Bearer <access_token>
A request to the protected profile endpoint might look like this:
GET /api/profile HTTP/1.1
Host: localhost:8000
Authorization: Bearer eyJhbGciOiJIUzI1NiIsInR5cCI6IkpXVCJ9...
The authentication journey is now: User Signs In → API Issues Access Token → Client Sends Bearer Token → API Extracts Token → JWT Verified → Protected Request Evaluated
Use the Authorization Header Instead of Putting Tokens in URLs
Avoid sending access tokens as query parameters such as: /api/profile?token=
URLs can appear in browser history, application logs, analytics systems, monitoring tools, proxy logs, and other places where bearer credentials do not belong.
Using the Authorization header provides a standard location for authentication credentials and keeps the token separate from the resource URL.
The API should still run over HTTPS in production. JWT signing does not encrypt the HTTP request or protect a bearer token while it travels across an insecure connection.
Treat the JWT as a Credential Even Though Its Payload Is Readable
A signed JWT is not secret simply because it looks like an unreadable string.
Its header and payload are typically Base64URL-encoded and can be decoded without possessing the signing key. The signature protects integrity and authenticity when correctly verified; it does not provide payload confidentiality.
That creates two separate rules.
First, avoid putting unnecessary sensitive information inside the token. Second, protect the token itself because possession may allow someone to present it as a bearer credential.
If an attacker steals a valid access token, they do not need to modify its payload to cause trouble. They may simply replay the original token while it remains acceptable to the API.
Do Not Treat localStorage as the Default JWT Storage Answer
Browser token storage is more nuanced than “save the JWT in localStorage.”
JavaScript-accessible storage can expose tokens when an application has an exploitable cross-site scripting (XSS) vulnerability. Cookies configured with HttpOnly can prevent JavaScript from directly reading the token, but cookie-based authentication introduces its own considerations, including CSRF protections and cookie configuration.
The right approach depends on the application architecture.
A browser-based frontend, native mobile application, server-rendered application, and machine-to-machine client do not necessarily need the same token-storage strategy.
For this Deno API, the important server-side assumption is simpler: anything received as a bearer token is untrusted until verification succeeds.
Send the Token From the Client
A JavaScript client making an API request can attach the token to the header:
const response = await fetch("http://localhost:8000/api/profile", {
headers: {
Authorization: Bearer ${accessToken},
},
});
For curl, the equivalent request is: curl http://localhost:8000/api/profile
-H "Authorization: Bearer <access_token>"
Sending the header correctly does not prove the caller is authenticated. It only gives the API a credential to evaluate.
Never Trust Claims Just Because the Client Sent a JWT
Suppose a request arrives with a token whose decoded payload says:
{
"sub": "admin-user",
"role": "admin"
}
Those values should mean nothing to the application until the JWT has been cryptographically verified and all required claims have passed validation.
A client can construct an arbitrary string that looks like a JWT. Attackers can also modify payload values in a legitimate token. The signature and validation process determine whether the server should trust what it received.
That gives the protected request a strict boundary: Bearer Token Received → Treat as Untrusted → Verify Signature and Claims → Establish Trusted Identity → Evaluate Authorization
The next piece of the implementation is therefore the most security-sensitive part of the request path: building Deno middleware that rejects missing, malformed, expired, incorrectly issued, or otherwise invalid JWTs before protected route logic executes.
Verify JWTs in Deno Before Allowing Access to Protected Routes
Every protected request should pass through JWT verification before the route uses identity information from the token.
The API needs to extract the bearer token, verify its signature using the expected key and algorithm, validate relevant claims, and only then make the verified identity available to downstream application logic.
A useful request path is: Request → Read Authorization Header → Extract Bearer Token → Verify Signature → Validate Claims → Establish Identity → Continue to Protected Route
If any required check fails, the request should stop there.
Extract the Bearer Token Safely
Start with the Authorization header:
Authorization: Bearer <access_token>
The authentication layer should account for a missing header, an unsupported authentication scheme, an empty token, and malformed input rather than assuming every request follows the expected format.
A small helper can keep that parsing separate:
function extractBearerToken(request: Request): string | null {
const authorization = request.headers.get("authorization");
if (!authorization) {
return null;
}
const [scheme, token] = authorization.trim().split(/s+/);
if (scheme?.toLowerCase() !== "bearer" || !token) {
return null;
}
return token;
}
A missing or malformed credential should result in a 401 Unauthorized response instead of allowing the request to continue.
Verify the JWT Signature With jose
The same JWT module used to issue tokens can contain the verification logic.
For the HS256 example:
import { jwtVerify } from "jose";
const secret = Deno.env.get("JWT_SECRET");
if (!secret) {
throw new Error("JWT_SECRET is not configured");
}
const key = new TextEncoder().encode(secret);
const issuer = Deno.env.get("JWT_ISSUER") ?? "deno-jwt-api";
const audience = Deno.env.get("JWT_AUDIENCE") ?? "deno-jwt-api-client";
export async function verifyAccessToken(token: string) {
const { payload } = await jwtVerify(token, key, {
algorithms: ["HS256"],
issuer,
audience,
});
return payload;
}
The important detail here is that verification is constrained by what the API expects. The application is not simply reading the algorithm declared by an incoming token and accepting it without policy.
Validate Expiration, Issuer, Audience, and Required Claims
Signature verification answers an important question: was this token signed using the expected cryptographic key and left unmodified?
It is not the only question the API needs to ask.
For an access token, the verification policy should also account for relevant claims such as:
exp → Is the token still valid?
nbf → Is the token valid yet, when this claim is present?
iss → Did the expected issuer issue it?
aud → Is this API an intended audience?
sub → Does the token identify the expected subject?
Libraries such as jose can perform several registered-claim validations as part of jwtVerify() when the expected values are supplied. Application-specific requirements still need explicit checks.
For example, if the application requires every user access token to contain a valid subject:
export async function verifyAccessToken(token: string) {
const { payload } = await jwtVerify(token, key, {
algorithms: ["HS256"],
issuer,
audience,
});
if (!payload.sub) {
throw new Error("TOKEN_SUBJECT_MISSING");
}
return payload;
}
Do not retrieve identity from payload.sub before the verification operation succeeds.
Turn the Verified Subject Into Authentication Context
Once verification succeeds, the application can create a small authentication context for the request.
For example:
export type AuthContext = {
userId: string;
};
export async function authenticateRequest(
request: Request,
): Promise {
const token = extractBearerToken(request);
if (!token) {
throw new Error("AUTHENTICATION_REQUIRED");
}
const payload = await verifyAccessToken(token);
if (!payload.sub) {
throw new Error("INVALID_TOKEN");
}
return {
userId: payload.sub,
};
}
Protected handlers can now work with userId rather than repeatedly parsing and verifying the JWT themselves.
That gives the application one consistent trust boundary: Unverified Request → Authentication Layer → Verified Identity Context → Application Logic
Reject Invalid and Expired Tokens Consistently
JWT verification can fail for several reasons. The token may be expired, malformed, signed with the wrong key, issued by an unexpected issuer, intended for another audience, or otherwise invalid.
The public response does not need to reveal exactly which cryptographic check failed.
A generic response is often enough:
{
"message": "Invalid or expired access token."
}
with: HTTP/1.1 401 Unauthorized
Detailed verification failures can be recorded internally where appropriate, but avoid turning API error responses into a debugging guide for attackers.
Keep JWT Verification Centralized
One of the easiest implementation mistakes is verifying tokens differently across endpoints.
For example, /api/profile might check expiration and issuer while /api/tasks only decodes the token and reads sub. The application then has different authentication guarantees depending on which endpoint receives the request.
Centralized authentication logic prevents that drift.
Protected routes should depend on the same verification policy:
Protected Route A ─┐
Protected Route B ─┼→ JWT Verification → Verified Authentication Context
Protected Route C ─┘
When signing algorithms, issuers, audiences, or token policies change later, the verification behavior can then be updated in one place.
A successfully verified JWT establishes the caller's authenticated identity. It still does not answer whether that identity is allowed to read, update, or delete a particular resource. The next step is applying both authentication and resource-level authorization to the CRUD API.
Test the Complete JWT Authentication Flow in Deno
A successful sign-in request proves only that the API can issue a JWT. Before considering the authentication flow complete, test what happens when the token is missing, invalid, expired, or used to request a resource the authenticated user does not own.
The full path should now work like this: Create Account → Sign In → Receive JWT → Send Bearer Token → Verify JWT → Establish User Identity → Check Authorization → Return Protected Resource
Use curl, Postman, Insomnia, or another API client to run the same checks against the application.
Create a Test User
Start with the public signup endpoint:
curl -X POST http://localhost:8000/api/signup
-H "Content-Type: application/json"
-d '{
"email": "user@example.com",
"password": "example-password"
}'
A successful registration should return an appropriate 201 Created response without exposing the stored password verifier.
Then try registering the same account again. The API should handle the duplicate deliberately rather than create a second identity.
Sign In and Obtain an Access Token
Authenticate using the registered credentials:
curl -X POST http://localhost:8000/api/signin
-H "Content-Type: application/json"
-d '{
"email": "user@example.com",
"password": "example-password"
}'
After successful password verification, the response should contain the access token:
{
"accessToken": "",
"tokenType": "Bearer",
"expiresIn": 900
}
Also test an incorrect password. Authentication should fail and no JWT should be issued.
Call a Protected Route Without a JWT
Now request the profile endpoint without an Authorization header: curl http://localhost:8000/api/profile
The request should be rejected with 401 Unauthorized. This confirms that the protected route cannot be reached simply because the client knows its URL.
Repeat the Request With a Valid Bearer Token
Send the access token obtained during sign-in: curl http://localhost:8000/api/profile
-H "Authorization: Bearer <access_token>"
The API should: Extract Token → Verify Signature → Validate Claims → Read Verified sub → Load User → Return Profile
A successful response confirms that the basic authenticated request path works.
Modify the JWT and Confirm That Verification Fails
Take a valid token and alter part of its payload or signature before sending it back to the API.
The modified token may still look structurally like a JWT, but its signature should no longer validate. The API should return 401 Unauthorized.
This test is important because it demonstrates why merely decoding the payload is not authentication. If changing sub, a role, or another claim still allows access, the implementation is trusting unverified data somewhere in the request path.
Test an Expired Access Token
For development testing, temporarily configure a very short token lifetime and wait for it to expire.
Then request: curl http://localhost:8000/api/profile
-H "Authorization: Bearer <expired_access_token>"
The API should reject the token even though its signature was originally created correctly. An expired token is not made acceptable simply because its signature remains cryptographically valid.
Test an Incorrect Issuer or Audience
Expiration is not the only claim worth testing.
Create or obtain a token whose iss or aud does not match the values expected by this API. Verification should fail.
This catches an important configuration problem: accepting a correctly signed token that was issued for a different security context.
The verification rule should remain: Valid Signature + Valid Required Claims = Token Can Be Considered for Authentication
Not: Valid Signature = Accept Everything in the Token
Verify Resource-Level Authorization With Two Users
Authentication testing becomes much more useful when there are at least two accounts.
Create User A and User B. Sign in as both and obtain separate access tokens.
Then have User A create a task: User A → POST /api/tasks → task_123
Next, use User B's valid JWT to request User A's task: User B → GET /api/tasks/task_123
User B is authenticated, so this is not simply an invalid-token test. The API needs to reject the request because User B is not authorized to access User A's resource.
The expected journey is: User B JWT Verified → User B Identity Established → Task Loaded → Ownership Evaluated → Access Denied
This test catches a class of security problems that JWT verification alone cannot solve.
Test Failure Paths Alongside the Successful Path
Before moving on, the API should behave predictably across the major scenarios:
| Test | Expected Result |
|---|---|
| Valid credentials | JWT issued |
| Incorrect credentials | Authentication rejected |
| Protected request without token | 401 |
| Malformed bearer token | 401 |
| Modified JWT | 401 |
| Expired JWT | 401 |
| Unexpected issuer or audience | 401 |
| Valid JWT and permitted resource | Request succeeds |
| Valid JWT but unauthorized resource | 403 or deliberate 404 policy |
A JWT authentication implementation is easier to trust when its rejection paths have been tested as carefully as its successful login flow.
Once these tests pass, the basic Deno implementation is working. The remaining risks are less about whether the code can create and verify a JWT and more about the mistakes that tend to appear when the same approach moves into a production environment.
Common JWT Authentication Mistakes in Deno and How to Avoid Them
A JWT implementation can pass every basic login test and still have security gaps. Most problems are not caused by the JWT format itself. They come from weak key management, incomplete verification, overly long token lifetimes, or treating authentication as if it automatically grants authorization.
Here are the issues worth checking before a Deno JWT implementation moves beyond development.
Hardcoding the JWT Signing Secret
Putting the signing secret directly in jwt.ts makes it easy for sensitive key material to end up in source control, build artifacts, logs, or copied code.
Avoid patterns such as: const secret = "my-super-secret-jwt-key";
Keep signing material outside the source code and restrict who or what can access it. Production deployments should also have a defined process for key rotation rather than treating one secret as permanent.
Generating a New Signing Key Every Time the Server Starts
Generating an ephemeral key at application startup may look secure because the key is random, but it creates a different problem.
Server Starts → New Key Generated → JWT Issued → Server Restarts → Different Key Generated → Existing JWT Fails Verification
In multi-instance environments, the problem becomes even clearer. If each Deno instance creates its own unrelated key, one instance may be unable to verify a token issued by another.
Signing keys need a lifecycle that matches the application's deployment and token architecture.
Creating Access Tokens Without an Expiration
An access token that never expires can remain usable for far longer than intended if it is stolen.
Set an explicit exp claim and choose the lifetime according to the application's security and session requirements. Shorter-lived access tokens reduce the window in which a leaked bearer token can be replayed, although they usually require a deliberate strategy for maintaining longer-lived user sessions.
Expiration is not a substitute for protecting the token in the first place.
Decoding JWTs Without Verifying Them
JWT payloads are easy to decode. That convenience sometimes leads applications to extract sub, role, or another claim and trust it before cryptographic verification.
That reverses the required trust model.
Use: Token Received → Verify → Validate Claims → Read Trusted Identity
Not: Token Received → Decode → Trust Claims → Continue
Any authorization decision based on unverified JWT data is built on attacker-controlled input.
Accepting Algorithms the API Does Not Expect
The API should know which signing algorithm is valid for its token architecture.
Do not make the verification policy depend entirely on whatever alg value arrives in the JWT header. Configure the verifier to accept only the expected algorithm or explicitly approved set of algorithms.
For the HMAC example in this tutorial, that means constraining verification to the algorithm used by the issuer:
await jwtVerify(token, key, {
algorithms: ["HS256"],
issuer,
audience,
});
If the architecture later moves to asymmetric signing, update issuance and verification as one deliberate change rather than broadening accepted algorithms unnecessarily.
Checking the Signature but Ignoring Token Claims
A valid signature does not mean a token is valid for every API, every time, and every context.
Depending on the token design, verification may need to enforce:
exp → token has not expired
nbf → token is not being used too early
iss → expected issuer
aud → intended audience
sub → required authenticated subject
This is especially important when multiple applications or APIs participate in the same identity architecture. A token issued for one audience should not automatically become a credential for another.
Putting Sensitive Information in the JWT Payload
JWT signing protects integrity, not confidentiality.
Avoid putting passwords, signing secrets, API keys, or unnecessary sensitive customer data inside the payload. Anyone who obtains a typical signed JWT can decode its header and payload.
Keep claims limited to what the receiving application actually needs.
Using Long-Lived Authorization Data Without Considering Changes
Putting roles or permissions into access tokens can reduce repeated lookups, but it introduces another issue: those claims can become stale.
Suppose an administrator removes a user's privileged role immediately after a token containing that role was issued. Unless the architecture has another control, the old claim may remain usable until that token expires.
For authorization data that needs to change quickly, consider how token lifetime, server-side policy evaluation, token revocation, or another mechanism will reflect those changes.
Treating Authentication as Authorization
A valid JWT establishes the identity represented by the token. It does not mean that identity can perform every operation.
This check is incomplete:
JWT valid? → Yes → Allow request
The stronger model is:
JWT valid?
↓
Identity established
↓
What resource is being requested?
↓
What action is being attempted?
↓
Is this identity authorized?
↓
Allow or Deny
This becomes essential for user-owned resources, administrative operations, tenant boundaries, and other access-control decisions.
Returning Too Much Detail in Authentication Errors
Detailed errors are useful during development but can reveal unnecessary information to external callers.
A production API generally does not need to tell an unauthenticated client whether verification failed because of a signature mismatch, unexpected algorithm, internal key configuration, or another low-level condition.
Return a controlled authentication response while keeping appropriate diagnostic detail in protected application logs.
Assuming JWTs Automatically Solve Logout and Revocation
A self-contained JWT can remain cryptographically valid until its expiration time. Logging a user out in the UI does not automatically invalidate every previously issued token.
This is one reason access-token lifetime matters.
Applications that require stronger session termination, credential-revocation behavior, or long-running sessions need an explicit token lifecycle rather than assuming JWT issuance and verification solve those requirements automatically.
Creating and validating the token is therefore only one part of production authentication. For applications that need users to remain signed in beyond a short access-token lifetime, the next architectural question is how access tokens, refresh mechanisms, rotation, revocation, and logout should work together.
Manage Access Tokens, Refresh Tokens, Rotation, and Logout in Production
A short-lived JWT access token creates an obvious question: what happens when it expires while the user is still legitimately signed in?
For a small API, requiring the user to authenticate again may be acceptable. Applications that need longer-running sessions usually require a separate mechanism for obtaining new access tokens without turning the original access token into a credential that remains valid for days or months.
A common model looks like this:
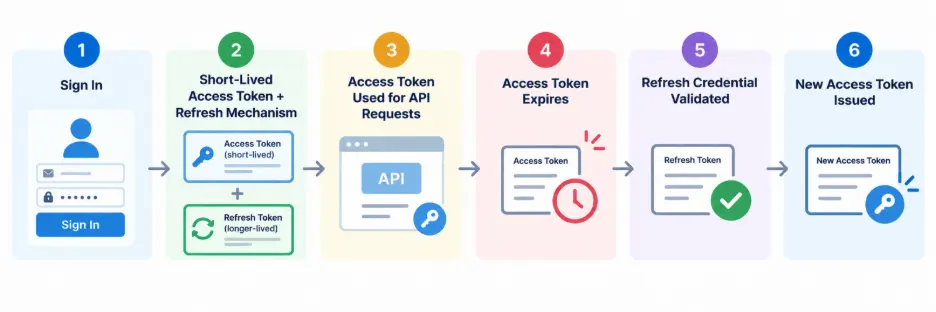
The access token and refresh credential serve different purposes and should not be treated as interchangeable.
Keep Access Tokens Relatively Short-Lived
Access tokens are presented frequently to APIs, which increases their exposure compared with credentials that are used less often.
A limited lifetime reduces how long a stolen access token can be replayed. The appropriate duration depends on the application's risk profile, user experience, architecture, and ability to renew authentication.
Add Refresh Tokens Only When the Session Model Needs Them
A refresh token can allow a client to obtain a new access token after the current one expires without asking the user to enter credentials again.
Conceptually:
Access Token Expires
↓
Client Presents Refresh Credential
↓
Refresh Credential Validated
↓
Session / Security State Checked
↓
New Access Token Issued
Not every application needs this design. A short-lived administrative tool, internal service, or application where frequent reauthentication is acceptable may use a different session model.
Treat Refresh Tokens as High-Value Credentials
A refresh token can potentially be exchanged for multiple new access tokens, so protecting it is critical.
Do not expose refresh tokens unnecessarily to application code, logs, URLs, analytics tools, or other systems. The appropriate storage mechanism depends on whether the client is a browser application, native application, backend service, or another type of client.
Rotate Refresh Tokens When the Architecture Supports It
Refresh-token rotation limits repeated use of the same long-lived credential.
Instead of returning the same refresh token every time: Refresh Token A → New Access Token → Refresh Token A Reused Again
a rotation model can work more like: Refresh Token A → New Access Token + Refresh Token B → Token A Invalidated
If an invalidated token later appears again, that can indicate replay or credential theft and may trigger broader session invalidation depending on the security policy.
Design Revocation Around the Type of Token
JWT access tokens are often designed for local verification: the API verifies the signature and claims without contacting a central session database on every request.
That efficiency creates a trade-off. Once issued, a valid JWT may remain acceptable until expiration unless the system introduces additional state or checks.
Applications that require immediate invalidation can use mechanisms such as session state, token denylisting, token versioning, key rotation in specific scenarios, or other centralized policy checks. Each approach adds operational and performance considerations.
This is another reason short-lived access tokens are useful: they limit how long an access token remains usable without requiring every API request to perform a revocation lookup.
Understand What Logout Actually Does
With a traditional server-side session, logout can delete or invalidate the server's session record.
A self-contained JWT behaves differently.
Removing a JWT from the client stops that client from sending it, but it does not change the cryptographic validity of another copy of the same token. If an attacker already possesses it, the token may remain usable until it expires unless the API has an additional revocation mechanism.
A stronger logout flow for an application using refresh credentials may look like this:
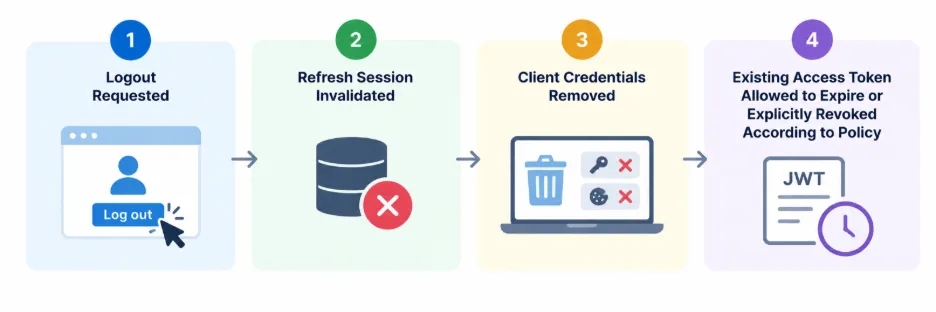
For higher-risk applications, logout requirements may also include terminating sessions across devices, revoking related refresh-token families, or requiring reauthentication after sensitive account changes.
Keep Access and Refresh Responsibilities Separate
The resulting model is easier to reason about when each credential has a narrow job:
Access Token
→ Sent to protected APIs
→ Short lifetime
→ Carries claims required by the API
→ Verified on resource requests
Refresh Credential
→ Used to obtain new access tokens
→ Longer-lived when required
→ More tightly protected
→ Rotated/revoked according to session policy
This gives the Deno application a more complete token lifecycle than simply issuing a long-lived JWT and hoping it remains secure.
For a small service, building and maintaining that lifecycle may still be manageable. Once authentication expands into account recovery, MFA, passwordless login, federation, multiple applications, session management, and broader customer identity requirements, however, the question changes from “How do we create a JWT?” to “How much of the identity stack should this application own?”
When to Build JWT Authentication Yourself vs Use a CIAM Platform
Building JWT authentication directly in Deno can make sense when the identity requirements are narrow. A prototype, learning project, or tightly scoped API may only need user registration, credential verification, token issuance, and a few protected endpoints.
The code itself can remain manageable.
The calculation changes when authentication becomes part of a customer-facing application used across multiple products, devices, or channels. At that point, the team is no longer responsible for only creating and verifying JWTs. It also owns the surrounding identity lifecycle.
That can include account registration, verification, password recovery, MFA, passwordless authentication, social login, federation, session management, account changes, security controls, and recovery paths. Each feature creates additional states that have to work together without weakening authentication.
Custom JWT Authentication Works Best When the Scope Stays Small
A custom implementation gives developers direct control over token claims, signing choices, API middleware, authorization integration, and application-specific behavior.
That can be useful when the requirements are deliberately limited.
For example: User Signs In → Application Verifies Credentials → Application Issues JWT → Deno API Verifies JWT → Application Applies Authorization
The team owns the entire path and can adapt it closely to the service.
But ownership also means maintaining it. Signing-key rotation, password security, session behavior, token renewal, account recovery, security logging, and changes to authentication requirements remain application responsibilities.
The decision should therefore account for ongoing identity operations, not just how quickly a team can implement the first /signin endpoint.
Customer Identity Requirements Usually Extend Beyond JWTs
Consider what happens when a basic login flow grows.
Customers may need MFA for higher-risk activity. Product teams may want passkeys or social login. Enterprise customers may require federation. Users need secure account recovery. Multiple applications may need connected authentication experiences. Security teams may need stronger session controls and visibility into authentication events.
The architecture begins to look less like: Credentials → JWT → API
and more like: Registration → Verification → Authentication → MFA or Passwordless → Token/Session Management → Application Access → Account Recovery → Profile and Security Changes
JWTs may still play an important role in this architecture. They simply do not provide all of these identity capabilities by themselves.
Use CIAM When Identity Becomes Shared Application Infrastructure
A Customer Identity and Access Management (CIAM) platform moves much of the external-user identity layer out of individual application code.
Instead of every Deno service implementing its own registration, credential handling, authentication methods, and identity lifecycle, applications can consume authenticated identity and token information from a centralized customer identity system.
The separation can look like this: Customer → CIAM Authentication → Authenticated Identity / Token → Deno Application → Token Validation → Application Authorization → Protected Resource
The Deno API still has important responsibilities. It must validate the credentials or tokens it accepts according to the integration model, enforce application-specific authorization, and protect its own resources.
CIAM does not remove those responsibilities. It reduces the amount of customer identity infrastructure each application needs to build and maintain independently.
Where LoginRadius Fits Into a Deno Authentication Architecture
LoginRadius is a CIAM platform for managing customer and partner identity and access. In a production Deno architecture, it can provide the customer authentication layer while the application remains responsible for its business logic and resource-level authorization.
That distinction is important.
LoginRadius is not simply a JWT utility that replaces jose. A JWT library helps developers perform operations such as signing or verifying tokens. A CIAM platform addresses the broader customer identity lifecycle around authentication.
For teams whose requirements extend beyond a small custom authentication service, separating these responsibilities can produce a cleaner architecture:
LoginRadius → Customer Identity and Authentication
Deno → Application Logic and APIs
Authorization Layer → What the Authenticated Customer Can Access or Do
The right choice depends on the application's scope. If JWT authentication is genuinely all the service needs, a carefully designed custom implementation may be sufficient. If customer identity is becoming shared infrastructure across applications and authentication methods, moving that responsibility into a dedicated CIAM layer can reduce the amount of identity functionality the Deno application has to own.
Build JWT Authentication in Deno With Verification, Expiration, and Authorization in Mind
Creating a JWT is the easy part. A secure JWT authentication in Deno implementation depends on what happens around that token: how the user is authenticated before issuance, how signing keys are protected, which claims are included, how long the token remains valid, and what the API verifies before trusting it.
Authorization matters just as much. A valid JWT can establish the caller's identity, but every protected API still needs to decide whether that identity is allowed to perform the requested action on a specific resource. Add a deliberate token lifecycle, secure recovery and session controls where required, and the result is far stronger than simply checking for a bearer token.
For smaller applications, owning this flow directly may be practical. As customer authentication expands across MFA, passwordless experiences, federation, account recovery, multiple applications, and session management, maintaining the complete identity layer becomes a much larger responsibility.
LoginRadius provides a developer-centric CIAM platform for managing customer and partner identity and access, allowing your Deno applications to stay focused on application logic and authorization rather than rebuilding the broader customer identity lifecycle.
Ready to simplify customer authentication without giving up control over your application architecture? Book a LoginRadius demo to see how CIAM can fit into your authentication stack.
FAQs
Q: How do you implement JWT authentication in Deno?
A: Authenticate the user first, then issue a signed JWT with an expiration time and required claims. For protected requests, verify the JWT's signature and claims before establishing identity and applying authorization.
Q: Which JWT library should you use with Deno?
A: jose is a widely used JavaScript library for signing and verifying JWTs and works with Deno through its npm compatibility. Choose a maintained library rather than implementing JWT cryptography yourself.
Q: How do you create a JWT in Deno?
A: With jose, you can use SignJWT to define claims such as sub, iss, aud, iat, and exp, set the protected header, and sign the token using appropriately protected key material.
Q: How do you verify a JWT in Deno?
A: Use jwtVerify() with the expected verification key and explicitly configured algorithm, issuer, and audience where applicable. Trust the token's claims only after verification succeeds.
Q: How do you protect API routes with JWT in Deno?
A: Extract the JWT from the Authorization: Bearer header and pass it through centralized verification before executing protected route logic. After authentication, apply authorization for the requested action and resource.
Q: Where should JWT signing secrets be stored in a Deno application?
A: Do not hardcode signing secrets in application source or commit them to version control. Load signing material from appropriately protected configuration or a secrets-management system and establish a deliberate rotation strategy.
Q: Should JWT access tokens expire?
A: Yes. Access tokens should have an explicit expiration appropriate to the application's risk and session model. Shorter lifetimes limit how long a stolen bearer token can potentially be replayed.
Q: What is the difference between JWT authentication and authorization?
A: JWT authentication can help establish the identity making an API request after the token is verified. Authorization happens afterward and determines what that authenticated identity is permitted to access or do.