

In this blog, we’ll be implementing authentication with JWT in a NodeJS web application. For this, we’ll be using jsonwebtoken package
What is JWT?
JWT(JSON Web Token) is a token format. It is digitally-signed, self-contained, and compact. It provides a convenient mechanism for transferring data. JWT is not inherently secure, but the use of JWT can ensure the authenticity of the message so long as the signature is verified and the integrity of the payload can be guaranteed. JWT is often used for stateless authentication in simple use cases involving non-complex systems.
Here's an example of JWT:
1eyJhbGciOiJIUzI1NiIsInR5cCI6IkpXVCJ9.eyJlbWFpbCI6Im9sYXR1bmRlZ2FydWJhQGdtYWlsLmNvbSIsImNow, let's authenticate/protect some routes.
Pre-requisites:
- Basic knowledge of HTML/JavaScript
- NodeJS should be installed in your system.
- express module for creating the server.
- mongoose module for MongoDB connection and queries.
- bcrypt module for hashing.
you can install all required packages by using following command:
1npm install express mongoose bcrypt --saveStep 1. First, create a directory structure as below :
JWTApp
1-api
2--models
3----userModel.js
4--controllers
5----userController.js
6--route
7----userRoute.js
8--server.js
Step 2. Install “jsonwebtoken” packageby using following command
1npm install jsonwebtoken -- saveStep 3. Create the user model
In the api/models folder, create a file called user userModel.js by running touch api/models/userModel.js.
In this file, create a mongoose schema with the following properties:
- fullName
- email address
- password
- the created date
Add the following code
1'use strict';
2var mongoose = require('mongoose'),
3bcrypt = require('bcrypt'),
4Schema = mongoose.Schema;
5/**
6
7User Schema
8*/
9var UserSchema = new Schema({
10fullName: {
11type: String,
12trim: true,
13required: true
14},
15email: {
16type: String,
17unique: true,
18lowercase: true,
19trim: true,
20required: true
21},
22hash_password: {
23type: String
24},
25created: {
26type: Date,
27default: Date.now
28}
29});
30
31UserSchema.methods.comparePassword = function(password) {
32return bcrypt.compareSync(password, this.hash_password);
33};
34mongoose.model('User', UserSchema);
Step 4. Create the user handlers
In the api/controllers folder, create a file called user userController.js by running touch api/controllers/userController.js
In the userController file, create three different handlers to handle by using the following code
1'use strict';
2var mongoose = require('mongoose'),
3jwt = require('jsonwebtoken'),
4bcrypt = require('bcrypt'),
5User = mongoose.model('User');
6exports.register = function(req, res) {
7var newUser = new User(req.body);
8newUser.hash_password = bcrypt.hashSync(req.body.password, 10);
9newUser.save(function(err, user) {
10if (err) {
11return res.status(400).send({
12message: err
13});
14} else {
15user.hash_password = undefined;
16return res.json(user);
17}
18});
19};
20exports.sign_in = function(req, res) {
21User.findOne({
22email: req.body.email
23}, function(err, user) {
24if (err) throw err;
25if (!user || !user.comparePassword(req.body.password)) {
26return res.status(401).json({ message: 'Authentication failed. Invalid user or password.' });
27}
28return res.json({ token: jwt.sign({ email: user.email, fullName: user.fullName, _id: user._id }, 'RESTFULAPIs') });
29});
30};
31exports.loginRequired = function(req, res, next) {
32if (req.user) {
33next();
34} else {
35return res.status(401).json({ message: 'Unauthorized user!!' });
36
37}
38};
39exports.profile = function(req, res, next) {
40if (req.user) {
41res.send(req.user);
42next();
43}
44else {
45return res.status(401).json({ message: 'Invalid token' });
46}
47};
Note: A hash password was saved in the database using bcrypt.
Step 6. In the api/route folder, create a file called user userRoute.js and add the following code:
1'use strict';
2module.exports = function(app) {
3    var userHandlers = require('../controllers/userController.js');
4    // todoList Routes
5    app.route('/tasks')
6        .post(userHandlers.loginRequired, userHandlers.profile);
7    app.route('/auth/register')
8        .post(userHandlers.register);
9   app.route('/auth/sign_in')
10        .post(userHandlers.sign_in);
11};
Step 7. Add the following code in server.js
1'use strict';
2var express = require('express'),
3app = express(),
4port = process.env.PORT || 3000,
5User = require('./api/models/userModel'),
6bodyParser = require('body-parser'),
7jsonwebtoken = require("jsonwebtoken");
8const mongoose = require('mongoose');
9const option = {
10socketTimeoutMS: 30000,
11keepAlive: true,
12reconnectTries: 30000
13};
14const mongoURI = process.env.MONGODB_URI;
15mongoose.connect('mongodb://127.0.0.1:27017/?compressors=disabled&gssapiServiceName=mongodb', option).then(function(){
16//connected successfully
17}, function(err) {
18//err handle
19});
20app.use(bodyParser.urlencoded({ extended: true }));
21app.use(bodyParser.json());
22app.use(function(req, res, next) {
23if (req.headers && req.headers.authorization && req.headers.authorization.split(' ')[0] === 'JWT') {
24jsonwebtoken.verify(req.headers.authorization.split(' ')[1], 'RESTFULAPIs', function(err, decode) {
25if (err) req.user = undefined;
26req.user = decode;
27next();
28});
29} else {
30req.user = undefined;
31next();
32}
33});
34var routes = require('./api/routes/userRoutes');
35routes(app);
36app.use(function(req, res) {
37res.status(404).send({ url: req.originalUrl + ' not found' })
38});
39app.listen(port);
40console.log(' RESTful API server started on: ' + port);
41module.exports = app;
Step 9. Now you just need to run the project by using the following command and try logging by using the JWT.
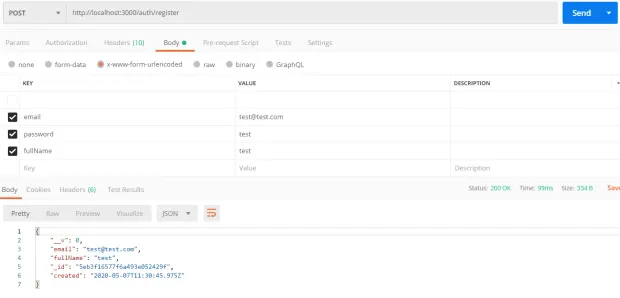
1npm startStep 10. Open Postman and create a post request to localhost:3000/auth/register as below:
Step 11. After this, let’s sign with this URL localhost:3000/auth/sign_in . Enter the keys and values for email and password
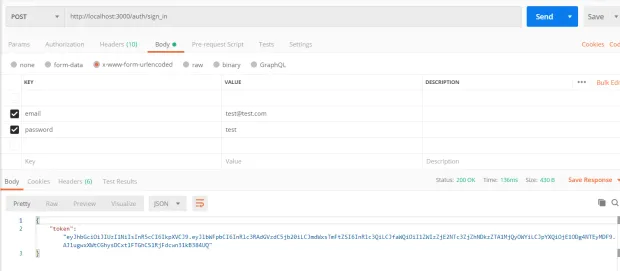
Under the value, add JWT and the token with a space between, like so:
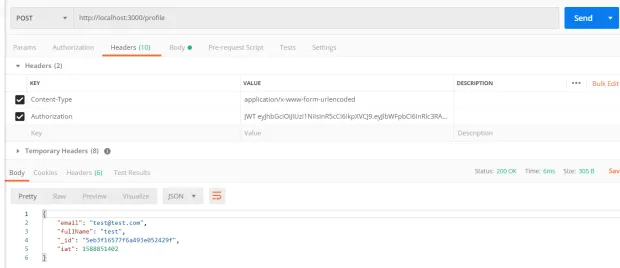
1JWT eyJhbGciOiJIUzI1NiIsInR5cCI6IkpXVCJ9.eyJlbWFpbCI6Im9sYXR1bmRlZ2FydWJhQGdtYWlsLmNvbSIsImZ1bGxOYW1lIjoiT2xhdHVuZGUgR2FydWJhIiwiX2lkIjoiNThmMjYzNDdiMTY1YzUxODM1NDMxYTNkIiwiaWF0IjoxNDkyMjgwMTk4fQ.VcMpybz08cB5PsrMSr25En4_EwCGWZVFgciO4M-3ENEStep 11. Then, enter the parameters for the key and value for fetching the profile. You want to create as shown below and send:
As we have seen it is fairly easy to build a JWT authentication system with NodeJS, You can found the complete code used in this tutorial https://github.com/LoginRadius/engineering-blog-samples/tree/master/NodeJs/JwtAuthentication