Introduction
Deno, the creation of Ryan Dahl is a simple, modern, and secure runtime for JavaScript and TypeScript that uses V8 and is built in Rust. As Deno 1.0.0 has released, there is much-awaited curiosity amongst developers around working with this new stack.
When it comes to learning a new language, the first thing that comes to our mind is the creation of a todo app, supporting CRUD functionality. So here we will be creating a very simple Todo application using the Deno.
So before starting I assume you have installed Deno on your system, if not then you can find the link here - https://www.loginradius.com/hello-world-deno/.
For the database, we will be using the JSON file as of now to completely focus on creating web API using Deno. Not more words and now let's start.
The file structure we are going to follow is as below
1// Final directory structure
2  deno-todo-api/
3    --|controllers/
4      |--|todo.ts
5      |data/
6      |--|todos.ts
7      |interfaces/
8      |--|Todo.ts
9      |routes/
10      |--|todo.ts
11    --|server.ts
At any point in time, if you are stuck somewhere, you can follow this link to get the complete code - https://github.com/LoginRadius/engineering-blog-samples/tree/master/Deno/RestAPIWithDeno.
- Create a directory named
deno-todo-apiand move into that directory
1mkdir deno-todo-api && cd deno-todo-api-
Create the file
server.tsin the root of the directory. -
Write the following code into the
server.tsfile to start a server
1import { Application, Router } from "https://deno.land/x/oak@v17.1.4/mod.ts";
2const app = new Application();
3const port: number = 8080;
4const router = new Router();
5router.get("/", ({ response }: { response: any }) => {
6response.body = {
7message: "Rest API tutorial with Deno",
8};
9});
10app.use(router.routes());
11app.use(router.allowedMethods());
12console.log('running on port ', port);
13await app.listen({ port });
Unlike NodeJS Deno does not need the package.json file for dependency management. Dependency management is simplified by having a list of modules and their respective URLs.
Here we have used oak, a middleware framework for Deno's HTTP server, including a router middleware.
server.tsis the entry point for our web application. To check it run the following command in the root directory
1deno run --allow-net server.tsOpen the browser and hit the URL http://localhost:8080/
You can see the following output in your browser

- Now following the directory structure, we will create following folders in our project with the help of below command
1mkdir controllers data interfaces routes- First of all, we will create dummy data to play with our todo APIs.Go to the data folder and create a file called
todos.tsand the following code into it
1import { v4 } from "https://deno.land/std/uuid/mod.ts";
2// interface
3import Todo from '../interfaces/Todo.ts';
4let todos: Todo[] = [
5{
6id: v4.generate(),
7task: 'Hello world app with Deno',
8done: true,
9},
10{
11id: v4.generate(),
12task: 'Simple Rest API with Deno',
13done: false,
14},
15];
16export default todos;
We will be using v4 provided by the uuid module to generate unique IDs.
- Now create a file in
interface/folderTodo.tsand paste the following code.
1export default interface Todo {
2  id: string,
3  task: string,
4  done: boolean,
5}
What are the interfaces??
An interface defines the specifications of an entity.
One of TypeScript’s core principles is that type checking focuses on the shape that values have. In TypeScript, interfaces fill the role of naming these types and are a powerful way of defining contracts within your code as well as contracts with code outside of your project.
- Now create a file named
todo.tsincontrollers/directory and paste the following code
1import { v4 } from "https://deno.land/std/uuid/mod.ts";
2// interfaces
3import Todo from "../interfaces/Todo.ts";
4// stubs
5import todos from "../data/todos.ts";
6export default {
7getAll: ({ response }: { response: any }) => {
8response.status = 200;
9response.body = {
10data: todos
11};
12},
13create: async (
14{ request, response }: { request: any; response: any },
15) => {
16const body = await request.body();
17if (!request.hasBody) {
18response.status = 400;
19response.body = {
20message: "Please provide the task detail and  status",
21};
22return;
23}
24let newTodo: Todo = {
25id: v4.generate(),
26task: body.value.todo,
27done: false,
28};
29let data = [...todos, newTodo];
30response.body = {
31data
32};
33},
34getById: (
35{ params, response }: { params: { id: string }; response: any },
36) => {
37const todo: Todo | undefined = todos.find((t) => {
38return t.id === params.id;
39});
40if (!todo) {
41response.status = 404;
42response.body = {
43message: "No task found related to given ID",
44};
45return;
46}
47response.status = 200;
48response.body = {
49data: todo
50};
51},
52update: async (
53{ params, request, response }: {
54params: { id: string },
55request: any,
56response: any,
57},
58) => {
59const todo: Todo | undefined = todos.find((t) => t.id === params.id);
60if (!todo) {
61response.status = 404;
62response.body = {
63message: "No todo found",
64};
65return;
66}
67const body = await request.body();
68const updatedData: { task?: string; done?: boolean } = body.value;
69
70let newTodos = todos.map((t) => {
71  return t.id === params.id ? { ...t, ...updatedData } : t;
72});
73response.status = 200;
74response.body = {
75  data: newTodos,
76};
77
78},
79delete: (
80{ params, response }: { params: { id: string }; response: any },
81) => {
82const allTodos = todos.filter((t) => t.id !== params.id);
83response.status = 200;
84response.body = {
85  data: allTodos,
86};
87
88},
89};- Now go to
routesand createtodo.tsfile in it and paste the following code
1import { Router } from "https://deno.land/x/oak/mod.ts";
2const router = new Router();
3// controller
4import todoController from "../controllers/todo.ts";
5router
6.get("/todos", todoController.getAll)
7.post("/todos", todoController.create)
8.get("/todos/:id", todoController.getById)
9.put("/todos/:id", todoController.update)
10.delete("/todos/:id", todoController.delete);
11export default router;- Now since we have created the complete MVC project for our todo APIs, we will be going to update our main
server.tsfile with following code
1import { Application, Router } from "https://deno.land/x/oak/mod.ts";
2import todoRouter from "./routes/todo.ts"; // added the router call
3const app = new Application();
4const port: number = 8080;
5app.use(todoRouter.routes()); // Intitialize the router with our application.
6app.use(todoRouter.allowedMethods());
7app.addEventListener("listen", ({ secure, hostname, port }) => {
8const protocol = secure ? "https://" : "http://";
9const url = ${protocol}${hostname ?? "localhost"}:${port};
10console.log(Listening on: ${port});
11});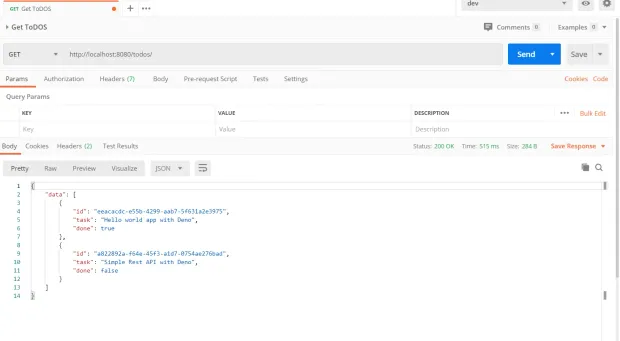
12await app.listen({ port });- Now run again the server with the following command
1deno run --allow-net server.tsNow open the postman and hit the get URL http://localhost:8080/todos/
To check the getByID router, copy the ID of any task and hit the URL like
http://localhost:8080/todos/:id
You will be getting output like below
1{
2    "data": {
3        "id": "eeacacdc-e55b-4299-aab7-5f631a2e3975",
4        "task": "Hello world app with Deno",
5        "done": true
6    }
7}
Similarly, we can verify the complete crud API created. Below is the reference of all APIs created in the blog post
| API | Method | Description |
|---|---|---|
http://localhost:8080/todos/ | GET | Fetch All todos |
http://localhost:8080/todos/{id} | GET | Fetch todo by ID |
http://localhost:8080/todos/ | POST | Create New todo |
http://localhost:8080/todos/{id} | PUT | Update todo by ID |
http://localhost:8080/todos/{id} | DELETE | Delete todo by ID |
You can find the complete code of the repo here