
Introduction
User authentication is the process of validating a user's identity to ensure that they are who they claim to be. Implementing user authentication in your application is critical to prevent unauthorized users from accessing sensitive information.
This tutorial focuses on implementing user authentication and registration in Flutter applications using the LoginRadius API.
Prerequisites
If you wish to follow along with this tutorial, you must have the following set up:
- Sign up for a free LoginRadius developer account
- Any IDE that has Flutter SDK installed (i.e., Android Studio, VSCode)
- A basic understanding of Dart and Flutter
This tutorial is verified with Flutter v2.5.1 and Android Studio v3.5.
Getting Started with LoginRadius
What is LoginRadius?
LoginRadius is a cloud-based, SaaS Customer Identity and Access Management (CIAM) platform that provides developers and businesses simplified and robust features for managing customer identity, privacy, and access. LoginRadius offers high-level, secure, and well-documented APIs for integrating User Authentication and Single Sign-on (SSO) into your application.
Why use LoginRadius?
LoginRadius offers:
- A scalable infrastructure
- Built-in security measures to improve user account security and safe user data management
- Advanced login options such as Social SSO and Passwordless Login to improve the user experience
- SDKs and well-documented APIs for seamless integration into your application
So, with everything out of the way, let's get started.
Setting Up LoginRadius for Your Application
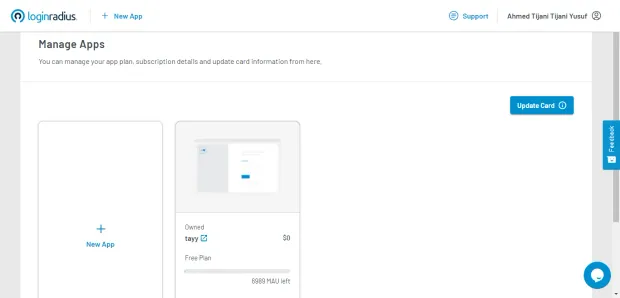
After creating an account with LoginRadius, it sets up a free app for you. This is the app in which you would integrate the LoginRadius API with Flutter. Here my app name is “tayy”.
Next, you need to obtain your LoginRadius API credentials. To do so, login to your Dashboard and navigate to the Configuration tab in the sidebar menu. You will find your API credentials under the API Key and Secret section. Copy and store your APP Name, API Key, and API Secret somewhere safe and easily accessible.

Integrating LoginRadius API with Your Flutter Application.
Step 1: Create a New Flutter project
Create a new Flutter project and navigate to the folder of the application by running the following commands in your terminal:
1flutter create loginradius_example
2cd loginradius_example
Step 2: Install Dependencies
Next, you need to install the dio package as a dependency in our project. The dio package is a powerful HTTP client used for making network requests.
Run the following command to get the newest version of the dio package in your project.
1flutter pub add dioThen, install the dependency by running flutter pub get in your terminal.
Project Structure
The project is being structured in this order:
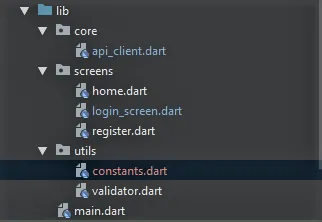
- Core (contains a class that handles network requests)
- Screens (the UI of our app)
- Utils (helper components)
Step 3: Setting up the API Client Class
Create a new dart file named api_client.dart and import the dio package into the file, as follows:
1import 'package:dio/dio.dart';Now let’s create a class named ApiClient and initialize the Dio object in it. The ApiClient class will contain several methods for making network requests based on your features, including User Registration, User Login, Get User Profile Data, and User Logout.
1import 'package:dio/dio.dart';
2class ApiClient {
3final Dio _dio = Dio();
4Future<Response> registerUser() async {
5    //IMPLEMENT USER REGISTRATION
6}
7
8Future<Response> login() async {
9    //IMPLEMENT USER LOGIN
10}
11
12Future<Response> getUserProfileData() async {
13    //GET USER PROFILE DATA
14}
15
16Future<Response> logout() async {
17    //IMPLEMENT USER LOGOUT
18 }
19
20}
Step 4: Implement User Registration
Before implementing the user registration functionality, you must first obtain the user registration endpoint URL from the LoginRadius API Docs.
After retrieving the endpoint URL, you need to send a POST request to the endpoint using the Dio package by passing in:
- the
apiKeyyou obtained earlier as a query parameter; - the
userDataas the request body; and, - the
SOTTkey as a header, as shown below.
1class ApiClient {
2       //...
3       Future<Response> registerUser(Map<String, dynamic>? userData) async {
4        try {
5          Response response = await _dio.post(
6              'https://api.loginradius.com/identity/v2/auth/register',  //ENDPONT URL
7              data: userData, //REQUEST BODY
8              queryParameters: {'apikey': 'YOUR_API_KEY'},  //QUERY PARAMETERS
9              options: Options(headers: {'X-LoginRadius-Sott': 'YOUR_SOTT_KEY', //HEADERS
10          }));
11          //returns the successful json object
12          return response.data;
13        } on DioError catch (e) {
14          //returns the error object if there is
15          return e.response!.data;
16        }
17      }
18    }
Step 5: Implement User Login
The below code snippet shows how you’ll send a POST request to the LoginRadius login endpoint URL https://api.loginradius.com/identity/v2/auth/login, passing in your apiKey as a query parameter and the email and password of the user as the request body.
1class ApiClient {
2       //...
3       Future<Response> login(String email, String password) async {
4        try {
5          Response response = await _dio.post(
6            'https://api.loginradius.com/identity/v2/auth/login',
7            data: {
8              'email': email,
9              'password': password
10            },
11            queryParameters: {'apikey': 'YOUR_API_KEY'},
12          );
13          //returns the successful user data json object
14          return response.data;
15        } on DioError catch (e) {
16          //returns the error object if any
17          return e.response!.data;
18        }
19      }
20    }
Step 6: Get User Profile Data
To retrieve the user profile details, send a GET request to the Read Profile Endpoint URL https://api.loginradius.com/identity/v2/auth/account, passing in your apiKey as a query parameter and the user's access token as the header.
The user’s access token is gotten from the successful response object of the User Login endpoint.
1class ApiClient {
2       //...
3   Future<Response> getUserProfileData(String accesstoken) async {
4    try {
5      Response response = await _dio.get(
6        'https://api.loginradius.com/identity/v2/auth/account',
7        queryParameters: {'apikey': 'YOUR_API_KEY'},
8        options: Options(
9          headers: {
10            'Authorization': 'Bearer ${YOUR_ACCESS_TOKEN}',
11          },
12        ),
13      );
14      return response.data;
15    } on DioError catch (e) {
16      return e.response!.data;
17    }
18}
Step 7: Implement User Logout
Finally, to implement the user logout functionality, you would send a GET request to the Invalidate User Access Token endpoint URL https://api.loginradius.com/identity/v2/auth/access_token/InValidate. This API call invalidates the user's active access token, requiring them to re-authenticate if they want to access their data.
1class ApiClient {
2       //...
3  Future<Response> logout(String accessToken) async {
4    try {
5      Response response = await _dio.get(
6        'https://api.loginradius.com/identity/v2/auth/access_token/InValidate',
7        queryParameters: {'apikey': ApiSecret.apiKey},
8        options: Options(
9          headers: {'Authorization': 'Bearer $accessToken'},
10        ),
11      );
12      return response.data;
13    } on DioError catch (e) {
14      return e.response!.data;
15    }
16  }
17}
That concludes the ApiClient class. Next, you'll build the UI for your Flutter application, making use of the methods you just created in the ApiClient class.
Building the UI
Your Flutter application will consist of four screens, which include:
- Registration Screen
- Login Screen
- Home Screen
Let’s begin by building the Registration Screen.
Registration Screen
The RegistrationScreen has two TextFormField widgets that serve as our email and password fields, as well as an ElevatedButton to handle event submission, as shown in the code snippet below from the register.dart file.
1//...
2    @override
3    Widget build(BuildContext context) {
4      Scaffold(
5          backgroundColor: Colors.blueGrey[200],
6          body: Form(
7            key: _formKey,
8            child: SizedBox(
9              width: size.width,
10              height: size.height,
11              child: Align(
12                alignment: Alignment.center,
13                child: Container(
14                  width: size.width * 0.85,
15                  padding: const EdgeInsets.symmetric(horizontal: 20, vertical: 30),
16                  decoration: BoxDecoration(
17                    color: Colors.white,
18                    borderRadius: BorderRadius.circular(20),
19                  ),
20                  child: SingleChildScrollView(
21                    child: Column(
22                      crossAxisAlignment: CrossAxisAlignment.start,
23                      children: <Widget>[
24                        const Center(
25                          child: Text(
26                            "Register",
27                            style: TextStyle(
28                              fontSize: 30,
29                              fontWeight: FontWeight.bold,
30                            ),
31                          ),
32                        ),
33                        SizedBox(height: size.height * 0.05),
34                        TextFormField(
35                          validator: (value) =>
36                              Validator.validateEmail(value ?? ""),
37                          controller: emailController,
38                          keyboardType: TextInputType.emailAddress,
39                          decoration: InputDecoration(
40                            hintText: "Email",
41                            isDense: true,
42                            border: OutlineInputBorder(
43                              borderRadius: BorderRadius.circular(10),
44                            ),
45                          ),
46                        ),
47                        SizedBox(height: size.height * 0.03),
48                        TextFormField(
49                          obscureText: _showPassword,
50                          validator: (value) =>
51                              Validator.validatePassword(value ?? ""),
52                          controller: passwordController,
53                          keyboardType: TextInputType.visiblePassword,
54                          decoration: InputDecoration(
55                            hintText: "Password",
56                            isDense: true,
57                            border: OutlineInputBorder(
58                              borderRadius: BorderRadius.circular(10),
59                            ),
60                          ),
61                        ),
62                        SizedBox(height: size.height * 0.06),
63                        Row(
64                          mainAxisAlignment: MainAxisAlignment.center,
65                          children: [
66                            Expanded(
67                              child: ElevatedButton(
68                                onPressed: _handleRegister,
69                                style: ElevatedButton.styleFrom(
70                                    primary: Colors.indigo,
71                                    shape: RoundedRectangleBorder(
72                                        borderRadius: BorderRadius.circular(10)),
73                                    padding: const EdgeInsets.symmetric(
74                                        horizontal: 40, vertical: 15)),
75                                child: const Text(
76                                  "Register",
77                                  style: TextStyle(
78                                    fontSize: 20,
79                                    fontWeight: FontWeight.bold,
80                                  ),
81                                ),
82                              ),
83                            ),
84                          ],
85                        ),
86                      ],
87                    ),
88                  ),
89                ),
90              ),
91            ),
92          ),
93        );
94    }
95    //...
In the onPressed callback of the ElevatedButton widget, you'll handle the validation of your form data.
If the form is validated, you pass your userData to the registerUser method from the ApiClient class for processing.
If the response is an error, you show a snackbar with the error message. Otherwise, the user is redirected to the Login Screen.
In the following example, you've provided only a few user attributes as
userData. To view the complete list of user attributes, please look at the body parameters of the User Registration API here.
1Future<void> _handleRegister() async {
2    if (_formKey.currentState!.validate()) {
3    //show snackbar to indicate loading
4     ScaffoldMessenger.of(context).showSnackBar(SnackBar(
5        content: const Text('Processing Data'),
6        backgroundColor: Colors.green.shade300,
7      ));
8//the user data to be sent
9Map<String, dynamic> userData = {
10"Email": [
11{
12"Type": "Primary",
13"Value": emailController.text,
14}
15],
16"Password": passwordController.text,
17"About": 'I am a new user :smile:',
18"FirstName": "Test",
19"LastName": "Account",
20"BirthDate": "10-12-1985",
21"Gender": "M",
22};
23//get response from ApiClient
24dynamic res = await _apiClient.registerUser(userData);
25ScaffoldMessenger.of(context).hideCurrentSnackBar();
26
27//checks if there is no error in the response body.
28//if error is not present, navigate the users to Login Screen.
29if (res['ErrorCode'] == null) {
30  Navigator.push(context,
31      MaterialPageRoute(builder: (context) => const LoginScreen()));
32} else {
33 //if error is present, display a snackbar showing the error messsage
34  ScaffoldMessenger.of(context).showSnackBar(SnackBar(
35    content: Text('Error: ${res['Message']}'),
36    backgroundColor: Colors.red.shade300,
37  ));
38}
39
40}
41}
Login Screen
The LoginScreen UI code is similar to the RegistrationScreen in that it also has two TextFormField widgets that serve as our email and password fields, as well as an ElevatedButton to handle event submission. So, for the sake of brevity, I’ll be leaving out the LoginScreen UI code and focusing mainly on the code to be written in the ElevatedButton onPressed callback in the login_screen.dart file.
1//...
2    //...
3       Future<void> loginUsers() async {
4        if (_formKey.currentState!.validate()) {
5          //show snackbar to indicate loading
6          ScaffoldMessenger.of(context).showSnackBar(SnackBar(
7            content: const Text('Processing Data'),
8            backgroundColor: Colors.green.shade300,
9          ));
10      //get response from ApiClient
11      dynamic res = await _apiClient.login(
12        emailController.text,
13        passwordController.text,
14      );
15      ScaffoldMessenger.of(context).hideCurrentSnackBar();
16
17      //if there is no error, get the user's accesstoken and pass it to HomeScreen
18      if (res['ErrorCode'] == null) {
19        String accessToken = res['access_token'];
20        Navigator.push(
21            context,
22            MaterialPageRoute(
23                builder: (context) => HomeScreen(accesstoken: accessToken)));
24      } else {
25      //if an error occurs, show snackbar with error message
26      ScaffoldMessenger.of(context).showSnackBar(SnackBar(
27        content: Text('Error: ${res['Message']}'),
28        backgroundColor: Colors.red.shade300,
29      ));
30      }
31    }
32  }
33//...
The code snippet above is a method that first validates the form before passing the email and password values to the login method from the ApiClient class for handling.
If the response is successful, you obtain the user’s access_token from the response data and pass it over to the HomeScreen. Otherwise, you display a snackbar with the error message that occurred.
Then, you pass the loginUsers method you created above to the onPressed property of the ElevatedButton widget in the LoginScreen, as shown below.
1ElevatedButton(
2        onPressed: loginUsers, //<--
3        style: ElevatedButton.styleFrom(
4        primary: Colors.indigo,
5        shape: RoundedRectangleBorder(
6               borderRadius: BorderRadius.circular(10)),
7               padding: const EdgeInsets.symmetric(
8                        horizontal: 40, vertical: 15)),
9        child: const Text("Login",
10            style: TextStyle(
11                fontSize: 20,
12                fontWeight: FontWeight.bold,
13            ),
14           ),
15         ),
16       ),
Next, you need to provide a screen that reveals the user's profile data when they successfully log in, and the HomeScreen is there to do so.
Home Screen
The HomeScreen displays the user’s profile details using a FutureBuilder widget that accepts a future getUserData.
1Future<Map<String, dynamic>> getUserData() async {
2        dynamic userRes;
3        userRes = await _apiClient.getUserProfileData(widget.accesstoken);
4        return userRes;
5      }
The getUserData method above is used to retrieve details of a user by passing in the access_token obtained earlier from the LoginScreen to the ApiClient getUserProfileData method.
To display the result of your getUserData method on our screen, use a FutureBuilder widget. The code snippet below shows how to use the FutureBuilder to get the results of the getUserData future in the home.dart file.
1class HomeScreen extends StatefulWidget {
2 final String accesstoken;
3 const HomeScreen({Key? key, required this.accesstoken}) : super(key: key);
4 @override
5 State<HomeScreen> createState() => _HomeScreenState();
6 }
7 class _HomeScreenState extends State<HomeScreen> {
8 //instance of ApiClient class
9 final ApiClient _apiClient = ApiClient();
10 //get user data from ApiClient
11 Future<Map<String, dynamic>> getUserData() async {
12 dynamic userRes;
13 userRes = await _apiClient.getUserProfileData(widget.accesstoken);
14 return userRes;
15 }
16 @override
17 Widget build(BuildContext context) {
18 var size = MediaQuery.of(context).size;
19 return Scaffold(
20 backgroundColor: Colors.white,
21 body: SizedBox(
22 width: size.width,
23 height: size.height,
24 child: FutureBuilder<Map<String, dynamic>>(
25 future: getUserData(), //<---
26 builder: (context, snapshot) {
27 if (snapshot.hasData) {
28 if (snapshot.connectionState == ConnectionState.waiting) {
29 return Container(
30 height: size.height,
31 width: size.width,
32 color: Colors.blueGrey,
33 child: const Center(
34 child: CircularProgressIndicator(),
35 ),
36 );
37 }
38 //get results from snapshot
39 String fullName = snapshot.data!['FullName'];
40 String firstName = snapshot.data!['FirstName'];
41 String lastName = snapshot.data!['LastName'];
42 String birthDate = snapshot.data!['BirthDate'];
43 String email = snapshot.data!['Email'][0]['Value'];
44 String gender = snapshot.data!['Gender'];
45 return Container(
46 width: size.width,
47 height: size.height,
48 color: Colors.blueGrey.shade400,
49 child: SingleChildScrollView(
50 physics: const BouncingScrollPhysics(),
51 //...
52 //...Finally, let's add the logout feature.
Add an ElevatedButton widget to the HomeScreen.
1TextButton(
2        onPressed: (){},
3        style: TextButton.styleFrom(
4        backgroundColor: Colors.redAccent.shade700,
5        shape: RoundedRectangleBorder(
6               borderRadius: BorderRadius.circular(5)),
7               padding: const EdgeInsets.symmetric(
8                    vertical: 15, horizontal: 25)),
9        child: const Text('Logout',
10          style: TextStyle(color: Colors.white),           ),
11        ),
12     ),
On pressing the button, you'll call the logout method on the ApiClient class and pass in the access_token value, and then you route the user to the LoginScreen.
1TextButton(
2        onPressed: () async {
3          await _apiClient.logout(widget.accesstoken);
4          Navigator.pushReplacement(
5            context, MaterialPageRoute(builder: (context) => const LoginScreen()));
6        },
7        style: TextButton.styleFrom(
8        backgroundColor: Colors.redAccent.shade700,
9        shape: RoundedRectangleBorder(
10               borderRadius: BorderRadius.circular(5)),
11               padding: const EdgeInsets.symmetric(
12                    vertical: 15, horizontal: 25)),
13        child: const Text('Logout',
14             style: TextStyle(color: Colors.white),
15          ),
16     ),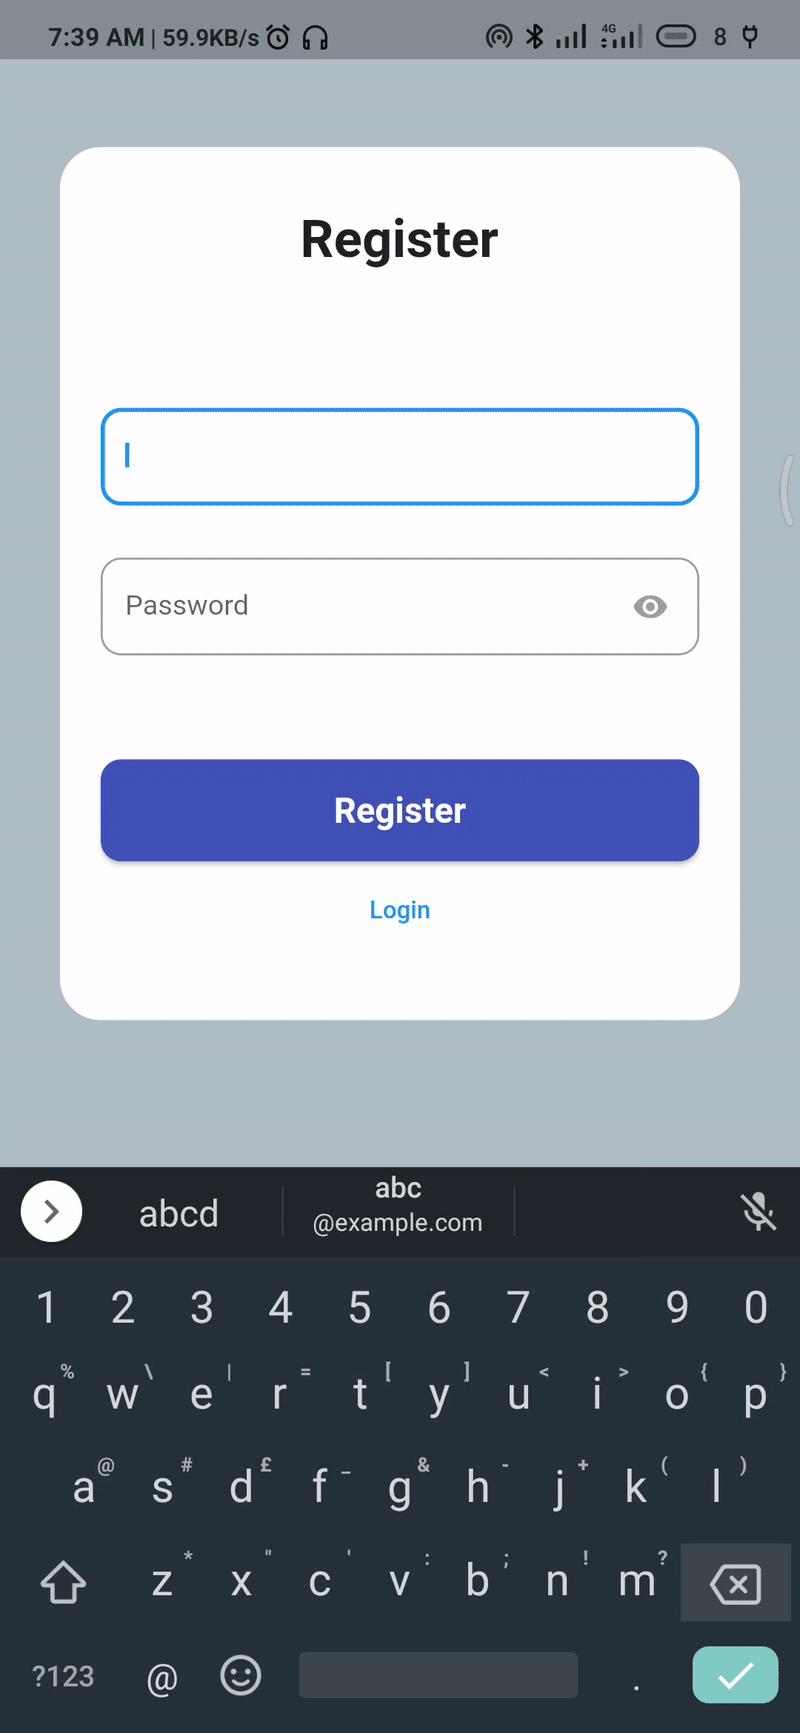
Conclusion
LoginRadius provides high-level, secure, and well-documented APIs to ease the implementation of authentication and user identity management. This tutorial has discussed LoginRadius's benefits and how to use the LoginRadius APIs to handle user authentication and registration in a Flutter application.
The complete source code of the demo application is available on GitHub.