Introduction
Creating a user registration form employs the management of the registered user. This is where user role authentication comes into play. Role authentication ensures that non-admin users cannot make changes or access exclusive information. It grants administrative privileges to admin users and basic privileges to basic users.
You can build your own authentication functionality with web tokens like JSON Web Token (JWT) or use a trusted third-party customer identity and access management (CIAM) software like LoginRadius.
Goal
This tutorial helps you:
- understand the differences between the Admin role and the Basic user role;
- use JWT to authenticate users; and
- learn role-based authentication using JWT in a simple Node.js app.
Prerequisites
You have installed the following:
You already understand JavaScript E56 Syntax.
Now that everything is in place, let's set up your database.
Set Up a Mongo Database
You'll store all your user data — which includes username, password, and role — in MongoDB.
Install a node package called Mongoose that will connect to MongoDB. Then create a user schema for your application.
1npm init
2npm install mongoose
npm init sets up your new project and creates a package.json file with the credentials.
After installing mongoose, create a new file db.js in the project's directory and require mongoose.
1const Mongoose = require("mongoose")With the help of mongoose, you can connect your application to MongoDB:
1// db.js
2const Mongoose = require("mongoose")
3const localDB = `mongodb://localhost:27017/role_auth`
4const connectDB = async () => {
5  await Mongoose.connect(localDB, {
6    useNewUrlParser: true,
7    useUnifiedTopology: true,
8  })
9  console.log("MongoDB Connected")
10}
11module.exports = connectDB
The code snippet here connects to mongodb://localhost:27017 and then specifies the name of the database /role_auth.
The function connectDB awaits for the connection, which contains the URI and options as a second parameter. If it connects without errors, it will log out MongoDB Connected. Error issues will be fixed while connecting to the database. After this, it exported the function for use in the server.
Set Up the Server
You need to install some dependencies that you'll use in this tutorial.
1npm i express nodemonExpress.js is a Node.js framework for building web applications quickly and easily.
Nodemon is a tool that watches the file system and automatically restarts the server when there is a change.
You require express in your application to listen for a connection on port 5000. Create a new file server.js in the root directory and create the listening event:
1const express = require("express")
2const app = express()
3const PORT = 5000
4app.listen(PORT, () => console.log(`Server Connected to port ${PORT}`))
The next step is to test your application. Open up your package.json file and add the following to scripts:
1"scripts": {
2  "start": "node server.js",
3  "dev": "nodemon server.js"
4}
Open your terminal and run npm run dev to start the server.
Connect to the Database
Earlier, you've created a function that connects to MongoDB and exported that function. Now import that function into your server.js:
1const connectDB = require("./db");
2...
3//Connecting the Database
4connectDB();
You also need to create an error handler that catches every unhandledRejection error.
1const server = app.listen(PORT, () =>
2  console.log(`Server Connected to port ${PORT}`)
3)
4// Handling Error
5process.on("unhandledRejection", err => {
6  console.log(`An error occurred: ${err.message}`)
7  server.close(() => process.exit(1))
8})
The listening event is assigned to a constant server. If an unhandledRejection error occurs, it logs out the error and closes the server with an exit code of 1.
Create User Schema
Schema is like a blueprint that shows how the database will be constructed.
You'll structure a user schema that contains username, password, and role.
Create a new folder model in the project's directory, and create a file called User.js. Now open User.js and create the user schema:
1// user.js
2const Mongoose = require("mongoose")
3const UserSchema = new Mongoose.Schema({
4  username: {
5    type: String,
6    unique: true,
7    required: true,
8  },
9  password: {
10    type: String,
11    minlength: 6,
12    required: true,
13  },
14  role: {
15    type: String,
16    default: "Basic",
17    required: true,
18  },
19})
In the schema, the username will be unique, required, and will accept strings.
You've specified the minimum characters(6) the password field will accept. The role field grants a default value (basic) that you can change if needed.
Now, you need to create a user model and export it:
1const User = Mongoose.model("user", UserSchema)
2module.exports = User
You've created the user model by passing the UserSchema as the second argument while the first argument is the name of the model user.
Perform CRUD Operations
You'll create functions that handle:
- adding users;
- getting all users;
- updating the role of users; and,
- deleting users.
Register Function
As the name implies, this function will handle the registrations of users.
Let's create a new folder named Auth. It will contain the Authentication file and the Route set-up file.
After creating the Auth folder, add two files — Auth.js and Route.js.
Now open up our Auth.js file and import that User model:
1const User = require("../model/User")The next step is to create an async express function that will take the user's data and register it in the database.
You need to use an Express middleware function that will grant access to the user's data from the body. You'll use this function in the server.js file:
1const app = express()
2app.use(express.json())
Let's go back to your Auth.js file and create the register function:
1// auth.js
2exports.register = async (req, res, next) => {
3  const { username, password } = req.body
4  if (password.length < 6) {
5    return res.status(400).json({ message: "Password less than 6 characters" })
6  }
7  try {
8    await User.create({
9      username,
10      password,
11    }).then(user =>
12      res.status(200).json({
13        message: "User successfully created",
14        user,
15      })
16    )
17  } catch (err) {
18    res.status(401).json({
19      message: "User not successful created",
20      error: error.mesage,
21    })
22  }
23}
The exported register function will be used to set up the routes. You got the username and password from the req.body and created a tryCatch block that will create the user if successful; else, it returns status code 401 with the error message.
Set Up Register Route
You'll create a route to /register using express.Router. Import the register function into your route.js file, and use it as the route's function:
1const express = require("express")
2const router = express.Router()
3const { register } = require("./auth")
4router.route("/register").post(register)
5module.exports = router
The last step is to import your route.js file as middleware in server.js:
1app.use("/api/auth", require("./Auth/route"))The server will use the router middleware function if there is a request to /api/auth.
Test the Register Route
You'll use Postman to test all the routes.
Open up Postman to send a POST request to http://localhost:5000/api/auth/register and pass the username and password to the body:

Login Function
You've created a function that adds registered users to the database. You have to create another function that will authenticate user credentials and check if the user is registered.
Open the Auth.js file and create the Login function, as follows:
1// auth.js
2exports.login = async (req, res, next) => {
3  const { username, password } = req.body
4  // Check if username and password is provided
5  if (!username || !password) {
6    return res.status(400).json({
7      message: "Username or Password not present",
8    })
9  }
10}
The login function returns status code 400 if the username and password were not provided. You need to find a user with the provided username and password:
1exports.login = async (req, res, next) => {
2  try {
3    const user = await User.findOne({ username, password })
4    if (!user) {
5      res.status(401).json({
6        message: "Login not successful",
7        error: "User not found",
8      })
9    } else {
10      res.status(200).json({
11        message: "Login successful",
12        user,
13      })
14    }
15  } catch (error) {
16    res.status(400).json({
17      message: "An error occurred",
18      error: error.message,
19    })
20  }
21}
Here, it returns status code 401 when a user isn't found and 200 when a user is found. The code snippet wrapped all this in a tryCatch block to detect and output errors, if any.
Set Up Login Route
To set up the login route, import the login function into your route.js:
1const express = require("express");
2const router = express.Router();
3const { register, login } = require("./auth");
4...
5router.route("/login").post(login);
6module.exports = router;
Test the Login Route
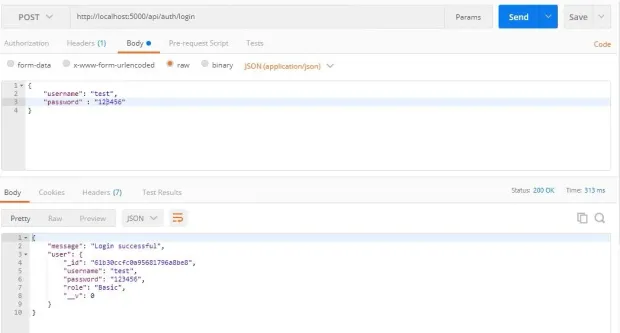
Make a POST request at http://localhost:5000/api/auth/login and pass a valid username and password to the body:
Update Function
This function will be responsibile for updating the role of a basic user to an admin user. Open the auth.js file and create the update function, as follows:
1//auth.js
2exports.update = async (req, res, next) => {
3  const { role, id } = req.body
4  // Verifying if role and id is presnt
5  if (role && id) {
6    // Verifying if the value of role is admin
7    if (role === "admin") {
8      await User.findById(id)
9    } else {
10      res.status(400).json({
11        message: "Role is not admin",
12      })
13    }
14  } else {
15    res.status(400).json({ message: "Role or Id not present" })
16  }
17}
The first if statement verifies if role and id are present in the request body.
The second if statement checks if the value of role is admin. You should do this to avoid having over two roles.
After finding a user with that ID, you'll create a third if block that will check for the role of the user:
1exports.update = async (req, res, next) => {
2  const { role, id } = req.body;
3  // First - Verifying if role and id is presnt
4  if (role && id) {
5    // Second - Verifying if the value of role is admin
6    if (role === "admin") {
7      // Finds the user with the id
8      await User.findById(id)
9        .then((user) => {
10          // Third - Verifies the user is not an admin
11          if (user.role !== "admin") {
12            user.role = role;
13            user.save((err) => {
14              //Monogodb error checker
15              if (err) {
16                res
17                  .status("400")
18                  .json({ message: "An error occurred", error: err.message });
19                process.exit(1);
20              }
21              res.status("201").json({ message: "Update successful", user });
22            });
23          } else {
24            res.status(400).json({ message: "User is already an Admin" });
25          }
26        })
27        .catch((error) => {
28          res
29            .status(400)
30            .json({ message: "An error occurred", error: error.message });
31        });
32   ...
The third if block prevents assigning an admin role to an admin user, while the last if block checks if an error occurred when saving the role in the database.
The numerous
ifstatements might be a little bit tricky but understandable. Please read the comments in the above code block for better understanding.
Set Up Update Route
Import the update function in your route.js, as follows:
1const { register, login, update } = require("./auth");
2...
3router.route("/update").put(update);
Testing the Update Route
Send a put request to http://localhost:5000/api/auth/update:

Delete Function
The deleteUser function will remove a specific user from the database. Let's create this function in our auth.js file:
1exports.deleteUser = async (req, res, next) => {
2  const { id } = req.body
3  await User.findById(id)
4    .then(user => user.remove())
5    .then(user =>
6      res.status(201).json({ message: "User successfully deleted", user })
7    )
8    .catch(error =>
9      res
10        .status(400)
11        .json({ message: "An error occurred", error: error.message })
12    )
13}
You remove the user based on the id you get from req.body.
Set up the deleteUser Route
Open your route.js file to create a delete request to /deleteUser, using the deleteUser as its function:
1const { register, login, update, deleteUser } = require("./auth");
2...
3router.route("/deleteUser").delete(deleteUser);
Test the deleteUser Route
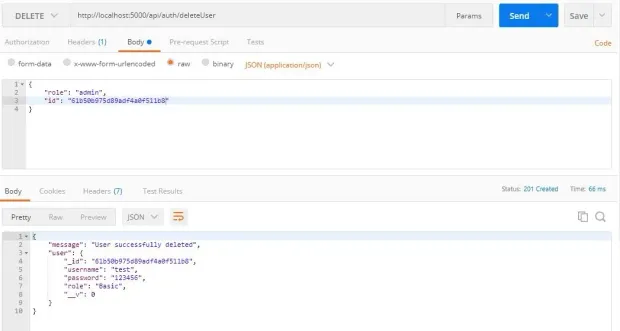
Send a delete request to http://localhost:5000/api/auth/deleteUser by passing a valid id to the body:
Hash User Passwords
Saving user passwords in the database in plain text format is reckless. It is preferable to hash your password before storing it.
For instance, it will be tough to decipher the passwords in your database if they are leaked. Hashing passwords is a cautious and reliable practice.
Let's use bcryptjs to hash your user passwords.
Lets install bcryptjs:
1npm i bcryptjsAfter installing bcryptjs, import it into your auth.js
1const bcrypt = require("bcryptjs")Refactor Register Function
Instead of sending a plain text format to your database, lets hash the password using bcrypt:
1exports.register = async (req, res, next) => {
2  const { username, password } = req.body;
3...
4bcrypt.hash(password, 10).then(async (hash) => {
5await User.create({
6username,
7password: hash,
8})
9.then((user) =>
10res.status(200).json({
11message: "User successfully created",
12user,
13})
14)
15.catch((error) =>
16res.status(400).json({
17message: "User not successful created",
18error: error.message,
19})
20);
21});
22};
bcrypt takes in your password as the first argument and the number of times it will hash the password as the second argument. Passing a large number will take bcrypt a long time to hash the password, so give a moderate number like 10.
bcrypt will return a promise with the hashed password; then, send that hashed password to the database.
Test the Register Function
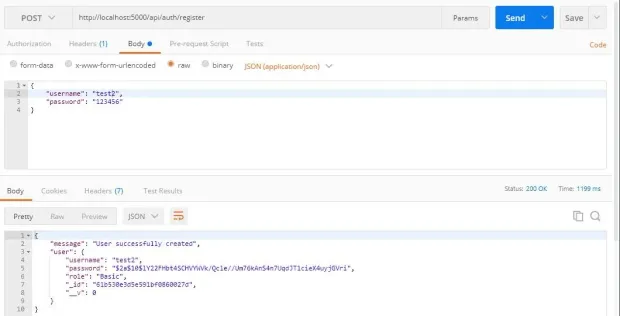
Send a POST request to http://localhost:5000/api/auth/register and pass the username and password to the body:
Refactor the Login Function
1exports.login = async (req, res, next) => {
2  const { username, password } = req.body
3  // Check if username and password is provided
4  if (!username || !password) {
5    return res.status(400).json({
6      message: "Username or Password not present",
7    })
8  }
9  try {
10    const user = await User.findOne({ username })
11    if (!user) {
12      res.status(400).json({
13        message: "Login not successful",
14        error: "User not found",
15      })
16    } else {
17      // comparing given password with hashed password
18      bcrypt.compare(password, user.password).then(function (result) {
19        result
20          ? res.status(200).json({
21              message: "Login successful",
22              user,
23            })
24          : res.status(400).json({ message: "Login not succesful" })
25      })
26    }
27  } catch (error) {
28    res.status(400).json({
29      message: "An error occurred",
30      error: error.message,
31    })
32  }
33}
bcrypt.compare checks if the given password and the hashed password in the database are the same.
Test the Login Function
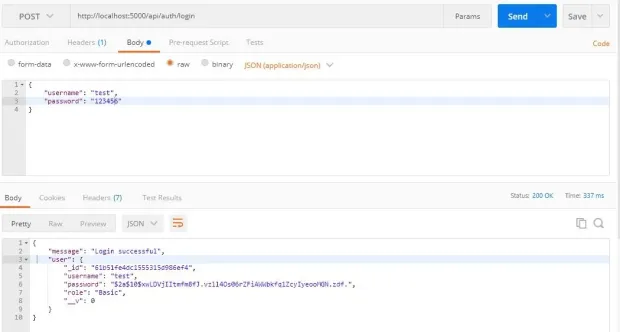
Send a POST request to http://localhost:5000/api/auth/login and pass a valid username and password to the body:
Authenticate Users with JSON Web Token (JWT)
JSON Web Token helps shield a route from an unauthenticated user. Using JWT in your application will prevent unauthenticated users from accessing your users' home page and prevent unauthorized users from accessing your admin page.
JWT creates a token, sends it to the client, and then the client uses the token for making requests. It also helps verify that you're a valid user making those requests.
You've to install JWT before using it in your application:
1npm i jsonwebtokenRefactor the Register Function
When a user registers, you'll send a token to the client using JWT as a cookie. To create this token, you need to set a secret string. You'll use the node's in-built package called crypto to create random strings:
1node
2require("crypto").randomBytes(35).toString("hex")
Output:

Storing this secret string in an environment variable is a safe practice. If this secret string is leaked, unauthenticated users can create fake tokens to access the route.
Store your secret string in a variable:
1const jwtSecret =
2  "4715aed3c946f7b0a38e6b534a9583628d84e96d10fbc04700770d572af3dce43625dd"
Once you've created your jwtSecret, import jsonwebtoken as the token in the register function:
1...
2const jwt = require('jsonwebtoken')
3const jwtSecret = '4715aed3c946f7b0a38e6b534a9583628d84e96d10fbc04700770d572af3dce43625dd'
4exports.register = async (req, res, next) => {
5  const { username, password } = req.body;
6...
7bcrypt.hash(password, 10).then(async (hash) => {
8await User.create({
9username,
10password: hash,
11})
12.then((user) => {
13const maxAge = 3 * 60 * 60;
14const token = jwt.sign(
15{ id: user._id, username, role: user.role },
16jwtSecret,
17{
18expiresIn: maxAge, // 3hrs in sec
19}
20);
21res.cookie("jwt", token, {
22httpOnly: true,
23maxAge: maxAge * 1000, // 3hrs in ms
24});
25res.status(201).json({
26message: "User successfully created",
27user: user._id,
28});
29})
30.catch((error) =>
31res.status(400).json({
32message: "User not successful created",
33error: error.message,
34})
35);
36});
37};
The code snippet created the token using JWT's sign function. This function takes in three parameters:
-
the payload is the first parament that you'll pass to the function. This payload holds data concerning the user, and this data should not contain sensitive information like passwords;
-
you passed your
jwtSecretas the second parameter; and, -
how long the token will last as the third parameter.
After passing all these arguments, JWT will generate a token. After the token is generated, send it as a cookie to the client.
Refactor the Login Function
Also, generate a token for logged in users:
1exports.login = async (req, res, next) => {
2...
3
4  bcrypt.compare(password, user.password).then(function (result) {
5    if (result) {
6      const maxAge = 3 * 60 * 60;
7      const token = jwt.sign(
8        { id: user._id, username, role: user.role },
9        jwtSecret,
10        {
11          expiresIn: maxAge, // 3hrs in sec
12        }
13      );
14      res.cookie("jwt", token, {
15        httpOnly: true,
16        maxAge: maxAge * 1000, // 3hrs in ms
17      });
18      res.status(201).json({
19        message: "User successfully Logged in",
20        user: user._id,
21      });
22    } else {
23      res.status(400).json({ message: "Login not succesful" });
24    }
25  });
26}
27
28} catch (error) {
29res.status(400).json({
30message: "An error occurred",
31error: error.message,
32});
33}
34};
Protect the Routes
To prevent unauthenticated users from accessing the private route, take the token from the cookie, verify the token, and redirect users based on role.
You'll get the token from the client using a node package called cookie-parser. Let's install the package before using it:
1npm i cookie-parserAfter installing it, import it into your server.js file and use it as a middleware:
1const cookieParser = require("cookie-parser");
2...
3app.use(cookieParser());
You'll create your middleware that verifies the token and grants access to your private route.
Let's create a new folder in the project's folder named middleware and create a file called auth.js.
Admin Authentication
Open the auth.js file and create the middleware:
1const jwt = require("jsonwebtoken")
2const jwtSecret =
3  "4715aed3c946f7b0a38e6b534a9583628d84e96d10fbc04700770d572af3dce43625dd"
4exports.adminAuth = (req, res, next) => {
5  const token = req.cookies.jwt
6  if (token) {
7    jwt.verify(token, jwtSecret, (err, decodedToken) => {
8      if (err) {
9        return res.status(401).json({ message: "Not authorized" })
10      } else {
11        if (decodedToken.role !== "admin") {
12          return res.status(401).json({ message: "Not authorized" })
13        } else {
14          next()
15        }
16      }
17    })
18  } else {
19    return res
20      .status(401)
21      .json({ message: "Not authorized, token not available" })
22  }
23}
The code snippet requests a token from the client, checks if a token is available, and verifies that token.
JWT verifies your token with your jwtSecret and returns a callback function. This function returns status code 401 if the token fails the authentication test.
When you've created the token, you passed a payload that contained the user's credentials. You'll get the role from the credentials and check if the user's role is admin. If the user is not an admin, you return status code 401, but you'll call the next function if the user is an admin.
Basic User Authentication
You'll also authenticate basic users before granting them access to the users route. Let's create another middleware in your auth.js file that will authenticate basic users:
1exports.userAuth = (req, res, next) => {
2  const token = req.cookies.jwt
3  if (token) {
4    jwt.verify(token, jwtSecret, (err, decodedToken) => {
5      if (err) {
6        return res.status(401).json({ message: "Not authorized" })
7      } else {
8        if (decodedToken.role !== "Basic") {
9          return res.status(401).json({ message: "Not authorized" })
10        } else {
11          next()
12        }
13      }
14    })
15  } else {
16    return res
17      .status(401)
18      .json({ message: "Not authorized, token not available" })
19  }
20}
Protect the Routes
You'll have two routes: one for the user and the other for the admin. Let's import this middleware into your server.js file and protect your routes:
1const { adminAuth, userAuth } = require("./middleware/auth.js");
2...
3app.get("/admin", adminAuth, (req, res) => res.send("Admin Route"));
4app.get("/basic", userAuth, (req, res) => res.send("User Route"));
Updating user roles and deleting users should be done by an Admin, so you need to import this auth.js middleware into your route.js file to protect the update and delete routes.
route.js:
1const { adminAuth } = require("../middleware/auth")
2router.route("/update").put(adminAuth, update)
3router.route("/deleteUser").delete(adminAuth, deleteUser)
Populate the Database with Admin User
You need to create an admin user in your database. Open up your terminal, and let's run some MongoDB methods:
1mongoAfter mongo is started, you need to use the role_auth database:
1use role_authBefore adding your admin user to the database, you need to hash the password using bcrypt in the node terminal. Open node terminal in your project's directory:
1const password = require("bcryptjs").hash("admin", 10)
2password
After you've created the constant password, you need to enter the password in the node terminal to get your hashed password.
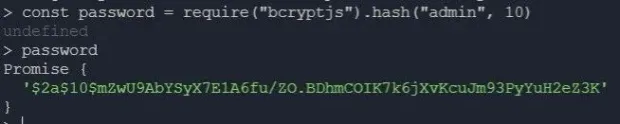
You'll use the hashed password to create your admin:
1db.users.insert({
2  username: "admin",
3  password: "$2a$10$mZwU9AbYSyX7E1A6fu/ZO.BDhmCOIK7k6jXvKcuJm93PyYuH2eZ3K",
4  role: "admin",
5})
To check if it was successfully created, run db.users.find().pretty() — this will output all users in the database.
Create the Login Form Using EJS
You'll use Embedded JavaScript (EJS) to create a front-end for your application.
Install the ejs package:
1npm i ejsAfter you've installed ejs, you need to set ejs as your default view engine in your server.js file:
1app.set("view engine", "ejs")Render Embedded JavaScript
When making a GET request to specific routes, you'll render an ejs file:
1app.get("/", (req, res) => res.render("home"))
2app.get("/register", (req, res) => res.render("register"))
3app.get("/login", (req, res) => res.render("login"))
4app.get("/admin", adminAuth, (req, res) => res.render("admin"))
5app.get("/basic", userAuth, (req, res) => res.render("user"))
Create EJS Files
By default, your application will look into the views folder when rendering an ejs file. You need to create the views folder in your project's folder and add your ejs files to it
Create a Home Page
Your home page will contain the links to /login and /register ejs file. Open up home.ejs and add these links:
1<!DOCTYPE html>
2<html lang="en">
3  <head>
4    <meta charset="UTF-8" />
5    <meta name="viewport" content="width=device-width, initial-scale=1.0" />
6    <title>Home page</title>
7  </head>
8  <body>
9    <h1>Home Page</h1>
10    <a href="/register"> Register</a> <br />
11    <a href="/login">Login</a>
12  </body>
13</html>
Create a Registration Form
Embedded JavaScript (EJS) supports HTML syntax. You'll create the registration form in register.ejs using HTML syntax:
1<!DOCTYPE html>
2<html lang="en">
3  <head>
4    <meta charset="UTF-8" />
5    <meta name="viewport" content="width=device-width, initial-scale=1.0" />
6    <title>Register Page</title>
7  </head>
8  <body>
9    <h1>Register Page</h1>
10    <form>
11      <div class="error" style="background-color: red;"></div>
12      <br />
13      <label for="username">Username</label><br />
14      <input type="text" id="username" required /><br />
15      <label for="password">Password</label><br />
16      <input type="password" id="password" required /><br />
17      <input type="submit" value="register" /><br />
18    </form>
19    <a href="/login">Already registered? Login</a>
20  </body>
21</html>
Add POST Request Functionality
You need to get the username and password that the user entered and pass it to the body when making the POST request:
1...
2<script>
3  const form = document.querySelector('form')
4  const username = document.querySelector('#username')
5  const password = document.querySelector('#password')
6  const display = document.querySelector('.error')
7  form.addEventListener('submit', async (e) => {
8     e.preventDefault()
9     display.textContent = ''
10     try {
11       const res = await fetch('/api/auth/register', {
12       method: 'POST',
13        body: JSON.stringify({ username: username.value, password: password.value }),
14       headers: { 'Content-Type': 'application/json' }
15       })
16       const data = await res.json()
17       if(res.status === 400 || res.status === 401){
18        return display.textContent = `${data.message}. ${data.error ? data.error : ''}`
19       }
20       data.role === "admin" ? location.assign('/admin') : location.assign('/basic')
21        } catch (err) {
22          console.log(err.message)
23        }
24      })
25</script>
26</body>
27</html>
The code snippet uses JavaScript's in-built library called fetch to send a POST request to /api/auth/register.
After the request has been sent, it stores the response to a constant res.
res.json will return the JSON you've passed as a response in the API.
When res.json returns the data, you store that data in a constant data.
If you get an error while making the request, display the error to the user. If an error isn't found, redirect the user based on their role on different routes.
Create a Login Form
Creating your login form and adding functionality to it will be similar to that of your registration. Open login.ejs and create this form:
1<!DOCTYPE html>
2<html lang="en">
3  <head>
4    <meta charset="UTF-8" />
5    <meta name="viewport" content="width=device-width, initial-scale=1.0" />
6    <title>Login Page</title>
7  </head>
8  <body>
9    <h1>Login Page</h1>
10    <form>
11      <div class="error" style="background-color: red;"></div>
12      <br />
13      <label for="username">Username</label><br />
14      <input type="text" id="username" required /><br />
15      <label for="password">Password</label><br />
16      <input type="password" id="password" required /><br />
17      <input type="submit" value="login" /><br />
18    </form>
19    <a href="/register">Don't have an accout? Register</a>
20  </body>
21</html>
Add POST Request Functionality
1<script>
2 const form = document.querySelector('form')
3 const username = document.querySelector('#username')
4 const password = document.querySelector('#password')
5 const display = document.querySelector('.error')
6 form.addEventListener('submit', async (e) => {
7 e.preventDefault()
8 display.textContent = ''
9 try {
10 const res = await fetch('/api/auth/login', {
11 method: 'POST',
12 body: JSON.stringify({ username: username.value, password: password.value }),
13 headers: { 'Content-Type': 'application/json' }
14 })
15 const data = await res.json()
16 if (res.status === 400 || res.status === 401) {
17 return display.textContent = `${data.message}. ${data.error ? data.error : ''}`
18 }
19 data.role === "admin" ? location.assign('/admin') : location.assign('/basic')
20 } catch (err) {
21 console.log(err.message)
22 }
23 })
24 </script>
25</body>
26</html>Add Registered Users to the Route
Once you've redirected users based on role to different routes, display all registered users on that route. You need to send a GET request to /getUsers.
Open auth.js file in Auth folder:
1exports.getUsers = async (req, res, next) => {
2  await User.find({})
3    .then(users => {
4      const userFunction = users.map(user => {
5        const container = {}
6        container.username = user.username
7        container.role = user.role
8        return container
9      })
10      res.status(200).json({ user: userFunction })
11    })
12    .catch(err =>
13      res.status(401).json({ message: "Not successful", error: err.message })
14    )
15}
The User.find method returns an array of users. After mapping through this array, it stores the username and role in the constant container and returns the container.
Display Registered User in user Route
You've rendered user.ejs when accessing the /user route. Now, you'll display all registered users to that route.
user.ejs:
1<!DOCTYPE html>
2<html lang="en">
3  <head>
4    <meta charset="UTF-8" />
5    <meta http-equiv="X-UA-Compatible" content="IE=edge" />
6    <meta name="viewport" content="width=device-width, initial-scale=1.0" />
7    <title>User page</title>
8  </head>
9  <body>
10    <h1>Users</h1>
11    <ul></ul>
12    <script>
13      const ul = document.querySelector("ul")
14      const getUsers = async () => {
15        const res = await fetch("/api/auth/getUsers")
16        const data = await res.json()
17        data.user.map(mappedUser => {
18          if (mappedUser.username !== "admin") {
19            let li = `<li> <b>Username</b> => ${mappedUser.username} <br> <b>Role</b> => ${mappedUser.role} </li>`
20            ul.innerHTML += li
21          } else {
22            return null
23          }
24        })
25      }
26      getUsers()
27    </script>
28  </body>
29</html>
Add Update and Delete Function to the Admin Route
You'll also display registered users to the admin route but add update and delete functionality to the route:
admin.ejs:
1<!DOCTYPE html>
2<html lang="en">
3  <head>
4    <meta charset="UTF-8" />
5    <meta http-equiv="X-UA-Compatible" content="IE=edge" />
6    <meta name="viewport" content="width=device-width, initial-scale=1.0" />
7    <title>Admin page</title>
8  </head>
9  <body>
10    <div class="display" style="background-color: red;"></div>
11    <h1>Users</h1>
12    <ul></ul>
13    <script>
14      const ul = document.querySelector("ul")
15      const display = document.querySelector(".display")
16      const getUsers = async () => {
17        const res = await fetch("/api/auth/getUsers")
18        const data = await res.json()
19        data.user.map(mappedUser => {
20          if (mappedUser.username !== "admin") {
21            let li = `<li> <b>Username</b> => ${mappedUser.username} <br> <b>Role</b> => ${mappedUser.role} </li> <button class="edit">Edit Role</button> <button class="delete">Delete User</button>`
22            ul.innerHTML += li
23          } else {
24            return null
25          }
26          const editRole = document.querySelectorAll(".edit")
27          const deleteUser = document.querySelector(".delete")
28        })
29      }
30      getUsers()
31    </script>
32  </body>
33</html>
Edit a User's Role
You'll create an event listener that will listen for a click on the Edit Role button. When the button is clicked, you'll send a PUT request to /api/auth/update:
1<script>
2...
3
4const editRole = document.querySelectorAll('.edit')
5const deleteUser = document.querySelector('.delete')
6
7editRole.forEach((button, i) => {
8button.addEventListener('click', async() => {
9display.textContent= ''
10const id = data.user[i+1].id
11const res = await fetch('/api/auth/update', {
12method: 'PUT',
13body: JSON.stringify({ role: 'admin', id}),
14headers: { 'Content-Type': 'application/json' }
15})
16const dataUpdate = await res.json()
17if (res.status === 400 || res.status === 401) {
18document.body.scrollTop = 0
19document.documentElement.scrollTop = 0
20return display.textContent = ${dataUpdate.message}. ${dataUpdate.error ? dataUpdate.error : ''}
21}
22location.assign('/admin')
23})
24});
25  ...
26
27</script>
Delete Users
Deleting Users from the database should be the duty of an admin.
admin.ejs:
1<script>
2...
3const editRole = document.querySelectorAll('.edit')
4const deleteUser = document.querySelector('.delete')
5deleteUser.forEach((button, i)=> {
6button.addEventListener('click', async ()=> {
7display.textContent =''
8const id = data.user[i+1].id
9const res = await fetch('/api/auth/deleteUser', {
10method: 'DELETE',
11body: JSON.stringify({id}),
12headers: {'Content-Type': 'application/json'}
13})
14const dataDelete = await res.json()
15if (res.status === 401){
16document.body.scrollTop = 0
17document.documentElement.scrollTop = 0
18return display.textContent = ${dataUpdate.message}. ${dataUpdate.error ? dataUpdate.error : ''}
19}
20location.assign('/admin')
21})
22})
23...
24</script>
You've created an event listener that listens for a click on the Delete User button. When the button is clicked, you'll send a DELETE request to /api/auth/deleteUser.
Please ensure the admin user is first on the list to avoid populating the database with an admin user again.
Logout Functionality
To log out users, you need to remove the token from the client and redirect the client to the home page.
You'll create a GET request to /logout in the server.js file:
1app.get("/logout", (req, res) => {
2  res.cookie("jwt", "", { maxAge: "1" })
3  res.redirect("/")
4})
The code snippet replaced the JWT token with an empty string and gave it a lifespan of 1 second.
After creating the GET request, add a logout button to the admin's route and user's route:
1...
2<ul></ul>
3<button class="logout"><a href="/logout">Log Out</a></button>
4...
Node.js Authentication with LoginRadius
You can simply replace the many steps discussed above using LoginRadius. In turn, it helps you focus more on developing core application features while letting you quickly implement user signup and login and manager users.
In other words, LoginRadius is a SaaS-based customer identity and access management (CIAM) system with features to manage customer identity, privacy, and access. It is a simple, implementable solution for adding user authentication and authorization to your website.
Basically, LoginRadius handles user registration, login, and authentication. Other features of LoginRadius include:
-
Forms: LoginRadius can automatically pre-create registration and login forms for you.
-
Authentication and Authorization: It generates and sends a token to the user when login or signup is successful. Instead of using
JWT, you can use this token to authenticate users -
Security: When using LoginRadius, you automatically have access to an admin console where you can control authentication factors, such as email, phone, and multi-factor auth for your Node.js app.
To get started with LoginRadius, you need to create an account with either the free plan or the Developer plan, customize your registration and login forms, and start managing your users.
How to Authenticate Your Node.js App with LoginRadius
This section briefly covers how authentication works with LoginRadius.
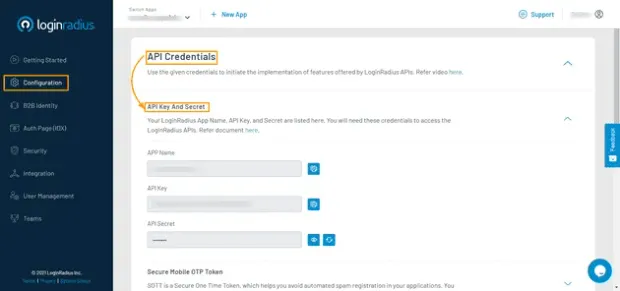
After signing up for LoginRadius, choose a name for your Node.js app.

After completing your LoginRadius signup process, you can get your App Name, API Key, and API Secret from the configuration link on the sidebar. With these configurations, you can easily link the server-side of our application to LoginRadius.
LoginRadius automatically generates a link that will be used to authenticate users. This link contains the name of your LoginRadius application and a URL that authenticated users will be redirected to:
1https://<LoginRadius-APP-Name>.hub.loginradius.com/auth.aspx?action=login&return_url=<Return-URL>An instance of the link is given below:
1https://noderoleauth.hub.loginradius.com/auth.aspx?action=login&return_url=http://localhost:5000Conclusion
You've successfully learned how to perform CRUD operations using MongoDB as a database, hash passwords, authenticate using JWT, and render Embedded JavaScript (EJS). You can put all these together to build more complex applications.
Resources
- A full, working version of the code used in this tutorial is available on GitHub
- Node.js Authentication with LoginRadius


