NestJS User Authentication with LoginRadius API
Want to authenticate users on your NestJS app? Follow this tutorial to learn how to authenticate users using a password and perform authorization using access tokens.


To create secure applications, you need a way to authenticate and authorize your users. In this tutorial, you will learn to authenticate users in your NestJS apps using LoginRadius Authentication API.
Authentication vs. Authorization
Authentication and authorization are often seen as similar concepts, but they are not. Authentication is the process of verifying that a user is who they claim to be, while authorization is verifying which resources the user has access to.
Authentication always comes first before authorization since you first need to identify the user before determining what level of access to give them.
You can either choose to implement your own authentication strategy or leverage the benefits of a third-party identity platform. A do-it-yourself solution is prone to security errors, takes up a lot of time, and can increase the complexity of your application.
With a third-party solution, you get access to multiple authentication methods, advanced security features, and you write less code.
User Authentication with LoginRadius
LoginRadius is a no-code identity platform offering authentication, authorization, account security, and privacy solutions.
The Authentication API provided by LoginRadius allows you to authenticate a user using an email and a password. Once the user is verified, LoginRadius responds with an access token. The user will, in turn, use the access token to send requests to protected endpoints.
User Authentication in NestJS
NestJS is a Node.js framework built on Express.js with an Angular-like architectural structure. It is used to build scalable and modern server-side applications. The following sections will guide you in creating a simple NestJS application with authentication.
Set Up the Project
Create a new NestJS project by running the following commands
1// Install NestJS CLI
2npm i -g @nestjs/cli
3// Create a new project
4nest new nest-loginradius-auth
5cd nest-loginradius-auth
Set Up LoginRadius
To authenticate a user using LoginRadius in NestJS, you need credentials: an API key and an API secret.
Get your account credentials by creating a free LoginRadius account and head over to the dashboard.
Create an app and select configuration and then get your app's credentials from the API credentials panel.
Set Up .env file
Since the API key and API secret from the LoginRadius dashboard are sensitive, you will store them in the .env file.
You will need the dotenv module to access the your environment variables. Run the following command to install it.
1npm install dotenvAdd the API key, API secret, and Secure One Time Token(SOTT) to the.env file.
1APP_NAME=<your app name>
2API_KEY=<your api key>
3API_SECRET=<your api secret>
4SOTT= <your sott>
Authentication Flow
In this project, you will be authenticating the user using their email and password. The following are the major steps you will be following:
- Create a signup route that will get the user information and create a new user.
- Create a login route that accepts the email and password of the user. This data will be authenticated, and an access token will be sent back in the response.
- Create a protected route that will only accept requests with valid access tokens.
Create an Authentication Module
Generate an auth module, controller, and service by running the following code.
1nest generate module auth
2nest generate controller auth
Create a User
To create a user, you need to create a signup route that will accept the email and password.
Since you are using TypeScript, define the DTO (Data Transfer Object) schema to validate the user data passed in the request body.
In the auth folder, add the dto folder and create a UserDTO class in the user.dto.ts file.
1export class UserDto {
2  email: string;
3  password: string;
4}
Next, inside the AuthController, import the DTO to be used to validate the request body.
1import { Injectable } from '@nestjs/common';
2import { UserDto } from './dto/user.dto';
3@Injectable()
4@Controller('auth')
5export class AuthController {
6@Post('signup')
7async signup(@Body() registerUserDto: UserDto) {
8// Register user
9}
10}
Generate Auth Service File
A service file is used to abstract the business logic away from the controller. You will be handling the actual authentication and authorization process in this file.
Generate a service for auth by running the following command.
1nest g service authNext, populate the auth.service file by adding the signup method.
1import { Injectable } from '@nestjs/common';
2import { UserDto } from './dto/user.dto';
3import * as LRAuthPrrovider from 'loginradius-sdk'
4@Injectable()
5export class AuthService {
6async signup(registerUserDto: UserDto) {
7console.log('sign up')
8}
9}
Note that you are also importing the user DTO and the loginradius-sdk at the top of the file.
To execute the signup method in the signup route, inject it in the auth.controller.ts file.
1import { Injectable } from '@nestjs/common';
2import { UserDto } from './dto/user.dto';
3import { AuthService } from './auth.service';
4@Injectable()
5@Controller('auth')
6export class AuthController {
7constructor(private readonly authService: AuthService) { }
8@Post('signup')
9async signup(@Body() registerUserDto: UserDto) {
10let response = await this.authService.signup(registerUserDto)
11return response
12}
13}
Before registering the user, validate if the email is already in use.
First, install loginradius-sdk using the following command.
1npm i loginradius-sdkNext import loginradius-sdk and configure it and since you will be using variables from the .env file, remember to also configure dotenv.
1import * as dotenv from 'dotenv';
2dotenv.config()
3import * as LRAuthPrrovider from 'loginradius-sdk'
4let config = {
5apiDomain: "api.loginradius.com",
6apiKey: process.env.API_KEY,
7apiSecret: process.env.API_SECRET,
8siteName: process.env.APP_NAME,
9apiRequestSigning: false,
10proxy: {
11host: "",
12port: "",
13user: "",
14password: "",
15},
16};
17let lrv2 = LRAuthPrrovider(config);
18let sott = process.env.SOTT
Next, check if the email is already in use.
1@Injectable()
2export class AuthService {
3  async signup(registerUserDto: UserDto) {
4    try {
5      const response = await lrv2.authenticationApi
6        .checkEmailAvailability(registerUserDto.email)
7        if (response.isExist) {
8          return "Email already in use"
9        }
10    catch(error) {
11      return error
12    }
13  }
14}
If the email is not already in use, register the user.
1@Injectable()
2export class AuthService {
3    async signup(registerUserDto: UserDto) {
4      try {
5        // check if email is already in use
6        const response = await lrv2.authenticationApi
7            .checkEmailAvailability(registerUserDto.email)
8          if (response.isExist) {
9          return "Email already in use"
10          }
11          // create registration model
12          let authUserRegistrationModel = {
13            email: [
14              {
15                type: "primary",
16                value: registerUserDto.email,
17              },
18            ],
19            password: registerUserDto.password,
20          };
21          // register user
22          let user = await lrv2.authenticationApi
23          .userRegistrationByEmail(authUserRegistrationModel, sott)
24          if(user) {
25            return "Sign up successful"
26          }
27        } catch (error) {
28          return error
29        }
30    }
31}
In the above code, you register a new user by passing in the user data to the authentication API. The authUserRegistrationModel object defines how the email and password will be stored in the database.
Log In the User
To log in the user, pass in the email and password to the authentication API of LoginRadius.
In auth.service.ts, add the login function.
1@Injectable()
2export class AuthService {
3    async signup(registerUserDto: UserDto) {
4        // register user
5    }
6    async login(loginUserDTO: UserDto) {
7        // login user
8    }
9}
Since you are expecting the same type of data from the request body, i.e., the email and password, like in the signup route, you can reuse the user DTO.
Next, add the login functionality.
1@Injectable()
2export class AuthService {
3    async signup(registerUserDto: UserDto) {
4        // register user
5    }
6    async login(loginUserDTO: UserDto) {
7        try {
8            let emailAuthenticationModel = {
9                email: loginUserDTO.email,
10                password: loginUserDTO.password,
11              };
12            let user = await lrv2.authenticationApi
13                .loginByEmail(emailAuthenticationModel)
14            return {
15                accessToken: user.access_token,
16            }
17        } catch (error) {
18            return error
19        }
20    }
21}
In the above code, you are logging in the user through loginradius-sdk. If successful, send back the accessToken in the response body. The user will use the access token to access protected routes.
Inject the login method in the auth.controller.ts file to use it in the login route.
1import { Injectable } from '@nestjs/common';
2import { UserDto } from './dto/user.dto';
3import { AuthService } from './auth.service';
4@Injectable()
5@Controller('auth')
6export class AuthController {
7constructor(private readonly authService: AuthService) { }
8@Post('signup')
9async signup(@Body() registerUserDto: UserDto) {
10// register user
11}
12async login(@Body() loginUserDto: UserDto) {
13// login user
14}
15}
Access Protected Routes
For protected routes, like accessing a user dashboard, the user will need to send the access token with the request. The access token will then be verified, and if valid, the application will be granted access.
The user will need to store the accessToken. In this tutorial, you will be storing the token in the authorization header as a bearer token. Another alternative would be to use HTTP-only cookies.
In NestJS, guards are responsible for handling authorization. They determine whether a request will be handled by the route.
In auth.guard.ts, add the following code.
1import {AuthService } from './auth.service';
2import { Request } from 'express';
3@Injectable()
4export class AuthGuard implements CanActivate {
5constructor(
6    private readonly authService: AuthService,
7) {}
8
9async canActivate(context: ExecutionContext): Promise<boolean> {
10    const request: Request = context.switchToHttp().getRequest();
11
12    // Extract the access token from the authorization header
13    const authheader = request.header('Authorization');
14    const token = authheader && authheader.split(" ")[1];
15    try {
16        let authorizedMsg = await this.authService.authenticate(token);
17        // Attach the authorized message to the request. You could also attach the user information.
18        request['isAuthorized'] = "Authorized"
19        return true;
20    } catch (error) {
21        throw new UnauthorizedException();
22    }
23}
24
25}
In the above code, you define the auth guard that will be used to decorate the protected routes. The token is extracted from the request authorization header and passed to the authenticate method defined in AuthService. This method will be responsible for verifying the token.
In auth.service.ts, create the authenticate method. This method will send the access token to LoginRadius for verification.
1import { Injectable, UnauthorizedException } from '@nestjs/common';
2import { UserDto } from './dto/user.dto';
3import * as LRAuthPrrovider from 'loginradius-sdk'
4@Injectable()
5export class AuthService {
6async signup(registerUserDto: UserDto) {
7// signup user
8}
9async login(loginUserDTO: UserDto) {
10// login user
11}
12async authenticate(accessToken: string) {
13try {
14const response = await lrv2.authenticationApi
15.authValidateAccessToken(accessToken)
16return response
17} catch (error) {
18throw new UnauthorizedException();
19}
20}
21}
Now, create a protected route. In auth.controller.ts, add the following.
1import { Controller, Get, Body, Post, UseGuards } from '@nestjs/common';
2import { UserDto } from './dto/user.dto';
3import { AuthService } from './auth.service';
4import { AuthGuard } from './auth.guard';
5@Controller('auth')
6export class AuthController {
7constructor(private readonly authService: AuthService) { }
8@Post('signup')
9async signup(@Body() registerUserDto: UserDto) {
10// signup user
11}
12@Post('login')
13async login(@Body() loginUserDto: UserDto) {
14// login user
15}
16@UseGuards(AuthGuard)
17@Get('protected')
18async protected() {
19return "Access granted"
20}
21}
Now, every route you add UseGuards to will require a valid access token.
Test with Postman
Use Postman or any other REST client of your choice to test the routes you have created.
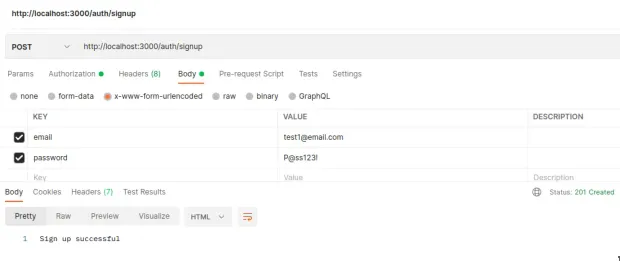
First, create a test user by sending a POST request to the signup endpoint. Remember to include the email and password of the user in the request body.
1POST http://localhost:3000/auth/signupYou should receive a "Sign up successful" message if the request is successful.
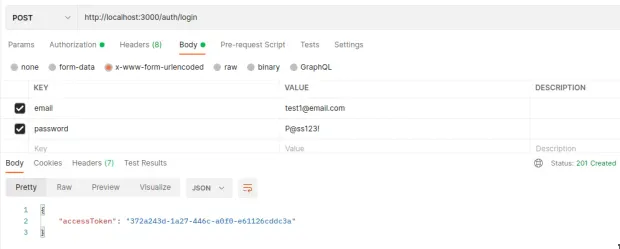
Next, log in the user by sending the login credentials to the login endpoint of your application.
1POST http://localhost:3000/auth/loginIf successful, you should receive the access token.
Finally, use the access token to access the protected route. Add the token to the authorization header.
1GET http://localhost:3000/auth/protected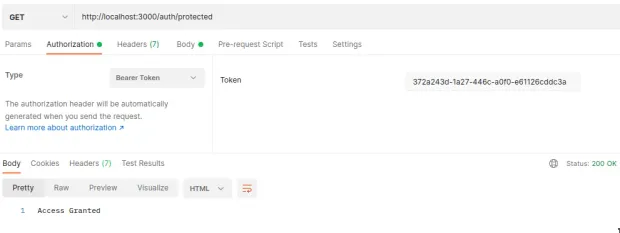
Conclusion
In this tutorial, you have learned how to implement NestJS authentication using the LoginRadius Authentication API. You have seen how to log in a user and use an access token to protect specific routes.
You can find the source code used in this tutorial on Github.
Learn more about the LoginRadius Authentication API from the documentation files. It has more identity management features than discussed in this tutorial. You can use these features to further enhance authentication as you need in your NestJS projects.
Featured Posts
How to Implement JWT Authentication for CRUD APIs in Deno
Multi-Factor Authentication (MFA) with Redis Cache and OTP
Introduction to SolidJS
Build a Modern Login/Signup Form with Tailwind CSS and React
Implement HTTP Streaming with Node.js and Fetch API
NestJS: How to Implement Session-Based User Authentication
NestJS User Authentication with LoginRadius API
How to Authenticate Svelte Apps
Flutter Authentication: Implementing User Signup and Login
How to Secure Your LoopBack REST API with JWT Authentication
Node.js User Authentication Guide
Your Ultimate Guide to Next.js Authentication
Local Storage vs. Session Storage vs. Cookies
How to Secure a PHP API Using JWT
Using JWT Flask JWT Authentication- A Quick Guide
Build Your First Smart Contract with Ethereum & Solidity
What are JWT, JWS, JWE, JWK, and JWA?
How to Build an OpenCV Web App with Streamlit
32 React Best Practices That Every Programmer Should Follow
How to Build a Progressive Web App (PWA) with React
Bootstrap 4 vs. Bootstrap 5: What is the Difference?
JWT Authentication — Best Practices and When to Use
What Are Refresh Tokens? When & How to Use Them
How to Upgrade Your Vim Skills
How to Implement Role-Based Authentication with React Apps
How to Authenticate Users: JWT vs. Session
How to Use Azure Key Vault With an Azure Web App in C#
How to Implement Registration and Authentication in Django?
11 Tips for Managing Remote Software Engineering Teams
Implementing User Authentication in a Python Application
Add Authentication to Play Framework With OIDC and LoginRadius