Introduction
It is an indisputable reality that authentication is critical in any application or system if you want to secure user data and enable secure access to information. Authentication is the procedure of establishing or demonstrating that something is true, legitimate, or valid.
Prerequisites
This tutorial is a hands-on demonstration. To follow along, ensure you have the following in place:
What is NestJS?
Nest (NestJS) is a Node.js server-side application framework for building scalable, efficient applications.
It is written in TypeScript and built on Express, a very minimalistic framework that is great on its own but lacks structure. It combines programming paradigms such as object-oriented programming, functional programming, and functional reactive programming.
It is a framework to use if you want a lot of structure on your backend. Its syntax and structure are very similar to AngularJS, a front-end framework. And it uses TypeScript, services, and dependency injection in the same way that AngularJS does.
It employs modules and controllers, and you can build controllers for a file using the command-line interface.
NestJS modules allow you to group related controllers and service providers into a single code file. Simply put, a NestJS module is a TypeScript file with the @Module annotation (). This decorator informs the NestJS framework about which controllers, service providers, and other associated resources will be instantiated and used by the app code later.
What is Session-based Authentication?
Session-based authentication is a method of user authentication in which the server creates a session after a successful log-in, with the session ID stored in a cookie or local storage in your browser.
Upon subsequent requests, your cookie is validated against the session ID stored on the server. If there is a match, the request is considered valid and processed.
When using this authentication method, it is critical to keep the following security best practices in mind:
- Generate long and random session IDs (128 bits is the recommended length) to make brute force attacks ineffective
- Avoid storing any sensitive or user-specific data
- Make HTTPS communications mandatory for all session-based apps
- Create cookies that have secure and HTTP-only attributes
Why Session-based Authentication?
Session-based authentication is more secure than most authentication methods because it is simple, secure, and has a limited storage size. It is also thought to be the best option for websites in the same root domain.
Project Setup
Start your project setup by installing Nest CLI globally. You don’t need to do this if you already have NestJS CLI installed.
The Nest CLI is a command-line interface tool for setting up, developing, and maintaining Nest applications.
1npm i -g @nestjs/cliNow, let’s set up your project by running the following command:
1nest new session-based-authThe above command creates a Nest application with some boilerplates, then prompts you to choose your preferred package manager to install the required modules to run your application. For demonstration, this tutorial uses npm. Hit the enter key to continue with npm.
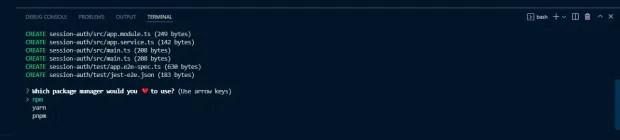
If everything went well, you should see an output like the one on the screenshot below on your terminal.
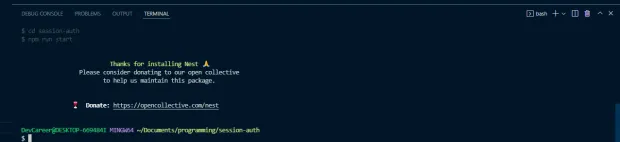
Once the installation is complete, move into your project directory, and run the application with the command below:
1npm run start:devThe above command runs the application and watches for changes. Your project src folder structure should look as follows.
1└───src
2│   └───app.controller.ts
3│   └───app.modules.ts
4│   └───app.service.ts
5│   └───main.ts
Install Dependencies
Now that your application is set up, let's install the dependencies needed.
1npm install --save @nestjs/passport passport passport-localThe above command installs Passport.js, a popular nest.js authentication library.
Also, install the types for the strategy with the command below:
It contains type definitions for passport-local.
1npm install --save-dev @types/passport-localSet Up MongoDB Database in NestJS
To set up and connect your database, install the Mongoose package and the NestJS wrapper with the following command:
1npm install --save @nestjs/mongoose mongooseThe Mongoose NestJS wrapper helps you use Mongoose in the NestJS application and gives approved TypeScript support.
Now, head over to your app.module.ts, and import the mongoose module from @nestjs/mongoose. Then call the forRoot() method, a method provided by the Mongoose module, and pass in your database URL string.
Setting up your database connection in app.module.ts helps your application connect to the database immediately as the server starts — after running your application since it’s the first module to be loaded.
app.module.ts
1import { Module } from "@nestjs/common"
2import { MongooseModule } from "@nestjs/mongoose"
3import { AppController } from "./app.controller"
4import { AppService } from "./app.service"
5@Module({
6imports: [
7MongooseModule.forRoot(
8"mongodb+srv://<username>:<password>@cluster0.kngtf.mongodb.net/session-auth?retryWrites=true&w=majority"
9),
10],
11controllers: [AppController],
12providers: [AppService],
13})
14export class AppModule {}
Create Users Module
For separation concerns, to make your code clean and well organized, create a module specifically for users using the NestJS CLI by running the following command:
1nest g module usersThe above command creates a users folder with users.module.ts and updates app.module.ts
Also, create users.service.ts and users.controller.ts files with the following commands:
1nest g service users
2nest g controller users
Note that you can create your folders and files manually without using the nest CLI, but using the CLI automatically updates the necessary folders and makes your life easier.
Create User Schema
The next step is to create your UserSchema, but first, add a users.model.ts file, where you will create UserSchema
This should be the shape of our application src folder now.
1└───src
2│   └───users
3│   │   └───users.controller.ts
4│   │   └───users.model.ts
5│   │   └───users.module.ts
6│   │   └───users.service.ts
7│   └───app.controller.ts
8│   └───app.module.ts
9│   └───app.service.ts
10│   └───main.ts
To create UserSchema, import everything as mongoose from the mongoose package in users.model.ts. Then call the new mongoose schema, a blueprint of the user Model, and pass in a JavaScript object where you will define the user object and data.
users.model.ts
1import * as mongoose from "mongoose"
2export const UserSchema = new mongoose.Schema(
3  {
4    username: {
5      type: String,
6      required: true,
7      unique: true,
8    },
9    password: {
10      type: String,
11      required: true,
12    },
13  },
14  { timestamps: true }
15)
16export interface User extends mongoose.Document {
17_id: string;
18username: string;
19password: string;
20}
Also, create an interface for your Model that extends mongoose, a document that helps you populate your MongoDB collections.
Head over to your users.module.ts and import MongooseModule in the imports array. Then call the forFeature() method provided by MongooseModule, and pass in an array of object that takes in name and schema.
This will enable you to share the file anywhere with the help of dependency injection.
users.module.ts
1import { Module } from "@nestjs/common"
2import { MongooseModule } from "@nestjs/mongoose"
3import { UsersController } from "./users.controller"
4import { UserSchema } from "./users.model"
5import { UsersService } from "./users.service"
6@Module({
7  imports: [MongooseModule.forFeature([{ name: "user", schema: UserSchema }])],
8  controllers: [UsersController],
9  providers: [UsersService],
10})
11export class UsersModule {}
In users.module.ts, export the UsersService to enable you to access it in another module.
users.module.ts
1import { Module } from "@nestjs/common"
2import { MongooseModule } from "@nestjs/mongoose"
3import { UsersController } from "./users.controller"
4import { UserSchema } from "./users.model"
5import { UsersService } from "./users.service"
6@Module({
7  imports: [MongooseModule.forFeature([{ name: "user", schema: UserSchema }])],
8  controllers: [UsersController],
9  providers: [UsersService],
10  exports: [UsersService],
11})
12export class UsersModule {}
It's usually a good idea to encapsulate the business logic in a separate class. Such a class is known as a service. The job of this class is to process the controller's requests and perform the business logic.
In users.service.ts file, import Model from mongoose, User from users.model.ts, and InjectModel from @nestjs/mongoose. Then add a method to the UsersService class that takes a username and password, and call the method insertUser().
users.service.ts
1import { Injectable } from '@nestjs/common';
2import { InjectModel } from '@nestjs/mongoose';
3import { Model } from 'mongoose';
4import { User } from './users.model';
5@Injectable()
6export class UsersService {
7  constructor(@InjectModel('user') private readonly userModel: Model<User>) {}
8  async insertUser(userName: string, password: string) {
9    const username = userName.toLowerCase();
10    const newUser = new this.userModel({
11      username,
12      password,
13    });
14    await newUser.save();
15    return newUser;
16  }
17}
Now that the UsersService class is ready, you need to inject it into your controller. But first, let's talk about storing the users' passwords securely.
The most critical aspect of the registration procedure is the users’ passwords, which must not be saved in plain text. It is the responsibility of the user to create a strong password, but it is your obligation as a developer to keep their passwords secure. If a database breach occurs, the users' passwords would be exposed. And what happens if it’s stored in plain text? I believe you know the answer. To address this, hash the passwords using bcrypt.
So, install bcrypt and @types/bcrypt with the following command:
1npm install @types/bcrypt bcryptWith that out of the way, set up your controller. First, import your UsersService class and everything from bcrypt. Then add a constructor and a method that allows you to add a user; it will handle incoming post requests, call it addUser, with a function body where you'll hash the password.
users.controller.ts
1import { Body, Controller, Post } from '@nestjs/common';
2import { UsersService } from './users.service';
3import * as bcrypt from 'bcrypt';
4@Controller('users')
5export class UsersController {
6  constructor(private readonly usersService: UsersService) {}
7  //post / signup
8  @Post('/signup')
9  async addUser(
10    @Body('password') userPassword: string,
11    @Body('username') userName: string,
12  ) {
13    const saltOrRounds = 10;
14    const hashedPassword = await bcrypt.hash(userPassword, saltOrRounds);
15    const result = await this.usersService.insertUser(
16      userName,
17      hashedPassword,
18    );
19    return {
20      msg: 'User successfully registered',
21      userId: result.id,
22      userName: result.username
23    };
24  }
25}
The registration happens in the app.module.ts file, which is achieved by adding the UsersModule to the @Module() decorator's imports' array in app.module.ts.
app.module.ts
1import { Module } from "@nestjs/common"
2import { MongooseModule } from "@nestjs/mongoose"
3import { AppController } from "./app.controller"
4import { AppService } from "./app.service"
5import { UsersModule } from "./users/users.module"
6@Module({
7imports: [
8MongooseModule.forRoot(
9"mongodb+srv://<username>:<password>@cluster0.kngtf.mongodb.net/session-auth?retryWrites=true&w=majority"
10),
11UsersModule,
12],
13controllers: [AppController],
14providers: [AppService],
15})
16export class AppModule {}
Congratulations! You are done with the registration. You can now register a user with a username and password.
Now, with registration out of the way, add a getUser function to your UsersService with the findOne method to find a user by username.
users.service.ts
1import { Injectable } from '@nestjs/common';
2import { InjectModel } from '@nestjs/mongoose';
3import { Model } from 'mongoose';
4import { User } from './users.model';
5@Injectable()
6export class UsersService {
7  constructor(@InjectModel('user') private readonly userModel: Model<User>) {}
8  async insertUser(userName: string, password: string) {
9    const username = userName.toLowerCase();
10    const newUser = new this.userModel({
11      username,
12      password,
13    });
14    await newUser.save();
15    return newUser;
16  }
17  async getUser(userName: string) {
18    const username = userName.toLowerCase();
19    const user = await this.userModel.findOne({ username });
20    return user;
21  }
22}
Create Authentication Module
Just as for users, create an auth module and service specifically for all the authentications/verifications. To do that, run the following commands:
1nest g module auth
2nest g service auth
The above will create an auth folder, auth.module.ts, and auth.service.ts, and update the auth.module.ts and app.module.ts files.
At this point, the shape of your application src folder should look as follows.
1└───src
2│   └───auth
3│   │   └───auth.module.ts
4│   │   └───auth.service.ts
5│   └───users
6│   │   └───users.controller.ts
7│   │   └───users.model.ts
8│   │   └───users.module.ts
9│   │   └───users.service.ts
10│   └───app.controller.ts
11│   └───app.module.ts
12│   └───app.service.ts
13│   └───main.ts
The above generate command will update your app.module.ts, and it will look like the code snippet below:
app.module.ts
1import { Module } from "@nestjs/common"
2import { MongooseModule } from "@nestjs/mongoose"
3import { AppController } from "./app.controller"
4import { AppService } from "./app.service"
5import { UsersModule } from "./users/users.module"
6import { AuthModule } from './auth/auth.module';
7@Module({
8imports: [UsersModule, AuthModule, MongooseModule.forRoot(
9//database url string
10'mongodb://localhost:27017/myapp'
11)],
12controllers: [AppController],
13providers: [AppService],
14})
15export class AppModule {}
Authenticate Users
Go to your auth.module.ts file and add UsersModule in the imports array to enable access to the UsersService exported from the users.module.ts file.
auth.module.ts
1import { Module } from "@nestjs/common"
2import { UsersModule } from "src/users/users.module"
3import { AuthService } from "./auth.service"
4@Module({
5imports: [UsersModule],
6providers: [AuthService],
7})
8export class AuthModule {}
In your auth.service.ts file, call the constructor so you can inject the UsersService, and add a method for validation that will take a username and password.
To add some basic validations, check if the user exists in the database, and compare the given password with the one in your database to ensure it matches. If it exists, return the user in the request.user object — else, return null.
auth.service.ts
1import { Injectable, NotAcceptableException } from '@nestjs/common';
2    import { UsersService } from 'src/users/users.service';
3    import * as bcrypt from 'bcrypt';
4@Injectable()
5export class AuthService {
6  constructor(private readonly usersService: UsersService) {}
7  async validateUser(username: string, password: string): Promise<any> {
8    const user = await this.usersService.getUser(username);
9    const passwordValid = await bcrypt.compare(password, user.password)
10    if (!user) {
11        throw new NotAcceptableException('could not find the user');
12      }
13    if (user && passwordValid) {
14      return {
15        userId: user.id,
16        userName: user.username
17      };
18    }
19    return null;
20  }
21}
Going further, create a new file and name it local.strategy.ts. This file will represent the strategy from Passport.js, which you installed earlier, that is the local strategy. And within it, pass in the strategy, which is the Strategy from passport-local.
Create a constructor and inject the AuthService, call the super() method; ensure to call the super() method.
local.strategy.ts
1import { Injectable, UnauthorizedException } from '@nestjs/common';
2    import { PassportStrategy } from '@nestjs/passport';
3    import { Strategy } from 'passport-local';
4    import { AuthService } from './auth.service';
5    @Injectable()
6    export class LocalStrategy extends PassportStrategy(Strategy) {
7      constructor(private readonly authService: AuthService) {
8        super();
9      }
10      async validate(username: string, password: string): Promise<any> {
11        const userName = username.toLowerCase();
12        const user = await this.authService.validateUser(userName, password);
13        if (!user) {
14          throw new UnauthorizedException();
15        }
16        return user;
17      }
18    }
Go back to your auth.module.ts file. Then add PassportModule to imports and LocalStrategy to providers.
auth.module.ts
1import { Module } from "@nestjs/common"
2import { PassportModule } from "@nestjs/passport"
3import { UsersModule } from "src/users/users.module"
4import { AuthService } from "./auth.service"
5import { LocalStrategy } from "./local.strategy"
6@Module({
7imports: [UsersModule, PassportModule],
8providers: [AuthService, LocalStrategy],
9})
10export class AuthModule {}
Now, add the login route to your users.controller.ts:
users.controller.ts
1import {
2      Body,
3      Controller,
4      Post,
5      Request,
6    } from '@nestjs/common';
7    import * as bcrypt from 'bcrypt';
8    import { UsersService } from './users.service';
9    @Controller('users')
10    export class UsersController {
11      constructor(private readonly usersService: UsersService) {}
12      //post / signup
13      @Post('/signup')
14      async addUser(
15        @Body('password') userPassword: string,
16        @Body('username') userName: string,
17      ) {
18        const saltOrRounds = 10;
19        const hashedPassword = await bcrypt.hash(userPassword, saltOrRounds);
20        const result = await this.usersService.insertUser(
21          userName,
22          hashedPassword,
23        );
24        return {
25          msg: 'User successfully registered',
26          userId: result.id,
27          userName: result.username
28        };
29      }
30      //Post / Login
31      @Post('/login')
32      login(@Request() req): any {
33        return {User: req.user,
34                msg: 'User logged in'};
35      }
36    }
Now that you have all these put in place, you still cannot log in a user because there is nothing to trigger the login route. Here, use Guards to achieve that.
Create a file and name it local.auth.guard.ts, then a class LocalAuthGuard that extends AuthGuard from NestJS/passport, where you will provide the name of the strategy and pass in the name of your strategy, local.
local.auth.guard.ts.
1import { Injectable } from "@nestjs/common"
2import { AuthGuard } from "@nestjs/passport"
3@Injectable()
4export class LocalAuthGuard extends AuthGuard("local") {}
Add the UseGuard decorator to your login route in the users.controller.ts file, and pass in the LocalAuthGuard.
users.controller.ts
1import {
2      Body,
3      Controller,
4      Post,
5      UseGuards,
6      Request,
7    } from '@nestjs/common';
8    import * as bcrypt from 'bcrypt';
9    import { LocalAuthGuard } from 'src/auth/local.auth.guard';
10    import { UsersService } from './users.service';
11    @Controller('users')
12    export class UsersController {
13      constructor(private readonly usersService: UsersService) {}
14      //post / signup
15      @Post('/signup')
16      async addUser(
17        @Body('password') userPassword: string,
18        @Body('username') userName: string,
19      ) {
20        const saltOrRounds = 10;
21        const hashedPassword = await bcrypt.hash(userPassword, saltOrRounds);
22        const result = await this.usersService.insertUser(
23          userName,
24          hashedPassword,
25        );
26        return {
27          msg: 'User successfully registered',
28          userId: result.id,
29          userName: result.username
30        };
31      }
32      //Post / Login
33      @UseGuards(LocalAuthGuard)
34      @Post('/login')
35      login(@Request() req): any {
36        return {User: req.user,
37                msg: 'User logged in'};
38      }
39    }
Finally, you can log in a user with a registered username and password.
Protect Authentication Routes
You have successfully set up user authentication. Now, protect your routes from unauthorized access by limiting access to just authenticated users. Go to your users.controller.ts file, and add another route — name it ‘protected’ and make it return the req.user object.
users.controller.ts
1import {
2      Body,
3      Controller,
4      Get,
5      Post,
6      UseGuards,
7      Request,
8    } from '@nestjs/common';
9    import * as bcrypt from 'bcrypt';
10    import { LocalAuthGuard } from 'src/auth/local.auth.guard';
11    import { UsersService } from './users.service';
12    @Controller('users')
13    export class UsersController {
14      constructor(private readonly usersService: UsersService) {}
15      //signup
16      @Post('/signup')
17      async addUser(
18        @Body('password') userPassword: string,
19        @Body('username') userName: string,
20      ) {
21        const saltOrRounds = 10;
22        const hashedPassword = await bcrypt.hash(userPassword, saltOrRounds);
23        const result = await this.usersService.insertUser(
24          userName,
25          hashedPassword,
26        );
27        return {
28          msg: 'User successfully registered',
29          userId: result.id,
30          userName: result.username
31        };
32      }
33      //Post / Login
34      @UseGuards(LocalAuthGuard)
35      @Post('/login')
36      login(@Request() req): any {
37        return {User: req.user,
38                msg: 'User logged in'};
39      }
40    // Get / protected
41      @Get('/protected')
42      getHello(@Request() req): string {
43        return req.user;
44      }
45    }
The protected route in the above code will return an empty object instead of returning the user’s details when a logged-in user makes a request to it because it already lost the login.
To get that sorted, this is where the session-based authentication comes in.
In session-based authentication, when a user logs in, the user is saved in a session so that any subsequent request by the user after login will grab the details from the session and grant the user easy access. The session expires when the user logs out.
To start session-based auth, install express-session and the NestJS types using the following command:
1npm install express-session @types/express-sessionWhen the installation is completed, go to your main.ts file, the root of your application, and do the configurations there.
Import everything from passport and express-session, then add passport initialize and passport session.
It is preferable to keep your secret key in your environment variables.
main.ts
1import { NestFactory } from "@nestjs/core"
2import { AppModule } from "./app.module"
3import * as session from "express-session"
4import * as passport from "passport"
5async function bootstrap() {
6  const app = await NestFactory.create(AppModule)
7  app.use(
8    session({
9      secret: "keyboard",
10      resave: false,
11      saveUninitialized: false,
12    })
13  )
14  app.use(passport.initialize())
15  app.use(passport.session())
16await app.listen(3000)
17}
18bootstrap()
Add a new file, authenticated.guard.ts, in your auth folder. And create a new Guard that checks if there is a session for the user making the request — name it authenticatedGuard.
authenticated.guard.ts
1import { CanActivate, ExecutionContext, Injectable } from "@nestjs/common"
2@Injectable()
3export class AuthenticatedGuard implements CanActivate {
4async canActivate(context: ExecutionContext) {
5const request = context.switchToHttp().getRequest()
6return request.isAuthenticated()
7}
8}
In the above code, the request is gotten from the context and checked if authenticated. isAuthenticated() comes from passport.js automatically; it says. "hey! does a session exist for this user? If so, keep going."
To trigger the login, in your users.controller.ts file:
- import
authenticatedfromauthenticated.guard.ts; - add the
useGuarddecorator to theprotectedroute; and, - pass in
AuthenticatedGuard.
users.controller.ts
1import {
2      Body,
3      Controller,
4      Get,
5      Post,
6      UseGuards,
7      Request,
8    } from '@nestjs/common';
9    import * as bcrypt from 'bcrypt';
10    import { AuthenticatedGuard } from 'src/auth/authenticated.guard';
11    import { LocalAuthGuard } from 'src/auth/local.auth.guard';
12    import { UsersService } from './users.service';
13    @Controller('users')
14    export class UsersController {
15      constructor(private readonly usersService: UsersService) {}
16      //signup
17      @Post('/signup')
18      async addUser(
19        @Body('password') userPassword: string,
20        @Body('username') userName: string,
21      ) {
22        const saltOrRounds = 10;
23        const hashedPassword = await bcrypt.hash(userPassword, saltOrRounds);
24        const result = await this.usersService.insertUser(
25          userName,
26          hashedPassword,
27        );
28        return {
29          msg: 'User successfully registered',
30          userId: result.id,
31          userName: result.username
32        };
33      }
34      //Post / Login
35      @UseGuards(LocalAuthGuard)
36      @Post('/login')
37      login(@Request() req): any {
38        return {User: req.user,
39                msg: 'User logged in'};
40      }
41      //Get / protected
42      @UseGuards(AuthenticatedGuard)
43      @Get('/protected')
44      getHello(@Request() req): string {
45        return req.user;
46      }
47    }
At this point, it still fails because you've only configured express-session but didn't implement it.
When a user logs in, you need to save the user in a session so that the user can access other routes with the session.
One thing to keep in mind is that by default, the express-session library stores the session in the web server's memory.
Before it goes into the session, you need to serialize the user. As it comes out of the session, deserialize the user.
So, create a new file in the auth folder for serializer and deserializer, name it session.serializer.ts.
At this point, the shape of our application src folder should look like this.
1└───src
2    │   └───auth
3    │   │   └───auth.module.ts
4    │   │   └───auth.service.ts
5    │   │   └───authenticated.guard.ts
6    │   │   └───local.auth.guard.ts
7    │   │   └───local.strategy.ts
8    │   │   └───session.serializer.ts
9    │   └───users
10    │   │   └───users.controller.ts
11    │   │   └───users.model.ts
12    │   │   └───users.module.ts
13    │   │   └───users.service.ts
14    │   └───app.controller.ts
15    │   └───app.module.ts
16    │   └───app.service.ts
17    │   └───main.ts
session.serializer.ts
1import { Injectable } from "@nestjs/common"
2import { PassportSerializer } from "@nestjs/passport"
3@Injectable()
4export class SessionSerializer extends PassportSerializer {
5serializeUser(user: any, done: (err: Error, user: any) => void): any {
6done(null, user)
7}
8deserializeUser(
9payload: any,
10done: (err: Error, payload: string) => void
11): any {
12done(null, payload)
13}
14}
Go back to your auth.module.ts file, provide the SessionSerializer, and add the register method to the PassportModule.
auth.module.ts
1import { Module } from "@nestjs/common"
2import { PassportModule } from "@nestjs/passport"
3import { UsersModule } from "src/users/users.module"
4import { AuthService } from "./auth.service"
5import { LocalStrategy } from "./local.strategy"
6import { SessionSerializer } from "./session.serializer"
7@Module({
8imports: [UsersModule, PassportModule.register({ session: true })],
9providers: [AuthService, LocalStrategy, SessionSerializer],
10})
11export class AuthModule {}
Add some codes within the LocalAuthGuard in the local.auth.guard.ts file.
Call the login method in super and pass in the request to trigger the actual login by creating a session. If you want to use sessions, you must remember to trigger the super.login().
local.auth.guard.ts
1import { ExecutionContext, Injectable } from '@nestjs/common';
2 import { AuthGuard } from '@nestjs/passport';
3 @Injectable()
4 export class LocalAuthGuard extends AuthGuard('local') {
5 async canActivate(context: ExecutionContext) {
6 const result = (await super.canActivate(context)) as boolean;
7 const request = context.switchToHttp().getRequest();
8 await super.logIn(request);
9 return result;
10 }
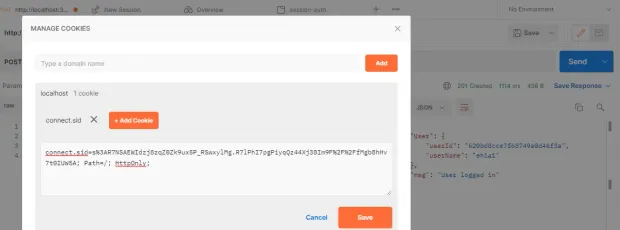
11 }If you log in now, you will see the session ID stored in a cookie, which is just a key to the session store, and the cookie gets saved in the browser. The cookie is automatically attached to the rest of the request.
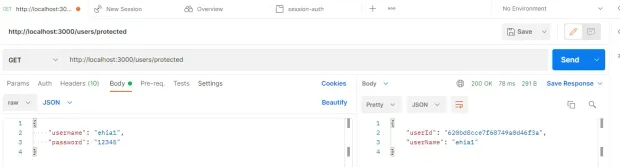
Now that the session is working, you can access the protected route; it will return the expected user’s details.
Logout Users
As mentioned earlier, once a user logs out, you destroy all sessions.
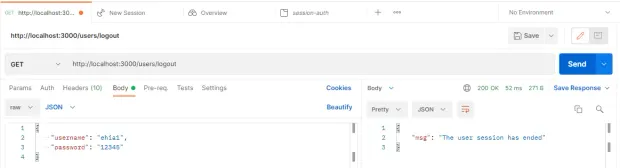
To log out a user, go to the users.controller.ts file, add a logout route, and call the req.session.session() method. You can return a message notifying that the user’s session has ended.
1import {
2      Body,
3      Controller,
4      Get,
5      Post,
6      UseGuards,
7      Request,
8    } from '@nestjs/common';
9    import * as bcrypt from 'bcrypt';
10    import { AuthenticatedGuard } from 'src/auth/authenticated.guard';
11    import { LocalAuthGuard } from 'src/auth/local.auth.guard';
12    import { UsersService } from './users.service';
13    @Controller('users')
14    export class UsersController {
15      constructor(private readonly usersService: UsersService) {}
16      //signup
17      @Post('/signup')
18      async addUser(
19        @Body('password') userPassword: string,
20        @Body('username') userName: string,
21      ) {
22        const saltOrRounds = 10;
23        const hashedPassword = await bcrypt.hash(userPassword, saltOrRounds);
24        const result = await this.usersService.insertUser(
25          userName,
26          hashedPassword,
27        );
28        return {
29          msg: 'User successfully registered',
30          userId: result.id,
31          userName: result.username
32        };
33      }
34      //Post / Login
35      @UseGuards(LocalAuthGuard)
36      @Post('/login')
37      login(@Request() req): any {
38        return {User: req.user,
39                msg: 'User logged in'};
40      }
41       //Get / protected
42      @UseGuards(AuthenticatedGuard)
43      @Get('/protected')
44      getHello(@Request() req): string {
45        return req.user;
46      }
47       //Get / logout
48      @Get('/logout')
49        logout(@Request() req): any {
50          req.session.destroy();
51          return { msg: 'The user session has ended' }
52        }
53    }
So, once you log out, it returns a message notifying you that the user session has ended. The code for this tutorial is hosted here https://github.com/icode247/Session-based-Auth-with-Nestjs-MongoDB- on my Github repository.
Test Your Application
You have successfully implemented user signup, authentication, and protected the route to enable authorized access only.
It’s time to test the application. If everything is in order, your server should be running. Else, restart your server with the following command:
1npm run start:devHead over to your Postman. And let’s finally test our application.
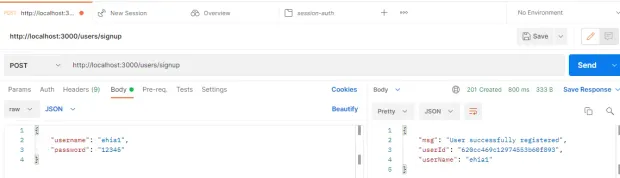
Sign Up As a User
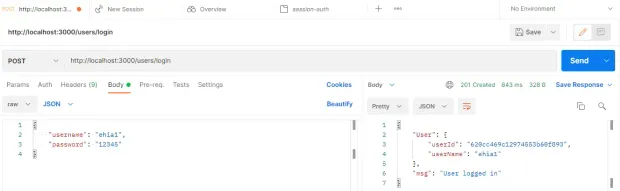
Log In As a User
Logged-in User’s Cookie ID
Request the Protected Route
User Logout
Alternatively, Implement User Authentication with LoginRadius
LoginRadius provides a variety of registration and authentication services to assist you in better connecting with your consumers.
On any web or mobile application, LoginRadius is the developer-friendly Identity Platform that delivers a complete set of APIs for authentication, identity verification, single sign-on, user management, and account protection capabilities like multi-factor authentication.
To implement LoginRadius in your NestJS application, follow this tutorial: NestJS User Authentication with LoginRadius API.
Conclusion
Congratulations! In this tutorial, you've learned how to implement session-based authentication in a NestJS application with the MongoDB database. You've created and authenticated a user and protected your routes from unauthorized access.
You can access the sample code used in this tutorial on GitHub.
Note: Session storage is saved by default in 'MemoryStore,' which is not intended for production use. So, while no external datastore is required for development, once in production, a data store such as Redis or another is suggested for stability and performance. You can learn more about session storage here.


