Introduction
It is essential to protect your APIs for a secure experience, and JSON Web Token (JWT) authentication allows you to protect your APIs so that an unauthorized person will not have access.
Prerequisites
This is a hands-on tutorial to follow. To get the most out of it, ensure you have:
- A code editor of your choice
- Basic knowledge of JavaScript/TypeScript.
- Basic knowledge of MongoDB
- Postman or Insomia installed
What is Deno?
Deno is developed in Rust. It is a modern runtime environment for JavaScript/TypeScript and a WebAssembly that uses the Google V8 engine. It is simple and safe. It implements web platform standards and provides web platform capabilities.
Deno’s features are intended to enhance Node.js’s capabilities. It’s secure by default, with no access to files, networks, or the environment except explicitly enabled. And it supports both JavaScript and TypeScript out of the box.
Why Use Deno?
Deno is a well-thought-out modular system. Apart from its simplicity and high security, there are so many other reasons to use Deno:
- Outside of an async function, you can use await
- No setting is required for TypeScript to work
- There are no dependencies, and it ships as a single executable
- A dependency inspector and a code formatter are built-in
- Packages in Deno are decentralized
What is JSON Web Token?
JSON Web Token, popularly called JWT, is an open standard that offers a concise and self-contained method for securely transferring data between parties as a JSON object. It holds information in an easy-to-access format for developers and computers; the token's compact size makes it simple to send through URL, POST parameter, or HTTP header. It allows two parties — a client and a server — to share information securely. A secret or public/private key pair is used to digitally sign the information in a JWT.
Authentication is the primary use of JWT. It is assigned to a user after they sign in to an application, and with the assigned JWT, a user can request other routes.
Install Deno
Without too many shenanigans, let's start by installing Deno!
Deno installation in Windows isn't as smooth sailing as on Mac or Linux. Unlike in Node.js, where you run a command on your terminal, Deno in Windows can be installed using PowerShell, Scoop (a command-line installer), or Chocolatey (a package manager). Click here for the guide on how to install Deno.
To install Deno with PowerShell, open your PowerShell and run the following command:
1iwr https://deno.land/x/install/install.ps1 -useb | iexRelax while Deno is being installed. When completed, exit PowerShell and close and reopen a terminal. The new PATH is activated by closing and reopening the terminal. Now that you have installed Deno, let's check the version of Deno.
To check the version of your installed Deno, run: deno -V
Project Setup
With installation out of the way, let us set up your project. Create a folder DenoAPI_JWT_Auth; you can call it any name you choose. Create an app.ts file and a folder src in your folder.
Inside your src folder, create the following folders: controllers, database, middlewares, routes, schema, and utils.
Your project directory should look as follows:
DenoAPI_JWT_Auth
│
└─src
│ └───controllers
│ │
│ └───database
│ │
│ └───middlewares
│ │
│ └───routes
│ │
│ └───schema
│ │
│ └───utils
└─app.ts
Create Oak Server
Next is to create your Oak server. Oak is a Deno middleware system that provides a router middleware for HTTP servers.
Go to app.ts, import Application from the Deno Oak URL, create an instance of the application, define your port, and call a middleware, as follows.
app.ts
1import { Application } from "https://deno.land/x/oak/mod.ts";
2const app = new Application();
3const PORT = 8080;
4app.use((ctx, next) => {
5ctx.response.body = 'Welcome';
6next();
7});
8console.log(Application is listening on port: ${PORT});
9await app.listen({port:PORT});
Let's quickly run your server: to run the server, use deno run --allow-net app.ts
Deno will always request permission to use your network. --allow-net gives Deno permission to all network calls.
You should see Application is listening on port: 8080
Now, in your routes folder, create a file called allRoutes.ts, and set up your router by importing Router from the oak URL, then create an instance of the router and export the default router.
routes.allRoutes.ts
1import { Router } from "https://deno.land/x/oak/mod.ts";
2const router = new Router();
3export default router;
Moving on, you need to modify app.ts. So, go to app.ts and import the router. Let the app use router.routes() and router.allowedMethods() methods, then remove the middleware, so it doesn't overshadow the imported routes. The allowedMethods() tells Deno to include all routes by your router.
app.ts
1import { Application } from "https://deno.land/x/oak/mod.ts";
2import router from "./src/routes/allRoutes.ts";
3const app = new Application();
4const PORT = 8080;
5app.use(router.routes());
6app.use(router.allowedMethods());
7console.log(Application is listening on port: ${PORT});
8await app.listen({port:PORT});
You can rerun your app with the same command: deno run --allow-net app.ts
Create User Data
Now, you need to create user data. But before that, let's connect your application to the MongoDB database.
- Go to your
databasefolder - Create a file called
connectBD.ts - Import MongoClient from the Deno MongoDB URL
- Create an instance of MongoClient
- Connect your database
- Export default
database.connectDB.ts
1import { MongoClient } from "https://deno.land/x/mongo@v0.30.0/mod.ts";
2// Connecting to a Mongo Database
3const client = new MongoClient();
4const dbString = "DB_String"
5await client.connect(dbString)
6console.log("Database connected!");
7const db = client.database("deno_auth");
8export default db;
With that out of the way, let's create an interface for your database.
In your schema folder, create a file user.ts, import objectId from deno MongoDB URL, then define and export your schema.
schema.user.ts
1import {ObjectId} from "https://deno.land/x/mongo@v0.30.0/mod.ts";
2export interface UserSchema {
3_id: ObjectId;
4username: string;
5password: string;
6}
Let's play with some logic: go to your controllers folder, and create a file called users.ts. In the file, import your database and UserSchema.
It's not a good practice to store your password in plain text for security reasons. To has your password, let's import bcrypt from the deno bcrypt URL.
So, create a function called signup that takes username and password. Take the user details from the request body, hash the password, and save them to your database.
controllers.users.ts
1import db from "../database/connectBD.ts";
2import * as bcrypt from "https://deno.land/x/bcrypt/mod.ts";
3import { UserSchema } from "../schema/user.ts";
4const Users = db.collection<UserSchema>("users");
5export const signup = async({request, response}:{request:any;response:any}) => {
6const {username, password} = await request.body().value;
7const salt = await bcrypt.genSalt(8);
8const hashedPassword = await bcrypt.hash(password, salt);
9const _id = await Users.insertOne({
10    username,
11    password:hashedPassword
12  });
13  response.status =201;
14  response.body = {message: "User created", userId:_id, user:username}
15
16
17};
Now, head over to allRoutes.ts in your routes folder, import the signup function from the controller, and create a POST route for signup, as follows.
routes.allRoutes.ts
1import { Router } from "https://deno.land/x/oak/mod.ts";
2import {signup} from "../controllers/users.ts";
3const router = new Router();
4//User routes
5router.post("/api/signup", signup)
6export default router;
Create Authenticate User route
Next, create an authentication route that authenticates your user route. The latest version of Deno does not allow a string as a secret key but accepts a cryptokey generated from a Web Crypto API with the generatekey() method of the SubtleCrypto interface.
So, head over to your utils folder, create a file called apiKey.ts, and in the file, generate your key and export it, as follows.
utils.apiKey.ts
1export const key = await crypto.subtle.generateKey(
2    { name: "HMAC", hash: "SHA-512" },
3    true,
4    ["sign", "verify"],
5  );
Now that you have successfully created your key, you can create a user authentication route so that every user that logs in will get authenticated.
Head over to user.ts in your controller, import the API key, create a signin function, and write some validation logic to validate that the user exists in your database. If validation is successful, you create a token to authenticate the user.
Using JWT to Authenticate a User
Now, let's import Deno JWT (djwt) create function from the URL to create a token. When a user logs in, take the id and username, pass the payload into the JWT create function, generate a token, and use the token to authenticate the user.
controllers.users.ts
1import db from "../database/connectDB.ts";
2import * as bcrypt from "https://deno.land/x/bcrypt/mod.ts";
3import { UserSchema } from "../schema/user.ts";
4import { create } from "https://deno.land/x/djwt@v2.4/mod.ts";
5import { key } from "../utils/apiKey.ts";
6const Users = db.collection<UserSchema>("users");
7//create a user
8export const signup = async({request, response}:{request:any;response:any}) => {
9const {username, password} = await request.body().value;
10const salt = await bcrypt.genSalt(8);
11const hashedPassword = await bcrypt.hash(password, salt);
12
13const _id = await Users.insertOne({
14    username,
15    password:hashedPassword
16  });
17  response.status =201;
18  response.body = {message: "User created", userId:_id, user:username}
19
20};
21//sign in a user
22export const signin = async ({request, response}:{request:any; response:any}) => {
23const body = await request.body();
24const {username, password} = await body.value;
25
26const user = await Users.findOne({username});
27
28if(!user) {
29    response.body = 404;
30    response.body = {message: `user "${username}" not found`};
31    return;
32}
33const confirmPassword = await bcrypt.compare(password, user.password);
34if(!confirmPassword){
35    response.body = 404;
36    response.body = {message: "Incorrect password"};
37    return;
38}
39
40//authenticate a user
41const payload = {
42    id: user._id,
43    name: username
44};
45const jwt =  await create({ alg: "HS512", typ: "JWT" }, { payload }, key);
46
47if(jwt) {
48    response.status = 200;
49    response.body = {
50        userId: user._id,
51        username: user.username,
52        token: jwt,
53    }
54 } else {
55    response.status = 500;
56    response.body = {
57        message: "internal server error"
58    }
59}
60    return;
61}
So far, you have progressed well. The next thing is to import your signin function in the routes and create a post request for it, as follows.
routes.allRoutes.ts
1import { Router } from "https://deno.land/x/oak/mod.ts";
2import {signup, signin} from "../controllers/users.ts";
3const router = new Router();
4//User routes
5router.post("/api/signup", signup)
6.post("/api/signin", signin);
7export default router;
Congratulations on making it this far! You are through with the authentication route. Now, you can register a user, sign in, and authenticate the user.
You need to create your todo CRUD API and protect the routes so that a random person will not be able to access your route except when authenticated.
Go to your schema folder, and create a file task.ts. In the file, create your tasks interface and export it.
Create Todo Route
schema.task.ts
1export interface TaskSchema {
2    name: string;
3    isCompleted: boolean;
4  }
After successfully creating the task interface, move to our controller, create a file tasks.ts, and import the database, schema, and object Id. Then write the logic for our todo CRUD API.
controllers.tasks.ts
1import db from "../database/connectDB.ts";
2import { TaskSchema } from "../schema/task.ts";
3import {ObjectId} from "https://deno.land/x/mongo@v0.30.0/mod.ts";
4const tasks = db.collection<TaskSchema>("tasks");
5export const create = async({request, response}:{request:any;response:any}) => {
6const {name, isCompleted} = await request.body().value;
7const _id = await tasks.insertOne({
8    name,
9    isCompleted
10  });
11  response.body = {message: "Task created!!", id:_id, name:name, Completed:isCompleted}
12};
13
14export const getTasks = async ({response}:{response:any}) => {
15const allTasks = await tasks.find({}).toArray();
16
17response.status = 200;
18response.body = {tasks:allTasks};
19
20};
21export const getById = async ({
22params,
23response
24
25}:{
26params:{taskId:string};
27response:any;
28}) => {
29const taskId = params.taskId;
30const task = await tasks.findOne({_id:new ObjectId(taskId)});
31if(!task){
32    response.body = {message: `no task with Id: ${taskId}`};
33    return;
34
35}
36response.status = 200;
37response.body = {task: task}
38};
39export const updateById = async ({
40params,
41request,
42response
43}:{
44params:{taskId:string};
45request:any;
46response:any;
47}) => {
48const taskId = params.taskId;
49const {name, isCompleted} = await request.body().value;
50const task = await tasks.updateOne({_id:new ObjectId(taskId)},
51{$set:{name:name, isCompleted:isCompleted}});
52response.status = 200;
53response.body = {message:"Updated task", task:task};
54
55};
56export const deleteTask = async ({
57params,
58response,
59}:{
60params:{taskId:string};
61response:any;
62}) => {
63const taskId = params.taskId;
64const task = await tasks.deleteOne({_id:new ObjectId(taskId)});
65response.status = 200;
66response.body = {message:"Deleted task", task:task};
67};
With that out of the way, you need to create your todo CRUD routes. So, head over to allRoutes.ts and import the CRUD functions from the task controllers, then create the routes for our todo, as follows.
routes.allRoutes.ts
1import { Router } from "https://deno.land/x/oak/mod.ts";
2import {signup, signin} from "../controllers/users.ts";
3import {create, getTasks, getById, updateById, deleteTask} from "../controllers/tasks.ts";
4const router = new Router();
5//User routes
6router.post("/api/signup", signup)
7.post("/api/signin", signin);
8//Task routes
9router.post("/api/tasks", create)
10.get("/api/tasks", getTasks)
11.get("/api/tasks/:taskId", getById)
12.patch("/api/tasks/:taskId", updateById)
13.delete("/api/tasks/:taskId", deleteTask);
14export default router;
Protect Todo Routes
You need to protect your todo routes so that an unauthorized person will not be able to access them.
To protect the todo routes, go to your middlewares folder: create a file called isAuthorized.ts, import the verify function from deno JWT URL, import Context from deno, import the secret key you've created, and create the authorized function.
The authorize function checks if a user has a JWT token, grant the user access if he does, and deny him access if otherwise.
middlewares.isAuthorized.ts
1import { verify } from "https://deno.land/x/djwt@v2.4/mod.ts";
2import { key } from "../utils/apiKey.ts";
3import { Context } from "https://deno.land/x/oak/mod.ts";
4export const authourized = async (ctx: Context, next:any) => {
5try{
6const headers: Headers = ctx.request.headers;
7const authorization = headers.get('Authorization');
8if(!authorization) {
9ctx.response.status = 401;
10return;
11}
12const jwt = authorization.split(' ')[1];
13if(!jwt) {
14    ctx.response.status = 401;
15    return;
16}
17const payload = await verify(jwt, key);
18
19if(!payload){
20throw new Error("!payload")
21}
22 await next();
23
24 } catch (error) {
25    ctx.response.status = 401;
26    ctx.response.body ={message: "You are not authorized to access this route"}
27    return;
28}
29
30};
To protect your todo routes, import the authorized middleware function from the isAuthorized.ts middleware file and pass the middleware into the todo routes to protect them from unauthorized people.
routes.allRoutes.ts
1import { Router } from "https://deno.land/x/oak/mod.ts";
2import {signup, signin} from "../controllers/users.ts";
3import {create, getTasks, getById, updateById, deleteTask} from "../controllers/tasks.ts";
4import { authourized } from "../middlewares/isAuthorized.ts";
5const router = new Router();
6//User routes
7router.post("/api/signup", signup)
8.post("/api/signin", signin);
9//Task routes
10router.post("/api/tasks", authourized, create)
11.get("/api/tasks", authourized, getTasks)
12.get("/api/tasks/:taskId", authourized, getById)
13.patch("/api/tasks/:taskId", authourized, updateById)
14.delete("/api/tasks/:taskId", authourized, deleteTask);
15export default router;
Awesome! Your application is ready, but wait! Don't get too excited yet, relax let's test the application :)
Below is what your final project directory looks like:
DenoAPI_JWT_Auth
│
└─src
│ └───controllers
│ │ └───users.ts
│ │ └───tasks.ts
│ │
│ └───database
│ │ └───connectDB.ts
│ │
│ └───middlewares
│ │ └───isAuthorized.ts
│ │
│ └───routes
│ │ └───allRoutes.ts
│ │
│ └───schema
│ │ └───user.ts
│ │ └───task.ts
│ │
│ └───utils
│ │ └───apiKey.ts
│ │
└─app.ts
Test Application
Now that your application is ready, you need to test the various routes to ensure they are working. To test the routes, rerun your server with deno run --allow-net app.ts.

Great! The app is running on port:8080. You can now head to the postman to test your routes.
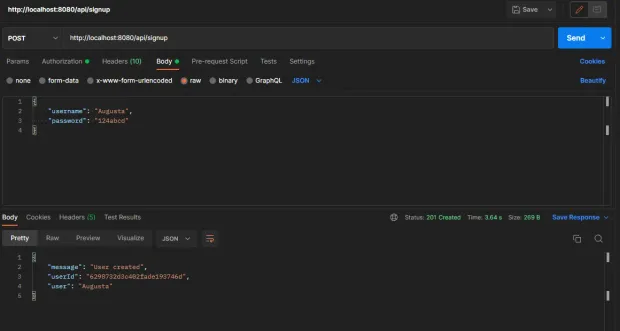
Signup Route

Sign-in Route

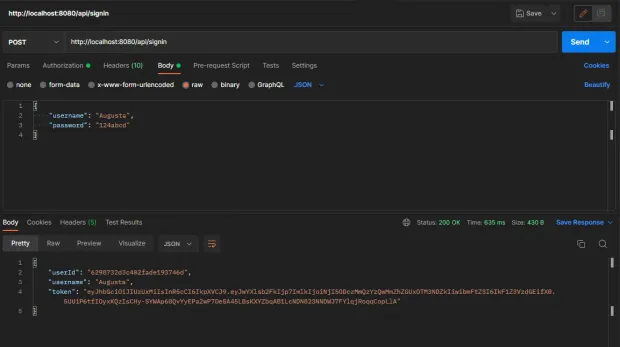
Amazing! Now that you have signed up and authenticated a user, the returned token, which shows that the user has been authenticated, can be used to access your todo CRUD APIs.
Accessing the Todo Routes
First, let's try accessing your todo routes without the token...
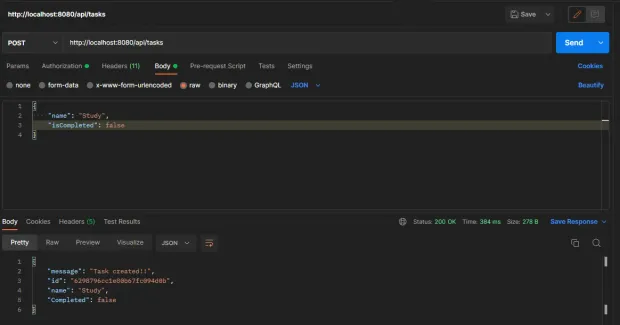
Create Task Route

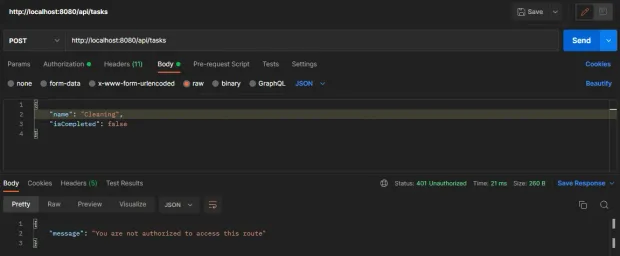
As you can see, when you tried to create a task, you got a message You are not authorized to access this route because a random person did it without a token.
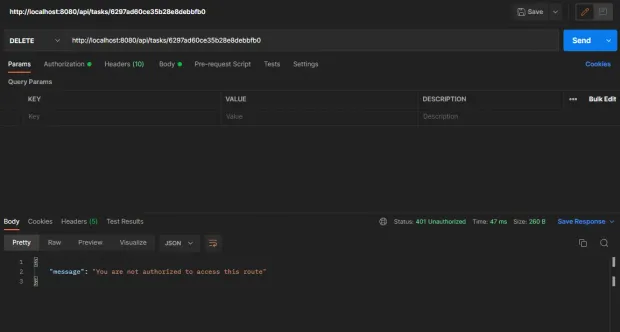
Now, let's also try accessing the delete by Id route without the token...
Delete Task Route

Your todo CRUD APIs have been protected, and the only way a user can access them is by getting authenticated. Now let's log in again and use the returned token to access the todo routes.
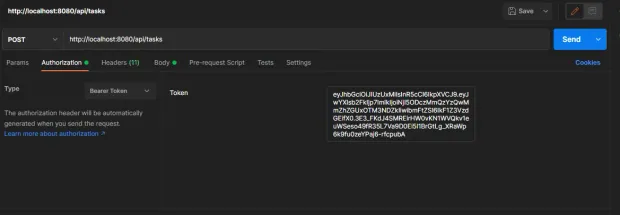
So, you have logged a user in and put the returned Bearer's token in the authorization header. You can access our todo APIs now because, with the bearer's token, you are authorized to access the todo APIs.
Create Task Route

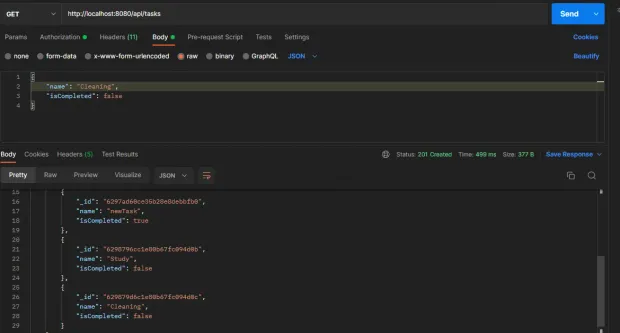
Get All Tasks Route

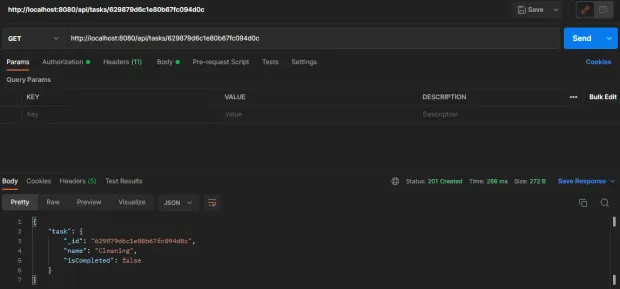
Get Task By Id Route

Feel free to test the other routes to see how things work.
Conclusion
In this tutorial, you've built a todo CRUD API and protected the routes from unauthorized access using JSON Web Token (JWT). You have learned how to create an Oak server in Deno, connect MongoDB, implement JWT authentication, as well as create and authenticate CRUD routes in a Deno application.
The code for this tutorial is available here on Github. Feel free to clone and extend the features of the application.


